


ENGLISH
en
17
– Rotate the saw blade manually. You should be
able to rotate the saw blade into any possible
position without touching other parts.
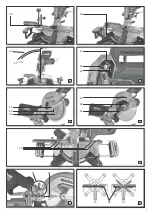
10.2 Table insert change
Danger!
small parts getting stuck between table insert and
saw blade, blocking the saw blade. Replace
damaged table inserts immediately!
1. Remove screws at table insert. If required,
rotate turntable and incline saw head to be
able to reach the screws.
2. Remove table insert.
3. Insert new table insert.
4. Tighten the screws at the table insert.
10.3 Adjust parallel guide/ripping fence
1. Loosen Allen screws
.
2. Adjust the parallel guide/ripping fence
such a way that it is exactly perpendicular to
the saw blade when the turntable engages in
the 0° position.
3. Tighten the Allen screws
10.4 Adjust the cutting laser
Align the laser perpendicularly
– Loosen the middle screw
Align laser laterally
Shift the laser horizontally. Tighten the right
10.5 Cleaning the tool
Remove chips and saw dust with vacuum cleaner
or brush from:
– adjustment installations
– controls;
– motor vent slots;
– space under table insert;
– cutting laser;
– illumination of cutting line
10.6 Storage of device
Danger!
Store the device in such a way that it cannot be
put into operation by unauthorised personnel.
Ensure that the stationary device cannot cause
injury.
Caution!
Do not store the tool outdoors or in damp
conditions without protection.
10.7 Maintenance
Prior to each use
Remove saw chips with vacuum or brush.
Check power cable and power cable plug or
battery pack for damage; if necessary have
damaged parts replaced by a qualified
electrician.
Check all movable parts if they can be moved
freely across the entire range of movement.
Regularly, depending on conditions of use
Check all screwed joints, retighten if necessary.
Check reset function of the saw head (saw head
has to return to the upper starting position by
means of spring force), if required have spring
replaced.
Slightly oil guide elements.
– Use appropriate supports on the left and right of
the saw for long workpieces.
– Hold workpiece on the right of the saw blade for
suitable cuts.
– When cutting small pieces, use additional guide
(a suitable wooden board attached with screws
to the guide of the device, can be used as
additional guide).
– When cutting a curved (contorted) board
place the convex side at the parallel guide/
ripping fence.
– Do not cut workpiece upright, but flat on the
turntable.
Use only genuine Metabo accessories.
Use only accessories which fulfil the requirements
and specifications listed in these operating
instructions.
A
Spray for maintenance and care for the
removal of resin residues and to preserve the
metal surfaces.
0911018691
B
Extraction adapter "Multi" for the connection of
extraction hoses with 44, 58 or 100 mm adapter
0910058010
C
Metabo all-purpose vacuum cleaner (see
catalogue)
D
Stands:
Universal machine stand UMS
6.3131700
Mobile stand KSU 250 Mobile
6.3131800
Stand KSU 400 0910066110
E
Roller stand:
RS 420 0910053353
RS 420 G 0910053345
RS 420 W 0910053361
Saw blades for KGS 216 M / KGSV 216 M /
KGSM 216 Vario Max:
F
Saw blade Power Cut 6.28009
216 × 2.4 / 1.8 × 30 24 WZ 5° neg
for longitudinal and transverse cuts in solid wood
G
Saw blade Precision Cut Classic 6.28060
216 × 2.4 / 1.8 × 30 40 WZ 5° neg
for longitudinal and transverse cuts in solid wood
and chipboard
H
Saw blade Multi Cut Classic 6.28066
216 × 2.4 / 1.8 × 30 60 FZ/TZ 5° neg
for longitudinal and transverse cuts in coated
materials, laminate, plastic and aluminium profiles
Saw blades for KGS 254 M:
I
Saw blade Precision Cut Classic 6.28061
254 × 30 x 2.4 / 1.8,48 WZ 5° neg
for longitudinal and transverse cuts in solid wood
and chipboard
J
Saw blade Multi Cut
6.28223
254 × 30 x 2.4 /1.6, 80 FZ/TZ 5° neg
for longitudinal and transverse cuts in coated
materials, laminate, plastic and aluminium profiles
Saw blades for KGS 305 M:
K
Saw blade Precision Cut Classic 6.28064
305 × 30 x 2.4 /1.8,56 WZ 5° neg
for longitudinal and transverse cuts in solid wood
and chipboard
L
Saw blade Multi Cut
6.28091
305 x 30 x 2.8/2.0 96 FZ/TZ 5° neg,
for longitudinal and transverse cuts in coated
materials, laminate, plastic and aluminium profiles
Saw blades for KGS 18 LTX 216:
M
Saw blade Precision Cut Classic 6.28065
216 × 1.8 / 1.2 × 30 40 WZ 5°
for longitudinal and transverse cuts in solid wood
and chipboard
For a complete range of accessories, see
www.metabo.com or the catalogue.
Danger!
Repair of power tools must be carried out by
qualified electricians only!
If you have Metabo power tools that require
repairs, please contact your Metabo service
centre. For addresses see www.metabo.com.
You can download a list of spare parts from
www.metabo.com.
Observe national regulations on environmentally
compatible disposal and on the recycling of
disused machines, packaging and accessories.
Only for EU countries: Never dispose of
power tools in your household waste! In
accordance with European Directive 2002/
96/EC on waste electrical and electronic
equipment and its implementation in national
legal systems, used power tools must be
collected separately and handed in for
environmentally compatible recycling.
Following you will find a description of problems
and faults that you may remedy yourself. If the
corrective measures described here do not help,
kindly refer to chapter 13. "Repairs".
Danger!
There are particularly many accidents in
connection with problems and faults. Therefore
keep in mind:
Prior to each correction of faults, pull the mains
plug or remove the detachable battery pack
(34)
.
Check that all safety devices are operational
again after each fault service.
No trimming function
Transport lock activated:
pull out transport lock.
Safety lock activated:
loosen safety lock.
Cutting power too low
Saw blade blunt (possibly tempering marks on
blade body);
Saw blade unsuitable for the material (see
chapter 12. "Accessories");
Saw blade contorted:
Replace saw blade (see chapter 10.
"Maintenance").
Saw vibrates a lot
Saw blade contorted:
Replace saw blade (see chapter 10.
"Maintenance").
Saw blade not installed properly:
Install saw blade properly (see chapter 10.
"Maintenance").
Turntable hard to turn
Chips under turntable:
remove chips.
Explanatory notes on the specifications on page 3.
Changes due to technological progress reserved.
U
=mains voltage / voltage of battery pack
I
=rated power
F
=min. fuse protection
P
1
=rated input power
IP
=protection class
n
0
=no-load speed
v
0
=max. cutting speed
D
=saw blade diameter (outer)
d
=saw blade hole (inside)
b
= max. tooth width of the saw blade
A
=dimensions (lxwxh)
m
=weight
Requirements for chip and dust extraction unit:
D
1
=connection diameter of the extraction
nozzle
D
2
=minimum air throughput
D
3
=minimum negative pressure at extraction
nozzle
D
4
=minimum air speed at extraction nozzle
Maximum cross-section of workpiece, see table
on page 4.
~
AC Power
Direct current
Machine in protection class II
The technical specifications quoted are subject to
tolerances (in compliance with the relevant valid
standards).
Emission values
These values make it possible to assess the
emissions from the power tool and to compare
different power tools. Depending on the operating
11. Tips and Tricks
12. Accessories
13. Repairs
14. Environmental Protection
15. Troubleshooting
16. Technical Specifications


