background image


9

®

HAE - NLFRENES - v1.1 - 09102013


ES

0.0 

- 4 -

5

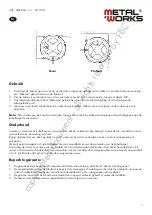
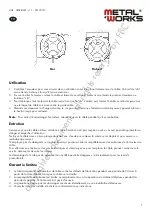
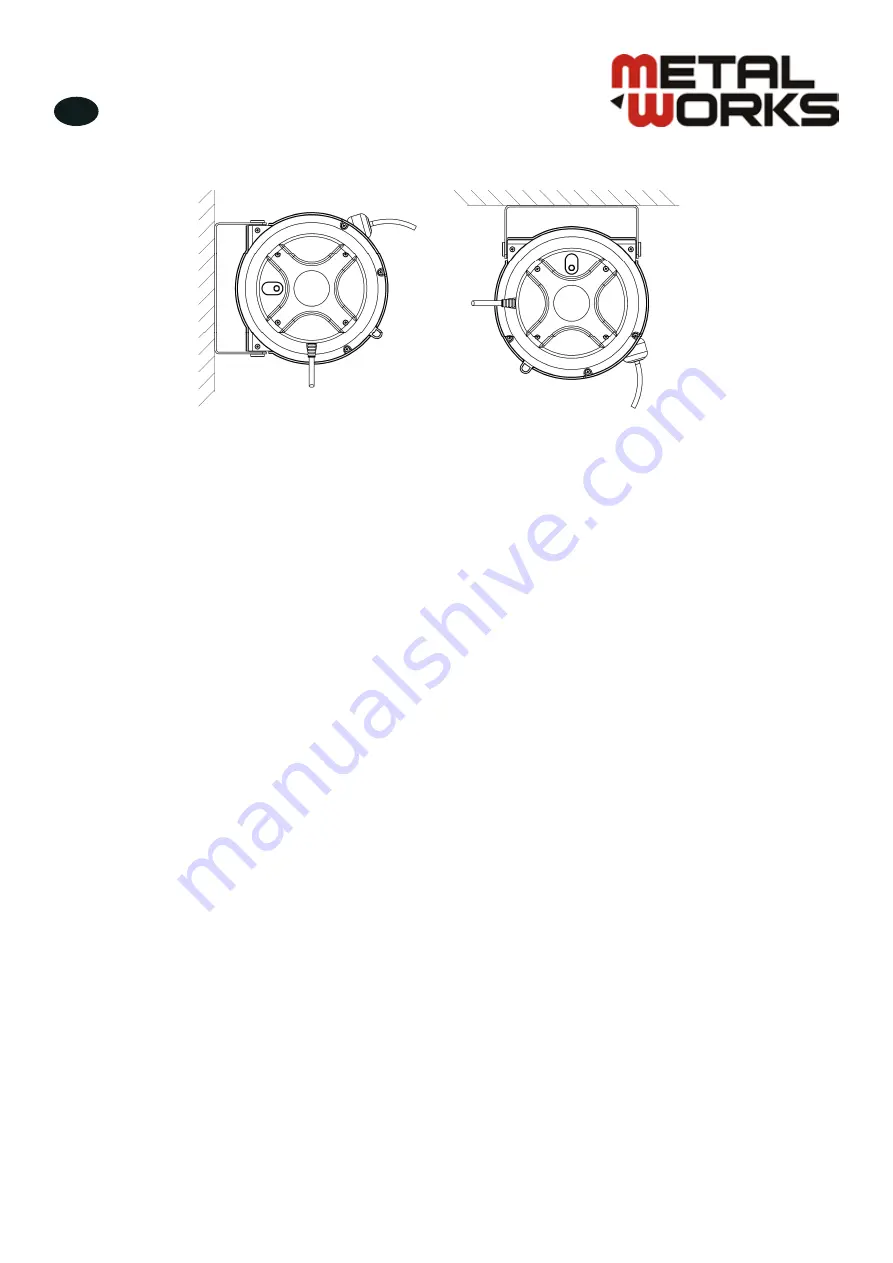
  The reel base has three 8.5mm (21/64”) drilled holes for mounting on a suitable 

flat surface.       

6

 Using the three holes in the base, mount the reel in the desired location. Be 

sure to use appropriate hardware and tighten securely.   

7

  Adjust the cable stopper to the suitable position when required. 


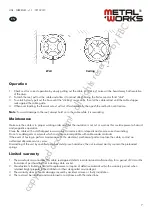
   Wall                          Ceiling 

Operation

1.  Check reel for correct operation by slowly pulling out the hose. A “clicking” noise 

will be heard every half revolution of the drum.   

2.  To latch the reel, pull out the cable and allow it to retract after hearing the first 

second or third “click”. 

3.  To unlatch, slowly pull out the hose until the “clicking” noise stops, then let the 

cable retract until the cable stopper rests against the cable guide.   

4.  When over loading, the thermal cut-out will cut off automatically, then push the 

red button until restore. 

Note: To avoid damage to the reel, always hold on to the cable while it is rewinding. 

Operación

1.  Compruebe el enrollador para la operación correcta tirando lentamente de la manguera. Un “clic” se oye cada 

media revolución del tambor.

2. 

Para enganchar el enrollador, tire del cable y deje que se retraiga después de escuchar el primer, segundo y tercer 

“clic”.

3. 

Para destrabar, tire lentamente de la manguera hasta que el ruido de “clic” pare, a continuación, deje que el cable 

se retraiga hasta que el tope del cable se apoye en la guía.

4. 

En caso de sobrecarga, la protección térmica se cortará automáticamente después de pulsar el botón rojo hasta su 

restauración.

Nota

: Para evitar daños en el enrollador, sostenga siempre el cable mientras se enrolla. 

Mantenimiento

Asegúrese de que el cable está en buen estado de funcionamiento y que el aislamiento no es cortado o desgastado, ya 

que podría representar un peligro y poner en peligro la operación.

Limpie el cable con un paño humedecido en agua tibia para eliminar la suciedad o los restos y garantizar el correcto 

rebobinado.

No utilice detergentes o disolventes que podrían ser incompatibles con los materiales de cable enrollador.

Si el caso de tener que realizar el mantenimiento de las partes eléctricas, mecánicas o reemplazar el cable, póngase en 

contacto con un centro de servicio post-venta autorizado.

La manipulación de la unidad por personal no cualificado podría resultar peligrosa, el riesgo que implica refiere 

principalmente a los muelles precargados.

Garantía limitada

1.  El fabricante garantiza la garantía por defectos de materiales y mano de obra, por un período de 24 meses a partir 

de la fecha de compra, pero no incluye el cable, enchufe.

2.  La responsabilidad del fabricante se limita a la sustitución o reparación del material defectuoso dentro del período 

de garantía, en el distribuidor o el taller.  

3.  La garantía no cubre daños causados por accidentes, mal uso o instalación incorrecta.

4.  El enrollador debe ser instalado y mantenido de acuerdo con las instrucciones.

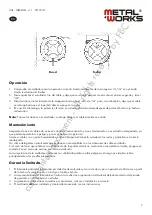
Pared

Techo

copyrighted 

document 

- all 

rights 

reserved 

by 

FBC

Summary of Contents for 756200605

Page 1: ...Enrouleur de c ble lectrique Electric cable reel Enrollador el ctrico P 02 Gelieve te lezen en voor later gebruik bewaren P 04 Veuillez lire et conserver pour usage ult rieur P 06 Please read and kee...

Page 2: ...nderhoudswerken te doen 5 Controleer voor elk gebruik op gebrekige en gebroken draden 6 Wanneer u de kabel van de haspel trekt trek dan altijd de kabel zelf niet het werkstuk 7 Verwijder de spanningst...

Page 3: ...verlaadt zal de thermische zekering automatisch afslaan druk vervolgens op de rode knop om te herstarten Nota Om schade aan de haspel te vermijden laat de kabel nooit los tijdens de terugloop om besch...

Page 4: ...courant lectrique de l enrouleur de c ble est coup avant son entretien 5 V rifiez les fils ab m s ou cass s avant chaque utilisation 6 Lorsque vous tirez le c ble prenez le c ble lectrique lui m me pa...

Page 5: ...soir pos contre le guide c ble 4 Quand vous d passez la charge autoris e le coupe circuit thermique l arr tera automatiquement poussez alors sur le bouton rouge pour restaurer Note Pour viter d endomm...

Page 6: ...ll electrical power is removed from reel before servicing 5 Check for frayed and broken wires before each use 6 When pull electrical cable from the reel always grasp the electrical cable itself not th...

Page 7: ...e stopper rests against the cable guide 4 When over loading the thermal cut out will cut off automatically then push the red button until restore Note To avoid damage to the reel always hold on to the...

Page 8: ...ador antes de darle servicio 5 Revise si hay cables pelados y rotos antes de cada uso 6 Cuando tire del cable el ctrico de la bobina agarre el cable el ctrico en s no el dispositivo de trabajo 7 Desco...

Page 9: ...caso de sobrecarga la protecci n t rmica se cortar autom ticamente despu s de pulsar el bot n rojo hasta su restauraci n Nota Para evitar da os en el enrollador sostenga siempre el cable mientras se e...

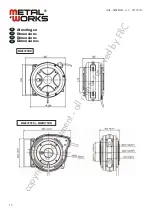
Page 10: ...10 HAE NLFRENES v1 1 09102013 NL FR EN Afmetingen Dimensions Dimensions Dimensiones HAE31515 HAE31520 HAE31508 ES c o p y r i g h t e d d o c u m e n t a l l r i g h t s r e s e r v e d b y F B C...

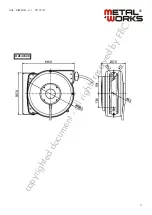
Page 11: ...11 HAE NLFRENES v1 1 09102013 HAE32520 c o p y r i g h t e d d o c u m e n t a l l r i g h t s r e s e r v e d b y F B C...

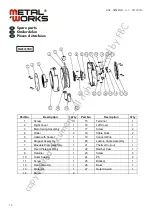
Page 12: ...Thermal Cut out 1 8 Fixed Plate Assembly 1 22 Ratchet Paw 1 9 Retainer 1 23 Screw 3 10 Outer Casing 1 24 Pin 2 11 Screw 1 25 Bracket 1 12 Ratchet Spring 1 26 Drum 1 13 Protector 1 27 Outer Casing 1 1...

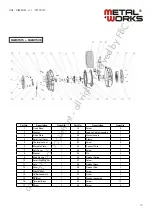
Page 13: ...Cover 1 21 Clamp 2 5 Thermal cut out 1 22 Screw 4 6 Movable Plate 1 23 Connect Wire 1 7 Left Cover 1 24 Screw 2 8 Bracket 1 25 Pin 2 9 Main Spring 1 26 Ratchet Spring 1 10 Small Right Cover 1 27 Scre...

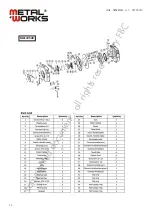
Page 14: ...FRENES v1 1 09102013 756200620 756200605 756202520GBNLF V1 09122010 Parts list Onderdelen Tekening Vue clat e HAE32520 HAE32520 c o p y r i g h t e d d o c u m e n t a l l r i g h t s r e s e r v e d...

Page 15: ...eze betreffende het tijdstip van de verklaring der geldende veranderingen R pond aux normes g n rales caract ris es plus haut y compris celles dont la date correspond aux modifications en vigueur Meet...

Reviews: