background image

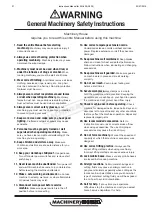
General Machinery Safety Instructions

1.  Read the entire Manual before starting 

machinery. 

Machinery may cause serious injury if 

not correctly used.

2.  Always use correct hearing protection when 

operating machinery. 

Machinery noise may cause 

permanent hearing damage.

3.  Machinery must never be used when tired, or 

under the influence of drugs or alcohol. 

When 

running machinery you must be alert at all times.

4.  Wear correct Clothing. 

At all times remove all loose 

clothing, necklaces, rings, jewelry, etc. Long hair 
must be contained in a hair net. Non-slip protective 
footwear must be worn.

5.  Always wear correct respirators around fumes 

or dust when operating machinery. 

Machinery 

fumes & dust can  cause serious respiratory illness. 
Dust extractors must be used where applicable.

6.  Always wear correct safety glasses. 

When 

machining you must use the correct eye protection 
to prevent injuring your eyes.

7.  Keep work clean and make sure you have good 

lighting. 

Cluttered and dark shadows may cause 

accidents.

8.  Personnel must be properly trained or well 

supervised when operating machinery. 

Make 

sure you have clear and safe understanding of the 
machine you are operating.

9.  Keep children and visitors away. 

Make sure 

children and visitors are at a safe distance for you 
work area.

10.  Keep your workshop childproof. 

Use padlocks, 

Turn off master power switches and remove start 
switch keys.

11.  Never leave machine unattended. 

Turn power off 

and wait till machine has come to a complete stop 
before leaving the machine unattended.

12.  Make a safe working environment. 

Do not use 

machine in a damp, wet area, or where flammable 
or noxious fumes may exist.

13.  Disconnect main power before service 

machine. 

Make sure power switch is in the off 

position before re-connecting.

14.  Use correct amperage extension cords. 

Undersized extension cords overheat and lose 
power. Replace extension cords if they become 
damaged.

15.  Keep machine well maintained. 

Keep blades 

sharp and clean for best and safest performance. 
Follow instructions when  lubricating and changing 
accessories.

16.  Keep machine well guarded. 

Make sure guards 

on machine are in place and are all working 
correctly.

17.  Do not overreach. 

Keep proper footing and 

balance at all times.

18.  Secure workpiece. 

Use clamps or a vice to 

hold the workpiece where practical. Keeping the 
workpiece secure will free up your hand to operate 
the machine and will protect hand from injury.

19.  Check machine over before operating. 

Check 

machine for damaged parts, loose bolts, Keys and 
wrenches left on machine and any other conditions 
that may effect the machines operation. Repair and 
replace damaged parts.

20.  Use recommended accessories. 

Refer to 

instruction manual or ask correct service officer 
when using accessories. The use of improper 
accessories may cause the risk of injury.

21.  Do not force machinery. 

Work at the speed and 

capacity at which the machine or accessory was 
designed.

22.  Use correct lifting practice. 

Always use the 

correct lifting methods when using machinery. 
Incorrect lifting methods can cause serious injury.

23.  Lock mobile bases. 

Make sure any mobile bases 

are locked before using machine.

24.  Allergic reactions. 

Certain metal shavings and 

cutting fluids may cause an ellergic reaction in 
people and animals, especially when cutting as the 
fumes can be inhaled. Make sure you know what 
type of metal and cutting fluid you will be exposed 
to and how to avoid contamination.

25.  Call for help. 

If at any time you experience 

difficulties, stop the machine and call you nearest 
branch service department for help.

Machinery House  

requires you to read this entire Manual before using this machine.

22/07/2019

Instructions Manual for SG-420 (S535)

31

Summary of Contents for SG-420

Page 1: ...HYDRAULIC GUILLOTINE OPERATION MANUAL Edition No SG 4281 1 Date of Issue 06 2019 Models SG 420 SG 815H Order Code S535 Order Code S537 22 07 2019 Instructions Manual for SG 420 S535 1...

Page 2: ...RIAL NO DATE OF MANF Note This manual is only for your reference Owing to the continuous improvement of the Metalmaster machines changes may be made at any time without obligation or notice Please ens...

Page 3: ...es 11 3 4 Electrical Installation 14 3 5 Full Load Current 14 3 6 Filling The Oil Tank 15 4 COMMISSIONING 4 1 Preparation of the Machine 16 4 2 Safety Sensor Alignment 16 4 3 Controls 19 4 4 Commissio...

Page 4: ...lade Angle Deg 2 2 Motor Power kW hp 2 2 3 2 2 3 Voltage Volts 240 240 Amperage amps 15 15 Shipping Dimensions L x W x H cm 185 x 122 x 116 298 x 120 x 150 Dimensions L x W x H cm 166 x 120 x 110 279...

Page 5: ...ICATION A A Main Frame F Mobile Foot Control B Rear Guard G Squaring Arm C Lifting Hook H Sheet Supports D Control Electrical Box I Finger Guard E Emergency Stops B C D E F G H I E 22 07 2019 Instruct...

Page 6: ...turer will not be held liable for injury or property damage from negligence improper training machine modifications or misuse WARNING 2 1 GENERAL METALWORKING MACHINE SAFE PRACTICES Always wear safety...

Page 7: ...safely Obtain first aid immediately for all injuries Understand that the health and fire hazards can vary from material to material Make sure all appropriate precautions are taken Clean machines and...

Page 8: ...the area Ensure the area is clear before using equipment Ensure cutting table is clear of scrap and tools OPERATIONAL SAFETY CHECKS Only one person may operate this machine at any one time Use correc...

Page 9: ...f the load on each sling Fig 2 2 Note The manufacturer recommends not to exceed 90 angle Fig 2 2 Fig 2 1 The machine is supplied with lifting points that are designed to lift the machine safely Fig 2...

Page 10: ...PARATION AND INSTALLATION In some case a suitable foundation may not be available and a new one may need to be prepared The foundation should be concrete approximately 200mm thick with pockets left cl...

Page 11: ...nd place a level on the surface of the working table Tolerances 1000 0 30mm for both longitudi nal and transverse Metal plates need to be placed under each jacking screw to distribute the load Once le...

Page 12: ...ing the stop by the amount allowed by the clearance of the holes q Re tighten the screws Fig 3 3 3 3 ATTACHING THE ACCESSORIES Cont Fig 3 4 Fig 3 5 ATTACHING THE REAR SAFETY FENCE q Unpack and attach...

Page 13: ...sure that the brass slug is under the bolt clamp to avoid damage to the arm q To adjust the back gauge undo the clamp and slide the back gauge to the required setting and re tighten the clamp Fig 3 6...

Page 14: ...hazards avoid overloading the machine during operation and make sure it is connected to a power supply circuit that meets the requirements 3 5 FULL LOAD CURRENT RATING Place the machine near an existi...

Page 15: ...tank Fig 3 9 q Remove the screws from the oil tank cover and remove the cover q Using a clean cloth wipe out the bottom of the tank making sure there is no dirt or dust remaining in the tank q Replace...

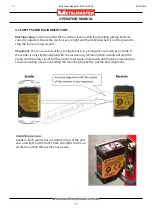
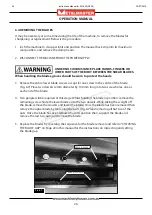
Page 16: ...e Warning Follow all setup instructions before starting the hydraulic pump The safety circuit consists of a reset button and two rear side guards each having 3 sensors The machine has a RED warning li...

Page 17: ...If the sender is only slightly aligned with the receiver any vibration when cutting will stop the pump and the safety circuit will have to be reset again Alignment could involve loosening the sensor...

Page 18: ...indicates it has power When it is correctly aligned with the sender an orange green light will be on and it will send power to No 2 receiver No 2 receiver top A green light on indicates it has power...

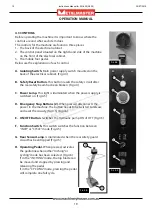
Page 19: ...luminated when the power supply is switched on Fig 4 5 D Emergency Stop Buttons 2 When pressed disconnects the power to the machine The button needs to be twisted to release and reset the circuity Fig...

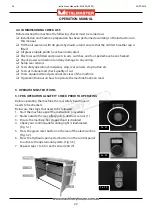
Page 20: ...ty of cut q Tools equipment and personnel are clear of the machine q Operation Manual on how to operate the machine has been read 5 OPERATION INSTRUCTIONS 5 1 PRE OPERATIONAL SAFETY CHECK PRIOR TO OPE...

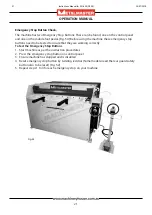
Page 21: ...e that they are working correctly To test the Emergency Stop Buttons 1 Start machine as per the instruction procedures 2 Press the emergency stop button on control panel 3 Ensure machine has stopped a...

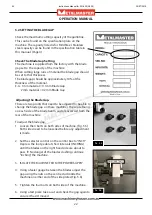
Page 22: ...hange the blade gap on these machines These are found on each side of the blade beam and are accessed from the rear of the machine To adjust the blade gap 1 Loosen the 4 bolts on both sides of machine...

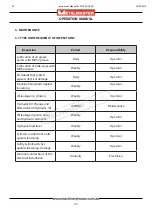
Page 23: ...loosening Weekly Operator Oil leakage in cylinders Weekly Operator Hydraulic Oil Change and filter with 46 Hydraulic Oil 1000hrs Maintenance Oil leakage in pipes hoses and hydraulic elements Weekly O...

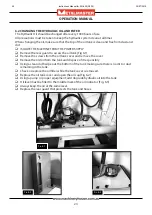
Page 24: ...and remove the cover q Remove the old oil from the tank and dispose of it responsibly q Using a clean cloth wipe out the bottom of the tank making sure there is no dirt or dust remaining in the tank...

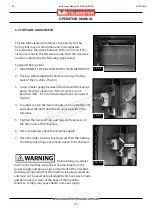
Page 25: ...quired Fig 6 5 4 To adjust loosen the two lock nuts on one side Fig 6 6 and adjust the bolts until the clearance is within the tolerance 5 Tighten the two lock nuts and repeat the process on the other...

Page 26: ...diameter by 100 mm long into two screw holes one at each end of the blade 4 Two people will be required at this stage Whilst holding the blade in position remove the remaining screw Slide the lower b...

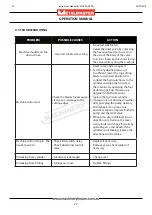
Page 27: ...the machine by operating the foot pedal and inch up If pressure is obtained in both directions replace the hydraulic cylinder 2 If pressure is not obtained in either direction plug the pump delivery...

Page 28: ...time without notification HOW TO ORDER SPARE PARTS 1 Have your machines model number serial number date of manufacture on hand these can be found on the specification plate mounted on the machine 2 A...

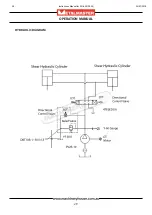
Page 29: ...29 OPERATION MANUAL HYDRAULIC DIAGRAM 22 07 2019 Instructions Manual for SG 420 S535 29...

Page 30: ...30 OPERATION MANUAL ELECTRICAL DIAGRAM 22 07 2019 Instructions Manual for SG 420 S535 30...

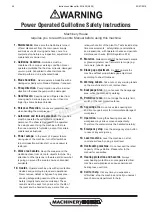
Page 31: ...re connecting 14 Use correct amperage extension cords Undersized extension cords overheat and lose power Replace extension cords if they become damaged 15 Keep machine well maintained Keep blades shar...

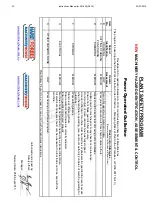
Page 32: ...ass Any presence sensing safeguarding used must have regular Safety integrity tests and records kept These records must be kept for 5 years or for the life of the plant and be handed to any person tha...

Page 33: ...s from sharp material offcuts Secure support work material on table Isolate power to machine prior to any checks or maintenance Hands should be kept clear of moving parts and blades Assessment Ensure...

Reviews: