

◈
Product Specifications
Item
Description
Printer
Printer type
Thermal transfer (thermal) printing
Dot pitch
203 dpi (8dots/mm)
Printing width
48 mm
Number of characters
per line (default value)
32 (Font A) (12x24)
42 (Font C) (9x24)
Printing speed *1)
19 lines/sec, 65 mm/sec
Receive buffer size
4Kbyte
SMPS input voltage
100 ~ 240 VAC
Frequency 50/60
Hz
SMPS output voltage
12 VDC
Temperature
0 ~ 45
℃
(Operating)
-20 ~ 60
℃
(Storage)
Humidity
10 ~ 80 % RH (Operating)
10 ~ 90 % RH (Storage)
; paper is not included
Auto cutter
1,000,000 cuts
Mechanism MCBF *2)
20,000,000 lines
Paper
Paper type
Roll paper
Roll paper width
58 ± 0.5mm
Diameter of roll paper
Maximum 80mm
Paper thickness
0.062~0.075 mm
※
Note
*1) Printing speed may be slower depending on the combination of data transfer speed and
commands.
*2) This value is based on the measurement at standard temperature, specified paper, and
printing level 2, and it can be changed depending on the temperature or printing level.
◈
Serial (RS-232C) Interface Model
Windows Driver Installation
1. After installing the product installation CD, execute
Metapace T-4 > Drivers > Windows
Driver > Drivers folder > Metapace T-4_WIN_Vx.x.x.exe
.
2. Select the
Next
button in the initial installation window.
3. Select the
Install
button in the
Ready to Install the Program
window.
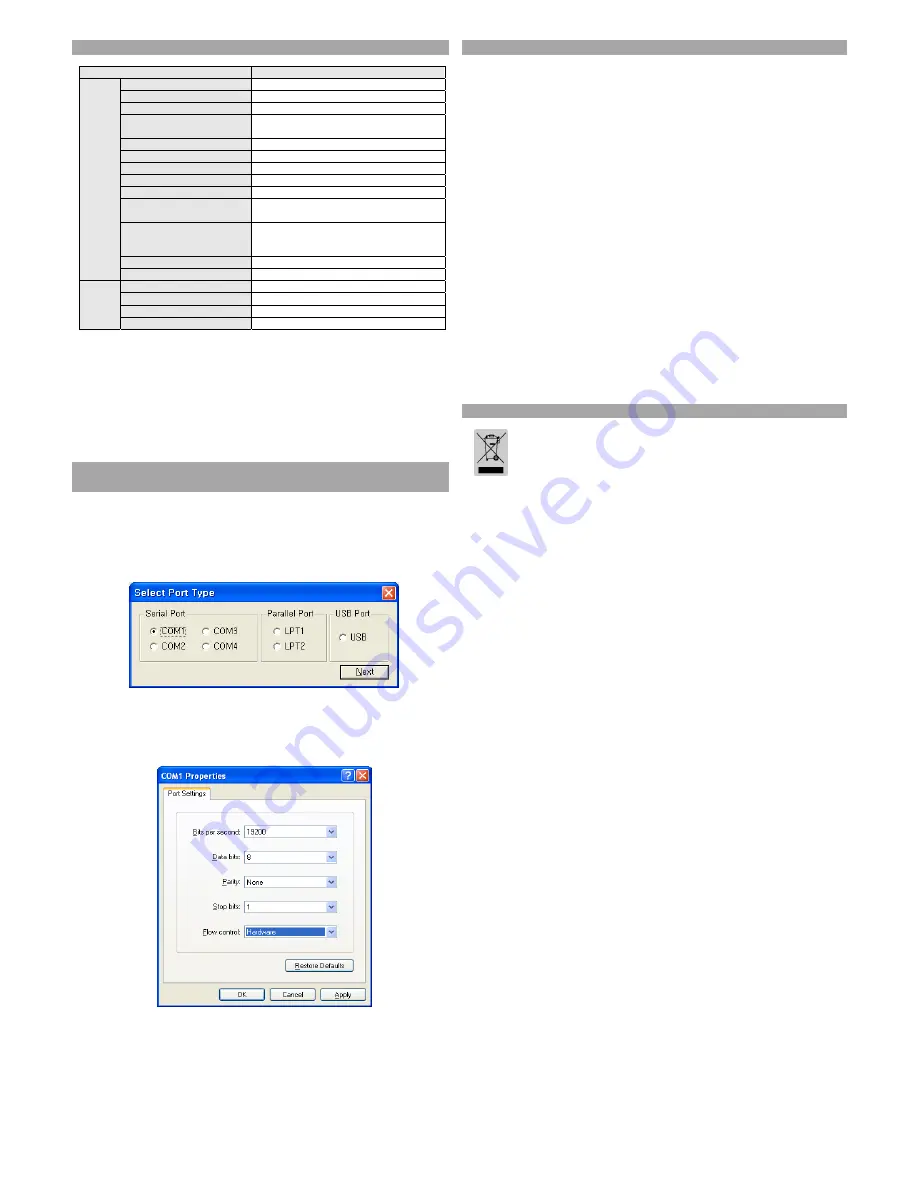
4. Select the Serial Port 1 (
COM1
) in
Serial Port
setting in
Select Port Type
window and
select the
Next
button.
5. Reboot the computer by selecting the
Yes
button from the
Question
window.
6. After rebooting, select
Start> Setting > Printers and Faxes > Metapace T-4 Icon >
Right mouse click > Properties
.
7. Select
Port
tab and then
Port Configuration
from the
Properties
window and set the
settings same as the result shown in the self test, and select the
OK
button.
(Fig 1)
8. Select the
General
tab and then
Print Test Page
from the
Properties
window, and check
whether the printer is working correctly.
◈
USB Interface Model Windows Driver Installation
1. After installing the product installation CD, execute
Metapace T-4 > Drivers > Windows
Driver > Drivers folder > Metapace T-4_WIN_Vx.x.x.exe
.
2. Select the
Next
button in the initial installation window.
3. Select
Install
in the
Ready to Install the Program
window.
4. Select
USB
from the
Select Port Type
window and select the
Next
button (refer to Fig. 1)
5-1. If using
Windows 2000/VISTA/2008 Server/7
①
When the
Information
window pops up, turn the printer off and on and select the
OK
button.
②
Reboot the computer after completing the installation.
5-2. If using
XP/2003 Server
①
When the
Information
window pops up, turn the printer off and on and select the
OK
button.
②
When the
New Hardware Search
window pops up, keep selecting the
Next
button to
install the USB driver, and reboot the computer one more time after installing the USB
driver.
※
Note
Click
OK
or
Continue Anyway
when digital certificate messages pop up during the
installation.
6. After rebooting, select
Start > Setting > Printers and Faxes > Metapace T-4 Icon >
Right mouse click > Properties
.
7. Select the
General
tab and then
Print Test Page
from the
Properties
window, and check
that the printer is working correctly.
◈
WEEE (Waste Electrical and Electric Equipment)
This marking shown on the product or its literature, indicates that is should not be
disposed of with other household wastes at the end of its working life, To prevent
possible harm to the environment or human health from uncontrolled waste disposal,
please separate this from other types of wastes and recycle it responsibly to promote
the sustainable reuse of material resources. Household users should contact either
the retailer where they purchased this product, or their local government office, for
details of where and how they can take this item for environmentally safe recycling.
Business users should contact their supplier and check the terms and conditions of
the purchase contract. This product should not be mixed with other commercial
wastes for disposal.


