background image


Windows Driver Manual 

Metapace T-4 

Thermal Printer 
Rev. 1.00


http://www.metapace.com


Summary of Contents for T-4

Page 1: ...Windows Driver Manual Metapace T 4 Thermal Printer Rev 1 00 http www metapace com ...

Page 2: ... 31 5 1 Paper Supply Method 31 5 2 Paper Size 34 5 3 NV Image Additional Commands 35 5 4 NV Image Download 37 5 5 Open Drawer 42 5 6 VMSM 44 5 6 1 Printer Communication Setting 44 5 6 2 Getting the Memory Switch Status of the Printer 47 5 6 3 Setting the memory switch status of the Printer 49 5 6 4 Using the Command Test Editor 52 6 Windows Driver Specifications 53 6 1 Fonts 53 6 2 Special Functio...

Page 3: ...ting systems are supported for usage Microsoft Windows 2000 Microsoft Windows XP 32bit 64bit Microsoft Windows 2003 Server 32bit 64bit Microsoft Windows Embedded For Point Of Service Microsoft Windows Embedded POS Ready 2009 Microsoft Windows Embedded POS Ready 7 Microsoft Windows VISTA 32bit 64bit Microsoft Windows 2008 Server 32bit 64bit Microsoft Windows 7 32bit 64bit 3 Windows Driver Preparati...

Page 4: ...Windows Driver Rev 1 00 4 4 Windows Driver Installation 4 1 Installing on Windows 2000 4 1 1 Via Serial Port 1 Double click the Windows Driver installation file 2 Click the Next button ...

Page 5: ... to be used and click the Next button 4 When the following message box appears click the Yes button 5 Clicking the Yes button will reboot the PC 6 Open the printer properties window in the Windows OS 7 Click the Port Settings button in the Ports tab ...

Page 6: ...Windows Driver Rev 1 00 6 8 Match the communication settings to those of the printer The communication settings of the printer can be performed by conducting a self test ...

Page 7: ...Windows Driver Rev 1 00 7 9 Click the Print Test Page button and check printing status 10 Proper installation of the driver is indicated if the test page is printed normally ...

Page 8: ...Windows Driver Rev 1 00 8 4 1 2 Via USB Port 1 Double click the Windows Driver installation file 2 Click the Next button ...

Page 9: ...Windows Driver Rev 1 00 9 3 Select USB and click the Next button 4 When the following message box appears click the Yes button 5 Click the OK button 6 Turn on the printer ...

Page 10: ...Windows Driver Rev 1 00 10 7 The Windows Driver is automatically installed 8 The USB Port setting can be confirmed in the Windows Driver properties ...

Page 11: ...Windows Driver Rev 1 00 11 9 Click the Print Test Page button and check printing status 10 Proper installation of the driver is indicated if the test page is printed normally ...

Page 12: ...Windows Driver Rev 1 00 12 4 2 Installing on Windows XP 2003 Server 4 2 1 Via Serial Port 1 Double click the Windows Driver installation file 2 Click the Next button ...

Page 13: ... used and click the Next button 4 When the following message box appears click the Continue Anyway button 5 Clicking the Yes button will reboot the PC 6 Open the printer properties window in the Windows OS 7 Click the Port Settings button in the Ports tab ...

Page 14: ...Windows Driver Rev 1 00 14 8 Match the communication settings to those of the printer The communication settings of the printer can be performed by conducting a self test ...

Page 15: ...Windows Driver Rev 1 00 15 9 Click the Print Test Page button and check printing status 10 Proper installation of the driver is indicated if the test page is printed normally ...

Page 16: ...Windows Driver Rev 1 00 16 4 2 2 Via USB Port 1 Double click the Windows Driver installation file 2 Click the Next button ...

Page 17: ...Windows Driver Rev 1 00 17 3 Select USB and click the Next button 4 When the following message box appears click the Continue Anyway button 5 Click the OK button 6 Turn on the printer ...

Page 18: ...Windows Driver Rev 1 00 18 7 When the New Hardware Wizard appears for the installation of the Windows Driver select the option as shown below and click the Next button 8 Click the Next button ...

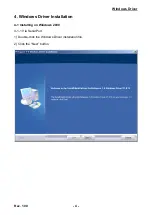
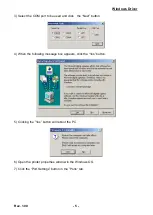
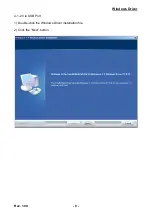
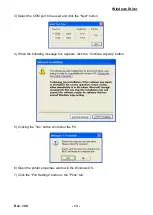
Page 19: ...Windows Driver Rev 1 00 19 9 Click the Next button 10 Click the Continue Anyway button ...

Page 20: ...Windows Driver Rev 1 00 20 11 Click the Finish button ...

Page 21: ...Windows Driver Rev 1 00 21 12 The USB Port setting can be confirmed in the Windows Driver properties ...

Page 22: ...Windows Driver Rev 1 00 22 13 Click the Print Test Page button and check printing status 14 Proper installation of the driver is indicated if the test page is printed normally ...

Page 23: ... 7 Note Please turn off UAC User Account Control prior to setting up configurations or properties in Windows driver 4 3 1 Via Serial Port 1 Double click the Windows Driver installation file 2 Click the Next button 3 Select the COM port to be used and click the Next button ...

Page 24: ...the following message box appears click the Install this driver software anyway button 5 Clicking the Yes button will reboot the PC 6 Open the printer properties window in the Windows OS 7 Click the Port Settings button in the Ports tab ...

Page 25: ...Windows Driver Rev 1 00 25 8 Match the communication settings to those of the printer The communication settings of the printer can be performed by conducting a self test ...

Page 26: ...Windows Driver Rev 1 00 26 9 Click the Print Test Page button and check printing status 10 Proper installation of the driver is indicated if the test page is printed normally ...

Page 27: ...Windows Driver Rev 1 00 27 4 3 2 Via USB Port 1 Double click the Windows Driver installation file 2 Click the Next button 3 Select USB and click the Next button ...

Page 28: ...Windows Driver Rev 1 00 28 4 When the following message box appears click the Install this driver software anyway button 5 Click the OK button 6 Turn on the printer ...

Page 29: ...Windows Driver Rev 1 00 29 7 The USB Port setting can be confirmed in the Windows Driver properties ...

Page 30: ...Windows Driver Rev 1 00 30 8 Click the Print Test Page button and check printing status 9 Proper installation of the driver is indicated if the test page is printed normally ...

Page 31: ...usted as follows Automatically Select Select the Receipt Partial cut automatically Receipt Partial cut After printed text is transferred up to the cutter auto cutter a paper is cut by auto cutter Receipt No cut Printed text is transferred up to the cutter manual cutter Receipt Partial cut without paper feeding A paper is cut by auto cutter without paper feeding Receipt No feed Printed text is tran...

Page 32: ...Windows Driver Rev 1 00 32 1 Open the printer properties window in the Windows OS 2 Click the Printing Preferences button in the General tab ...

Page 33: ...Windows Driver Rev 1 00 33 3 Select the desired setting in the Paper Quality tab Resolution is fixed at 203 203 ...

Page 34: ... 58 3276 mm T4 58 40 mm T4 58 80 mm T4 58 120 mm T4 58 160 mm T4 58 200 mm T4 Detailed setting can be done as follows 1 Open the printer properties window in the Windows OS 2 Click the Printing Preferences button in the General tab 3 Select the Paper Quality tab and click the Advanced button Select the desired setting ...

Page 35: ...as follows StartDoc NV Image Printing addition of NV Image at the beginning of the print job Text Command addition of command at the beginning of the print job StartPage NV Image Printing addition of NV Image at the beginning of the print page Text Command addition of command at the beginning of the print page EndPage NV Image Printing addition of NV Image at the beginning of the end page Text Com...

Page 36: ...B700019FF in the StartDoc space and click the Apply button 5 If the user wishes to open Cash Drawer 1 at the end of printing enter x1B x70 x00 x19 xff in the EndDoc space and click the Apply button 6 If the user wishes to download NV image to printer click NV Tool button and download the image using NV tool Detailed information is informed in NV Tool manual For more information on the hexadecimals...

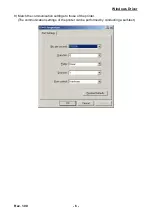
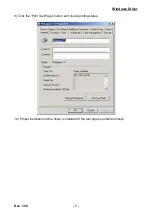
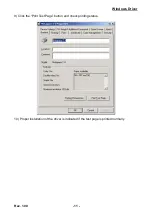
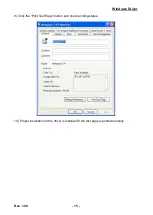
Page 37: ...Windows Driver Rev 1 00 37 5 4 NV Image Download 1 Click NV Tool Button in NV Image Tab ...

Page 38: ...Windows Driver Rev 1 00 38 2 Upon initiation of the program the following main window will be appeared 3 Click Port Setting button to set communication configuration ...

Page 39: ...After selecting the configuration press OK button to complete the communication configuration setting and press Cancel button to cancel the configuration selected 6 The images can be opened added deleted in the Image list box using three buttons in Bitmap selection Only bmp type of image is available to download ...

Page 40: ...window and the steps are different based on printer model 8 Download the mono image in thermal printer After all images stored on the corresponding printer are deleted the image is downloaded The image is assigned a number according to the image list displayed on the screen ...

Page 41: ...in the main screen can be used on each printer model to print and test a stored image 10 Print the mono image in thermal printer Configuration of expansion options and the selection of the number of the image to be printed can be done when printing ...

Page 42: ...ol UAC to help protect your computer checkbox under Turn User Account Control On or Off The command functions available are as follows BeginJob Open Cash Drawer1 External Beep 1 Addition of Open Drawer1 or External Buzzer1 at the beginning of the print job Open Cash Drawer2 External Beep 2 Addition of Open Drawer2 or External Buzzer2 at the beginning of the print job EndJob Open Cash Drawer1 Exter...

Page 43: ... Open Cash Drawer1 in the BeginJob and click the Apply button 4 If the user wishes to open Cash Drawer 2 at the end of printing check box of Open Cash Drawer2 in the EndJob and click the Apply button 5 If the user wishes to use Internal Beep at the end of printing check box of Internal Beep in the EndJob and click the Apply button ...

Page 44: ... Rev 1 00 44 5 6 VMSM 5 6 1 Printer Communication Setting To use the VMSM Virtual Memory Switch Manager It is necessary to set the status of communication between Printer and PC 1 Click VMSM Button in Open Drawer Tab ...

Page 45: ... 45 2 Upon initiation of the program the following pop up window will appear 3 Select the Interface Type SERIAL USB In the Serial Interface match the communication setting COM Port Number and Baud Rate to those of the Printer ...

Page 46: ...n t appear restart the program 5 If communication is okay the Self Test button Run Manager button and Command Test Editor button become available for selection Self Test Pressing this button prints the self test page of the printer Run Manager Pressing this button opens a window for memory switch settings of the printer Command Test Editor Pressing this button opens a window for command test of th...

Page 47: ...Driver Rev 1 00 47 5 6 2 Getting the Memory Switch Status of the Printer 1 If the Communication Setting is OK click the Run Manager button 2 Click the Get Status button It gets the status of the Printer Setting ...

Page 48: ...rinter Status window displays the current virtual memory switch settings of the printer and allows new settings to be defined 4 The Printer Setting Tab displays Language setting printer information and code page information and allows new settings to be defined ...

Page 49: ...er can be modified 1 Get Status Pressing this button displays the current memory switch settings read from the printer The following message appears if the switch settings are acquired normally 2 Set Status Pressing this button allows the user to designate switch settings of the printer The following message appears if the settings are appropriately defined ...

Page 50: ... button loads and displays the previously saved memory switch settings file 5 Initialize Status Pressing this button resets the memory switch settings 6 Default Code Page Combo Box The user may select and set the default code page However for T 4 printers this function is available only if the Nation Set Management Combo Box is set to STD ...

Page 51: ...tings can be designated according to country and distributor 1 If the Set Status button is pressed the following message will appear The default code page can be set by selecting the STD option in the combo box The default code page cannot be set if the Korean Chinese GB2312 option is selected ...

Page 52: ...r button is pressed the following dialog box will appear Using this Dialog the user can write and edit the command and send to the printer Each button of Printing Option and Etc group can insert commands to edit box Also Write Command button can transfer these commands to the printer To verify the result of sending the command can use the Print Test String button ...

Page 53: ...8x8 FontA8x8 Ext FontA8x8 255 FontA8x8 96x192 68 FontC1x1 FontC1x1 Ext FontC1x1 255 FontC1x1 9x24 8 5 FontC1x2 FontC1x2 Ext FontC1x2 255 FontC1x2 9x48 17 FontC2x1 FontC2x1 Ext FontC2x1 255 FontC2x1 18x24 8 5 FontC2x2 FontC2x2 Ext FontC2x2 255 FontC2x2 18x48 17 FontC2x4 FontC2x4 Ext FontC2x4 255 FontC2x4 18x96 34 FontC4x2 FontC4x2 Ext FontC4x2 255 FontC4x2 36x48 17 FontC4x4 FontC4x4 Ext FontC4x4 25...

Page 54: ...barcode q Adds HRI characters in FontA above the barcode r Adds HRI characters in FontA below the barcode s Adds HRI characters in FontC above the barcode t Adds HRI characters in FontC below the barcode w Aligns text to the left x Aligns text to the center y Aligns text to the right A Open Drawer 1 50ms drive pulse width B Open Drawer 1 100ms drive pulse width C Open Drawer 1 150ms drive pulse wi...

Page 55: ...activated does not entail the printing of the character 6 2 FontControl Font Function Printer Font for Special Function Function Size point dot FontControl Open Drawer 1 2 Cut receipt Cut receipt without paper feeding Justification Left Center Right Output HT Output LF Output CR Barcode Printing Print NV Graphic Data 8 5 12x24 ...

Page 56: ...8 Select Code128 and Size 18 and then enter B1234 The barcode corresponding to 1234 is printed When using Code128 characters such as A B C must be included before the input data Printer Font Name Size Supported Characters Codabar 18 35 5 53 71 Numberic 0 9 Symbols Letters A D Code39 18 35 5 53 71 Numberic 0 9 Symbols Letters A Z JAN13 EAN 18 35 5 53 71 Numberic 0 9 JAN8 EAN 18 35 5 53 71 Numberic ...

Page 57: ...ic to control the printer T 4 Sample programs are saved together if the Windows Driver is installed Take note 7 1 1 Windows Driver Selection The following code is an example of the selection of the Metapace T 4 Windows Driver For Each prnPrinter In Printers If prnPrinter DeviceName Metapace T 4 Then Set Printer prnPrinter Exit For End If Next ...

Page 58: ...ndows font Printer FontSize 9 Printer FontName Arial Printer Print Arial Test Print in printer font Printer FontSize 8 5 Printer FontName FontA1x1 Printer Print FontA1x1Test Printer EndDoc 7 1 3 Barcode Printing The following code is an example of the printing of the JAN8 EAN barcode Print Bar Code Printer FontSize 18 Printer FontName JAN8 EAN Printer Print 1234567 Printer EndDoc ...

Page 59: ...ect the printer Metapace T 4 Select Paper Size Orientation and Margins After selecting Page Setup from the File menu select the paper size orientation and margins 7 2 2 Text Printing Use the Windows Driver of the printer to run a test 1 Select the desired font from the Font menu FontA 1x1 2 Select the desired font size 8 5 3 Enter the text to be printed in WordPad 4 Click the Print button in the t...

Page 60: ...code Printing Use the Windows Driver of the printer to print the barcode 1 Select the desired barcode from the Font menu Code128 2 Select the desired font size 18 3 Enter A123453 in WordPad 4 Click the Print button in the toolbar to print ...

Reviews: