background image

User Manual

MOD3CT

s a l e s @ m e t e r s . c o . u k    |    W h i t e  L u n d  I n d u s t r i a l  E s t a t e  L a n c a s t e r  L A 3  3 B T   |    0 1 5 2 4  5 5 5  9 2 9

TROUBLE SHOOTING


The power supply 
indicators are off.
(L1, L2 & L3 LED)

The register 
doesn’t count.

No pulse outputs.

The pulse output rate is
incorrect

Please contact technical support.

Are the fuses or/and surge protection 
defect?
  
Make sure the wires are connected properly 
and tighten the screws if possible.

Check if there is 230V AC voltage between N
and one of the L connections with a voltage
meter.

  
Check if there is 400V AC volt between N and
one of the L connections with a voltage meter.
If the checks above don’t solve the problem,
please contact technical support.

The meter is not connected to a
power source

L1, L2, L3 and N are not connected
correctly

There is no 230V AC between the N
and one of the L connections when
power is supplied to the meter.

There is no 400V AC between the L
connections   when   power   is
supplied to the meter.

There is almost no load connected to
the meter.

The pulse output is not supplied with 
DC power.

The pulse output is not connected 
correctly.

Still no response.

Check if the (P-: red or P+: green) consumption
led   is flashing. 40 flashes of the LED at 400
pulses per kWh equals 0.1kWh.
  

Check the external voltage source (Ui) is 5-27V
DC with a voltage meter

Check if the connection is correct:  the 5-27V DC
should be connected to the collector connection 
(pin 28+ or pin 30+) and the signal wire (S) to 
the emitter connection (pin 29- or 31-)
  
Please contact technical support.

The consumption LED
is not flashing.

The pulse cable is not connected.

The load on the line is very low.

Connect the pulse cable.

Check the Ohm meter readings

No data received by the
Modbus communication
port.

The ID is not correct.

The communication distance 
is too long.

Too many meters connected.

The Modbus terminals are not
connected correctly.

Check the Meter ID by looking for the A in the
display. The number in front of the A, for
example 15A gives the actual address the
meter uses. The default for this meter is 0A.

Make the distance between the meter and the
reading device shorter. Make sure it is no more
than ≤1000m 
    
The number of M bus devices connected to the
meter should not exceed 64.
    
Make sure that the Modbus wires are connected
to terminals 34and 35. If the checks above
don’t solve the problem, please contact
technical support for a meter replacement.

Summary of Contents for MOD3CT

Page 1: ...55 929 Three Phase 4 module energy meter METER SPECIFICATION 25 C to 55 C 30 C to 70 C Performance Criteria Operating Humidity 75 Storage Humidity 95 Operating Temperature Storage Temperature Internat...

Page 2: ...ios to choose Power supply indicator Phase A B C Meter is connected A B C voltage power on Consumption indicator Pulse SO LED Flashing Communication indicator Communication symbol flashes Data Communi...

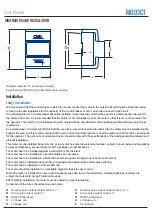
Page 3: ...ver current protection device should comply with the specifications of the buildings electrical design and all local regulations This meter can be installed indoor directly or in a meter box which is...

Page 4: ...not only prevent it from communicating but may also stop the entire communication system from working owing to incorrect direct polarisation voltage found on the terminals of the incorrectly connected...

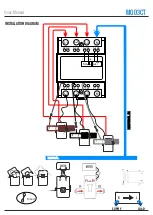
Page 5: ...User Manual INSTALLATION DIAGRAM MOD3CT LINE 1 LINE 2 LINE 3 NEUTRAL NEUTRAL IN 28 29 27 26 30 31 25 24 32 33 23 22 34 35 21 20 L1 L1 L2 L2 L3 L3 N N BUS2 BUS1 SO K SUPPLY L LOAD METER S2 S1 Fused...

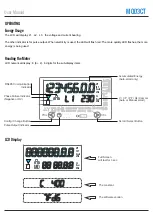
Page 6: ...the LED will flash red The more quickly LED flashes the more energy is being used Reading the Meter LCD numerical display 8 6 2 6 digits for the sub display items LCD Display MP EXP Kvarh kWh MP EXP K...

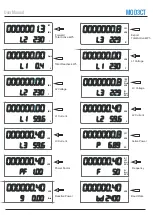
Page 7: ...h Total Reactive kWh Export Total Active kWh L1 Voltage L2 Voltage L3 Voltage 000000 40 0000000 8 l2 59 6 p 6 89 000000 40 pf 1 00 MP EXP Kvarh kWh MP EXP Kvarh kWh MP EXP Kvarh kWh 000000 00 l1 59 6...

Page 8: ...the order is as following voltage of one phase current of one phase active power reactive power frequency baud rate ID address serial number in total 13 parameters after one minute the backlight will...

Page 9: ...24 30 40 50 60 70 80 90 100 110 120 130 140 150 160 170 180 190 S 500 ie If you select CT ratio 100 it will display Ct100 To check it turn the meter off and then on again The 4th screen will display 5...

Page 10: ...meter completes startup after it shows the CT ratio Press and hold the PRG button for 3 seconds the display will show PS 0000 Press the SEL button once so that the display changes to PS 0001 Press an...

Page 11: ...Still no response Check if the P red or P green consumption led is flashing 40 flashes of the LED at 400 pulses per kWh equals 0 1kWh Check the external voltage source Ui is 5 27V DC with a voltage m...

Reviews: