background image


Operating Instructions 

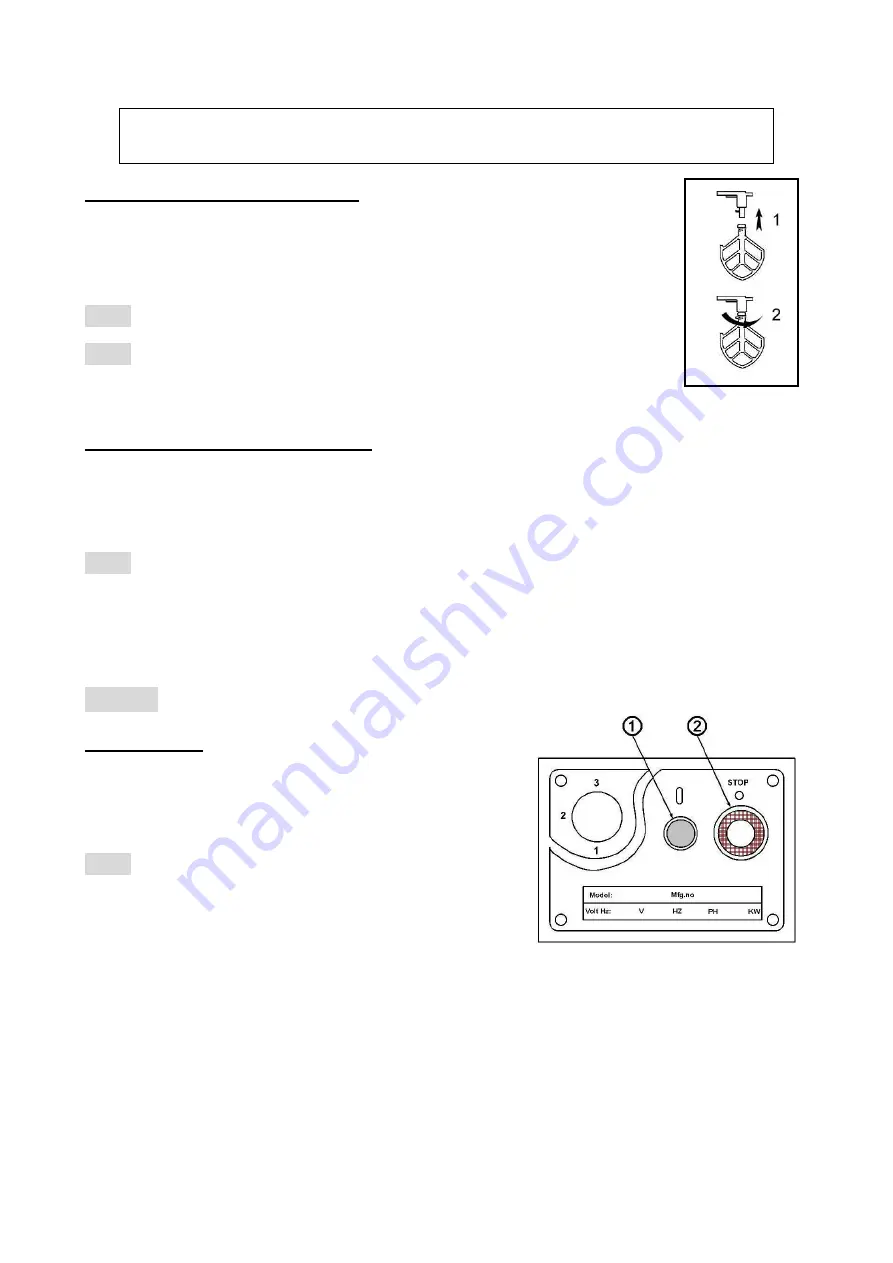
FITTING THE MIXING TOOL 

Slide the bayonet fitting of the agitator onto the drive shaft and twist 

clockwise to secure it in position. To remove the agitator, slide the tool up the 

shaft slightly and twist counter clockwise. Please refer to 

Figure 3

NOTE: Install the bowl BEFORE inserting agitators. 
NOTE: Agitators should always rotate in a clockwise direction around bowl. If 

agitators move counterclockwise, please contact licensed electrician 

immediately to remedy incorrect wiring. 

BOWL LIFT & BOWL GUARD 

The bowl cradle and bowl guard are electrically interlocked so that the machine will only 

operate with the bowl cradle at the raised position. In addition to this, the bowl guard must be 

locked into place by sliding it into position across the top of the bowl to the point where it will slide 

no further.   

NOTE: Only once the bowl is raised and the bowl guard locked, the machine can operate.


Thus 

ensuring total user safety at all times. Once the guard has been opened or the bowl lowered, the 

machine will stop immediately. The Mixer can only be restarted by pressing the start button 

again. 

During the mixing process, additional ingredients can be added by the chute located on the 

right hand side of the bowl guard. 

Remark: Chute is only available for JET-30I and JET-40WI. 

CONTROLS 

Press Start (Green Button) to star mixing. Press Stop 

(Red Button) to stop mixer. In case there is emergency 

situation, please press Stop Button to stop mixer 

immediately. 

NOTE: Please always stop mixer first before changing 

speed.


Figure 3 

Summary of Contents for JET Series

Page 1: ...___ Instruction Manual for JET Series Mixer JET 20I JET 30I JET 40WI CONTENTS Overall View of the Mixer P 2 Installation Instructions P 3 Operating Instructions P 4 Cleaning Instructions P 7 Maintenance P 8 Troubleshooting P 9 Revised Date JAN 2015 ...

Page 2: ...ition before operating NEVER reach into the bowl when the mixer is running NEVER place your hand or any kitchen utensil in the bowl whilst the mixer is in operation When mixing product always follow the recommends agitator and speed setting according to the capacity chart STOP the mixer before changing speed Always UNPLUG before cleaning or doing any maintenances DO NOT hose down or pressure wash ...

Page 3: ...haft C Bowl Guard D Bowl E Start Stop Button F Bowl Lift Handle G Chute H Bowl Cradle I Hand Wheel Remark Chute is only available for JET 30I and JET 40WI Remark Hand Wheel is only available for JET 40WI Control Panel 1 Start 2 Emergency Stop Model JET 30I I ...

Page 4: ...e machine correspond to the details of your electrical connection The mixer is supplied with a trailing lead fitted with a molded plug If the style of plug is unsuitable for the socket you plan to use the plug must be cut off and replaced with an appropriate plug Machines are fitted with a color coded three core cable as follows 1 Brown Live 2 Blue Neutral 3 Green Yellow Earth As the color of the ...

Page 5: ...periods not exceeding 24h at up to 70 Operating Instructions BEFORE USING THE MIXER Before using the mixer ensure that all users are familiar with the correct operation of the machine In particular care should be taken to ensure that the bowl and mixing tools are correctly fitted and that the bowl guard is in position prior to starting the machine SAFETY AT WORK NEVER place your hand or any kitche...

Page 6: ...tting of bags in the lower part of the bowl to allow dust free discharge of flour as flour as possible Use temporary bowl covers to minimize openings through which flour many escape TOOL SELECTION The beater whisk and spiral dough hook are tools for the work implied by their names Do not use the beater for dough making or the whisk for anything other than whisking aerating or mixing light mixtures...

Page 7: ...on In addition to this the bowl guard must be locked into place by sliding it into position across the top of the bowl to the point where it will slide no further NOTE Only once the bowl is raised and the bowl guard locked the machine can operate Thus ensuring total user safety at all times Once the guard has been opened or the bowl lowered the machine will stop immediately The Mixer can only be r...

Page 8: ...g Instructions CARE OF YOUR MIXER CAUTION ALWAYS DISCONNECT OR UNPLUG THE ELECTRICAL POWER FROM THE MIXER BEFORE CLEANING The mixer is designed for simple maintenance carried out by operators It may be necessary from time to time to apply a little Vaseline and oil to the rods on which the bowl cradle slides If so use a little food quality lubricant ensuring that there is no excess oil that could c...

Page 9: ...sis if machine is arduously used After replacing the parts by technicians please screw back tightly with anti leaking coat to avoid the gear oil leaking after replacement Do not insert any object into the air vent of motor or into the bowl Please unplug while not using the mixer Maintenance GEARBOX LUBRICANT Please refill the lubricant inside the gearbox every 5 years We recommended that this serv...

Page 10: ...ive resonance 3 Worn bearings replace bearings 4 Damaged or faulty gearbox replace gearbox 5 Reapply high pressure grease thought grease fitting Please refer to MIANTENANCE Mixer loses power 1 Check capacity 2 Check transmission gear 3 Check shaft bias 1 Overloading of bowl reduce load 2 Gear damaged or worn replace belt 3 Damaged or faulty gearbox replace shaft bias Motor overheating 1 Check capa...

Reviews: