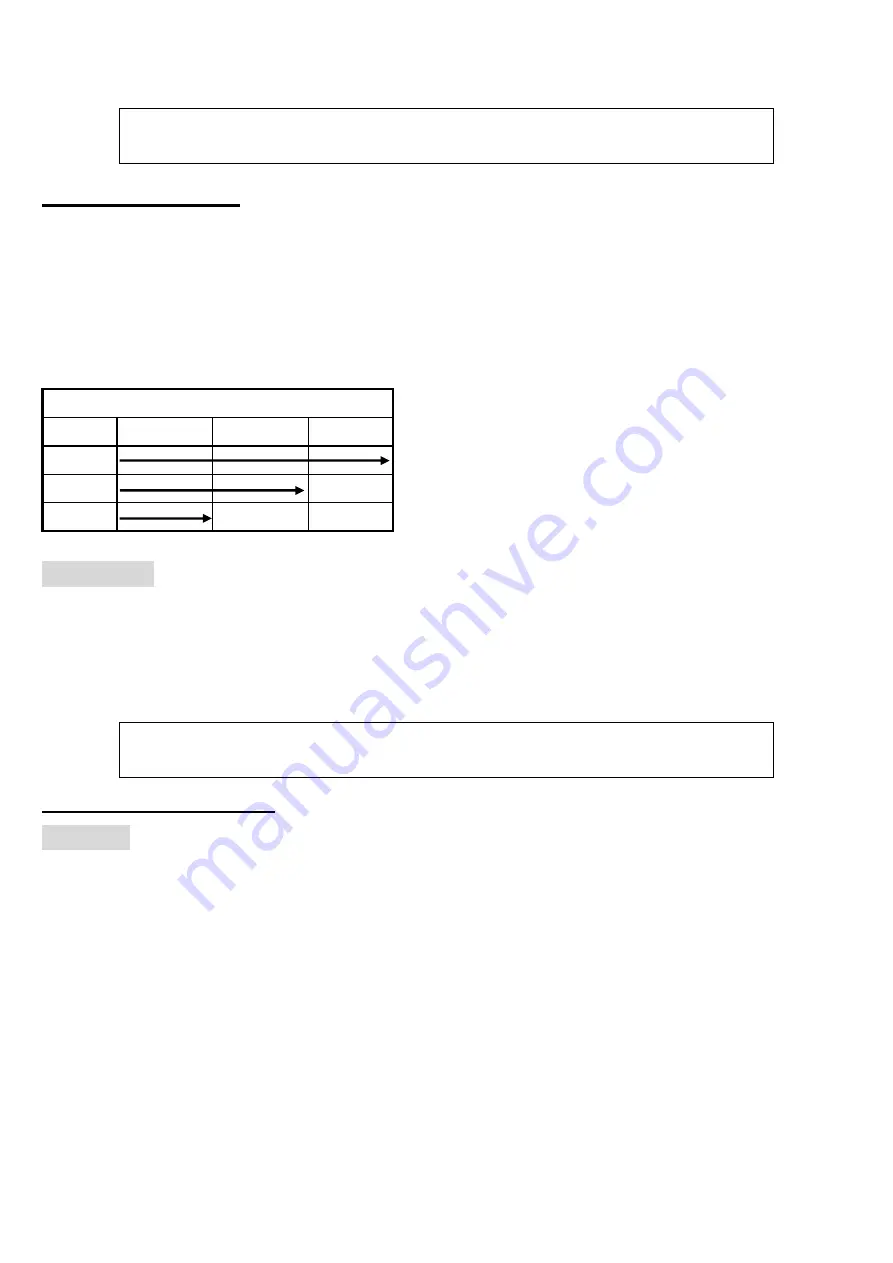
background image


Table 2 


SPEED SELECTION 

Before changing speeds, the mixer must always be STOPPED first

. The necessary speed can then be 

selected before restarting the machine by pressing the Green Start Button.   

The speed selected depends largely on the quantity and consistency of the product. It is recommended 

that mixing is always started at the lowest speed and progressively increased to the desired setting. In an 

emergency situation always use the Red Emergency Stop Button to stop the machine. 

Table 2

 shows the 

recommended speeds for the range of tools.   


IMPORTANT:

 When mixing products always follow the recommended agitator and speed setting. 

The mixer is equipped with a motor overload protection. If the mixer shuts off during operation, reduce 

the batch size and 

wait 2 minutes

Press the stop button then press the start button. 

For heavier loads, the mixer should not run longer than 15 minutes without pausing for a cool down 

period of at last 15 minutes or more before resuming mixer. For lighter loads the mixer should not run longer 

than 30 minutes without pausing for a cool down period of at last 30 minutes or more before resuming 

mixer. 

Cleaning Instructions 

CARE OF YOUR MIXER 

CAUTION:

 ALWAYS DISCONNECT OR UNPLUG THE ELECTRICAL POWER FROM THE MIXER BEFORE 

CLEANING.


The mixer is designed for simple maintenance carried out by operators. It may be necessary from time 

to time to apply a little Vaseline and oil to the rods on which the bowl cradle slides. If so, use a little food 

quality lubricant, ensuring that there is no excess oil that could contaminate the food mix. 

Clean the mixer thoroughly after use. After isolating the machine from the electricity supply, the body 

should be wiped down with a damp cloth. 

Do not spray the machine with or immerse it in water

. Do not 

forget to clean the rear of the machine and 

do not allow the rear vents to become blocked as this may 

result in overheating

.   

Pay particular attention to the bowl pins and any surrounding areas of the cradle to prevent the 

accumulation of mix, as this could prevent correct location of the bowl. For the same reason ensure that the 

beater shaft and each of the sockets on the tools are cleaned thoroughly. The bowl and tools should be 

washed in hot soapy water, rinsed and dried before being put into storage. 

Do not wash the agitator s in a 

dishwasher, as the polished finish will be adversely affected by the dishwashing chemicals.

Operating Instructions 

Recommended speed 


1

st

 Speed  2

nd

 Speed  3

rd

 Speed 

Whisk 


Beater   


Hook 


Summary of Contents for JET Series

Page 1: ...___ Instruction Manual for JET Series Mixer JET 20I JET 30I JET 40WI CONTENTS Overall View of the Mixer P 2 Installation Instructions P 3 Operating Instructions P 4 Cleaning Instructions P 7 Maintenance P 8 Troubleshooting P 9 Revised Date JAN 2015 ...

Page 2: ...ition before operating NEVER reach into the bowl when the mixer is running NEVER place your hand or any kitchen utensil in the bowl whilst the mixer is in operation When mixing product always follow the recommends agitator and speed setting according to the capacity chart STOP the mixer before changing speed Always UNPLUG before cleaning or doing any maintenances DO NOT hose down or pressure wash ...

Page 3: ...haft C Bowl Guard D Bowl E Start Stop Button F Bowl Lift Handle G Chute H Bowl Cradle I Hand Wheel Remark Chute is only available for JET 30I and JET 40WI Remark Hand Wheel is only available for JET 40WI Control Panel 1 Start 2 Emergency Stop Model JET 30I I ...

Page 4: ...e machine correspond to the details of your electrical connection The mixer is supplied with a trailing lead fitted with a molded plug If the style of plug is unsuitable for the socket you plan to use the plug must be cut off and replaced with an appropriate plug Machines are fitted with a color coded three core cable as follows 1 Brown Live 2 Blue Neutral 3 Green Yellow Earth As the color of the ...

Page 5: ...periods not exceeding 24h at up to 70 Operating Instructions BEFORE USING THE MIXER Before using the mixer ensure that all users are familiar with the correct operation of the machine In particular care should be taken to ensure that the bowl and mixing tools are correctly fitted and that the bowl guard is in position prior to starting the machine SAFETY AT WORK NEVER place your hand or any kitche...

Page 6: ...tting of bags in the lower part of the bowl to allow dust free discharge of flour as flour as possible Use temporary bowl covers to minimize openings through which flour many escape TOOL SELECTION The beater whisk and spiral dough hook are tools for the work implied by their names Do not use the beater for dough making or the whisk for anything other than whisking aerating or mixing light mixtures...

Page 7: ...on In addition to this the bowl guard must be locked into place by sliding it into position across the top of the bowl to the point where it will slide no further NOTE Only once the bowl is raised and the bowl guard locked the machine can operate Thus ensuring total user safety at all times Once the guard has been opened or the bowl lowered the machine will stop immediately The Mixer can only be r...

Page 8: ...g Instructions CARE OF YOUR MIXER CAUTION ALWAYS DISCONNECT OR UNPLUG THE ELECTRICAL POWER FROM THE MIXER BEFORE CLEANING The mixer is designed for simple maintenance carried out by operators It may be necessary from time to time to apply a little Vaseline and oil to the rods on which the bowl cradle slides If so use a little food quality lubricant ensuring that there is no excess oil that could c...

Page 9: ...sis if machine is arduously used After replacing the parts by technicians please screw back tightly with anti leaking coat to avoid the gear oil leaking after replacement Do not insert any object into the air vent of motor or into the bowl Please unplug while not using the mixer Maintenance GEARBOX LUBRICANT Please refill the lubricant inside the gearbox every 5 years We recommended that this serv...

Page 10: ...ive resonance 3 Worn bearings replace bearings 4 Damaged or faulty gearbox replace gearbox 5 Reapply high pressure grease thought grease fitting Please refer to MIANTENANCE Mixer loses power 1 Check capacity 2 Check transmission gear 3 Check shaft bias 1 Overloading of bowl reduce load 2 Gear damaged or worn replace belt 3 Damaged or faulty gearbox replace shaft bias Motor overheating 1 Check capa...

Reviews: