SH700 Installation.docx
Page 5 of 6
7/6/2017
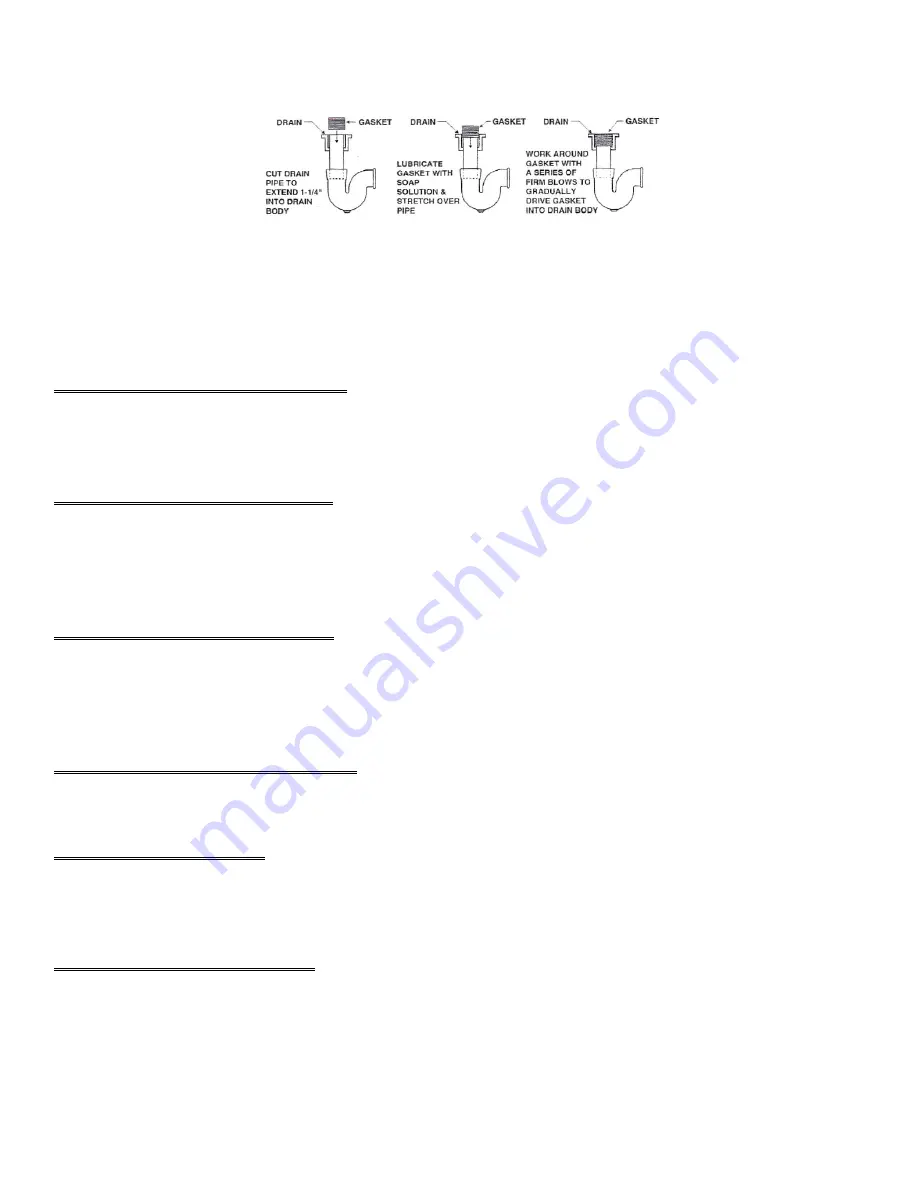
Cut the drain pipe to extend 1¼” into the drain body. The drain pipe should be even with the top of the gasket
when installation is complete. Position the terrazzo base over the waste pipe making sure that the pipe is
centered in the drain body.
Lubricate the gasket with a soap solution and stretch over the pipe. Push the gasket as far as possible into
the joint. Using a hammer and caulking tool, or a ¼” x ¾” x 6” piece of wood instead of a caulking tool, work
around the gasket with a series of firm blows and gradually drive the gasket into the drain body until it
bottoms out. The drain pipe should be even with the top of the gasket.
Step 3 - Prepare Rear Panels -
Take the rear panel and place one aluminum corner post on each side.
The beveled end of the corner post points downward. The top end of the panel is flat while the bottom is uneven
due to one face of the panel being longer. The inside face of the panel is identified as the longer of the two faces.
Step 4 - Install Rear Panels -
Lift the rear panel along with the corner posts and place the outside
bottom edge of the panel firmly against the inside of the rear flange of the base. Make sure that the corner
posts have fit between the two side flanges. Lower the panel into place so that it engages with the small lock
flange on the base.
Step 5 - Install Side Panels -
Take one side panel and slide it into the rear corner post previously
installed with the rear panel. As you slide the panel into the back post, slowly lower it so it engages into the lock
flange inside the base. Repeat this for the other side panel. CAUTION: make sure that the bottoms of the panels
are down and the longer faces are toward the inside.
Step 6 - Install Front Pilasters -
In a similar fashion as the other panels, install the two small front
pilasters along with the two front corner posts.
Step 7 - Set Top Cap -
Slide the top cap over the top of the shower so that the top of each panel fits
inside the top cap. The cap has an additional flange along one edge which sits above the front entry of the
shower and accepts the curtain track.
Step 8 - Install Thresholds -
Take one threshold and slide it down between the two small front pilasters
so it engages with the lock flange in the base. Take the other threshold and slide it up between the two small
front pilasters so it fits into the void under the cap. Secure this piece with screws through the holes in the top
cap.


