background image

OpErAtiON

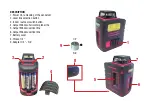
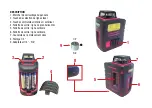
-  Open the battery cover, insert 3 AA batteries and close the cover.
-  Unlock button “1” to turn the instrument on and release the 

pendulum

-  The horizontal plane is projected
-  Press the button (2) of laser line once: a vertical line is 

projected

-  Press the button (2) of laser line again: the second vertical line 

is projected

-  Press the button (2) of laser line again: the horizontal plane 

switches off but the two vertical lines at 90 ° to each other 
remain visible

-  Press the button (2) of laser line again: the unit returns to the 

horizontal plane only. 

  By continuing to press this button, the cycle of operations de-

scribed above will be repeated.

-  Press the button (3) “Indoor / Outdoor switch”: the button will 

be back- lightened indicating that the function is active for 
outdoor use. It is possible to use the detector (optional) to find 
the position of the laser line. 

Note:

 entering the outdoor mode 

the brightness of the laser is reduced.

-  If the battery charge drops below 3V, the unit emits a warning 

signal: replace the batteries as soon as possible.

NOtES

The laser unit should be placed on a flat surface like a table, floor 

etc. The self-leveling range is ± 3°. If the unit moves outside the 
self-leveling range, the line laser begins to blink and the laser 
unit emits a sound signal.
Lock the pendulum and put the laser unit in the soft case when 
not in use.
 

StANDArD EqUipMENt

Laser  units,  magnetic  bracket,  target,  batteries,  soft  carrying 
case, and adapter 5/8.

Optional accessories: 

detector  with  bracket  clamp,  glasses, 

extendable tripod

CArE AND MAiNtENANCE

This  device  is  a  product  of  high  quality  and  production  and  it 
must be treated with care.
It should also be transported or handled with care to avoid falls, 
shock or vibration.

Here are some suggestions:

•  Keep  your  device,  all  its  parts  and  accessories  out  of  the 

reach of children.

•  Do not store in warm areas, high temperatures can reduce 

the life of the electronic device, damage batteries, and warp 
or melt plastic parts.

•  Do not store in cold areas because when the unit warms up to 

its normal operating temperature, moisture can form inside, 
threatening to damage circuits.

Summary of Contents for BRAVO LASER 360 + 2V

Page 1: ...BRAVO LASER 360 2V Ref 60814...

Page 2: ......

Page 3: ...zione allarme emette un segnale sonoro Dimensioni compatte per agevolarne il trasporto Sistema di blocco dell autolivellamento per evitare vibrazioni durante il trasporto Utilizzo esterno mediante Det...

Page 4: ...ee laser 3 Pulsante di commutazione Interno Esterno retroilluminato 4 Coperchio vano batterie 5 Finestra di uscita linea verticale 6 Finestra di uscita linea verticale 7 Finestra di uscita linea del p...

Page 5: ...ie piana tipo tavolo pavimento ecc Il campo di autolivellamento di 3 Se l unit esce dal campo di autolivellamento la linea laser comincia a lampeggiare ed il laser emette un segnale sonoro Bloccare il...

Page 6: ...Tenere le finestre di apertura del laser pulite strofinandole periodicamente con un batuffolo di cotone imbevuto di alcol isopropilico Togliere la batteria quando il dispositivo non in opera CARATTER...

Page 7: ...the alarm function issues a sound signal Compact size for easy transportation Locking system of self leveling to avoid vibration during tran sportation Outdoor working by using a detector supplied sep...

Page 8: ...pendulum 2 Laser line selection button 3 Indoor outdoor switch button 4 Output Window horizontal plane line 5 Output Window vertical line 6 Output Window vertical line 7 Battery cover 8 Thread 1 4 9 A...

Page 9: ...3V the unit emits a warning signal replace the batteries as soon as possible NOTES The laser unit should be placed on a flat surface like a table floor etc The self leveling range is 3 If the unit mov...

Page 10: ...solvents and harsh cleaner to clean it Use a soft cloth lightly moistened with a mild cleaning product Keep laser opening windows cleaned by periodically wiping with a cotton swab soaked in isopropyl...

Page 11: ...Syst me de verrouillage de l auto nivellement pour viter les vibrations pendant le transport Travail en plein air en utilisant un d tecteur fourni s par ment pour d tecter la ligne laser Avertissement...

Page 12: ...le 2 Touche de s lection de lignes laser 3 Touche commutateur int rieur ext rieur 4 Fen tre de sortie ligne de plan horizontal 5 Fen tre de sortie ligne verticale 6 Fen tre de sortie ligne verticale 7...

Page 13: ...a charge des piles descend en dessous de 3V l appareil met un signal d avertissement remplacer les piles d s que possible NOTES L appareil laser doit tre plac sur une surface plane comme une table sol...

Page 14: ...peuvent briser l ap pareil ou compromettre sa fonctionnalit Ne pas utiliser de produits chimiques corrosifs solvants et produits agressifs pour le nettoyer Utilisez un chiffon doux l g rement imbib d...

Page 15: ...beginnt der La serlinie zu blinken und die Alarmfunktion gibt ein akustisches Signal Kompakte Gr e f r einfachen Transport Blockiersystem der Selbstnivellierung um Vibrationen w h rend des Transports...

Page 16: ...wer On Entriegeln des Pendels 2 Laserlinien Auswahltaste 3 Indoor Outdoor Schaltknopf 4 Ausgabefenster horizontalebene Linie 5 Ausgabefenster vertikale Linie 6 Ausgabefenster vertikale Linie 7 Batteri...

Page 17: ...s wird die Helligkeit des Lasers reduziert Wenn die Akkuladung unter 3V gibt das Ger t ein Warnsignal ersetzen Sie die Batterien so schnell wie m glich HINWEISE Die Lasereinheit sollte auf einer flach...

Page 18: ...icht Pl tzliche Bewegungen k nnen zum Bruch des Ger ts f hren oder seine Funktionalit t beeintr ch tigen Verwenden Sie keine korrosiven chemischen Produkte L sungsmittel oder aggressive Mittel um es z...

Page 19: ...NOTE...

Page 20: ...NOTE...

Page 21: ...NOTE...

Page 22: ...NOTE...

Page 23: ...NOTE...

Page 24: ...Importato e Distribuito da Metrica S p A Via Grandi 18 20097 San Donato Mil se MI Italy...

Reviews: