background image

SECTION 3 - M. FRAME, ADJ. RING, TRAMP REL. & CLRNG JACK ASSY

3-14

MP SERIES CONE CRUSHER TECHNICAL REFERENCE MANUAL

3.4.3 Main Frame Seat and Fulcrum Bar 

Installation

There is a gap between the main frame fulcrum bar 

and adjustment ring fulcrum surface that is to be 

maintained when seat liners and fulcrum bars are 

replaced. Refer to Figure 3-9 for the MP1000 or 

Figure 3-10 for the MP800.
Over a long period of time, the adjustment ring 

conical seating surface will experience wear, even 

though it seats on a bronze frame seat liner. If 

enough adjustment ring wear occurs, the desired 

gap between the frame fulcrum bars and adjustment 

ring fulcrum surface will not be obtainable even 

though a new seat liner and fulcrum bars have been 

installed. It is very important that this gap is 

maintained when new seat liners and fulcrum bars 

are installed so the adjustment ring seats properly 

on the bronze frame seat liner and not on the frame 

fulcrum bars and adjustment ring.
If the adjustment ring is allowed to rest on the 

fulcrum bars instead of on the frame seat liner, 

major adjustment ring failure could occur. The 

procedure for seat liner, fulcrum bar replacement 

and possible adjustment ring rework is as follows. 
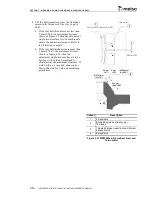
MP1000
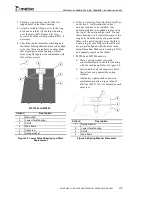
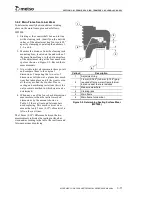
For the following procedure refer to Figure 3-11.

1. Remove worn bronze main frame seat liner 

and fulcrum bar.

2. The replacement main frame seat liner and 

fulcrum bar will be shipped in segments.

3. Position the seat liner at the dimension 

shown and weld using 4 mm (0.16") weld 

rod which meets AWS E Cu AL-A2 or R Cu 

AL-A2 specification. Do not butt vertical 

joints.

4. When using these 4 mm (0.16") weld rods 

reverse polarity and use between 130 to 

190 amps. The main frame seat and seat 

liner must be preheated to 20°C (68°F) to 

40°C (105°F).

5. Weld the fulcrum bar as shown.
6. After welding a new seat liner and fulcrum 

bar to the main frame place balls of clay or 

putty around the top outside corner of the 

main frame flange.

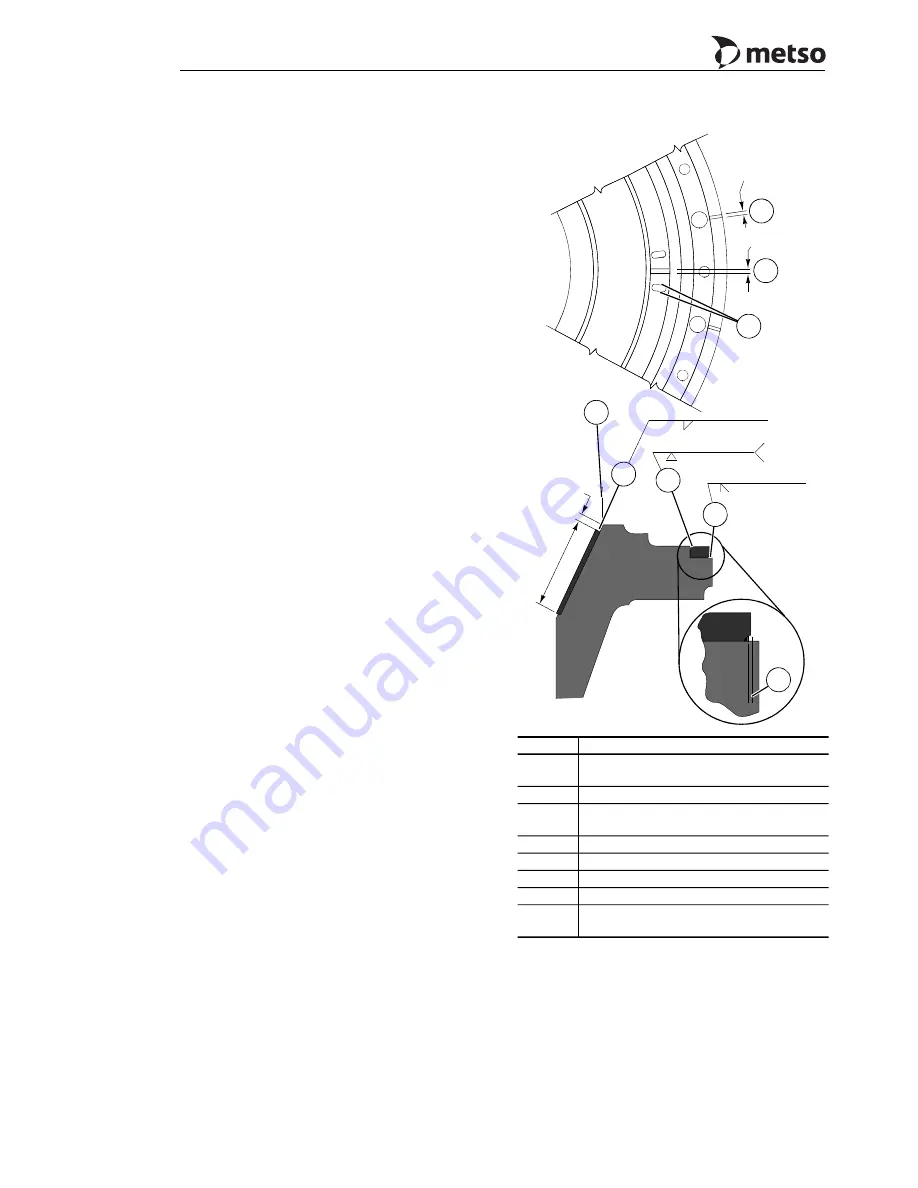
Figure 3-11 MP1000 Main Frame Seat Liner and 

Fulcrum Bar

Callout

Description

1

Typical gap between fulcrum bar 

segments

2

Typical gap between seat liners

3

9 mm (0.37") typ. braze length. Braze 

along sides of slot only — 16 places

4

3280 mm (129.13") diameter

5

Braze along top of segments

6

Weld typ. 16 segments

7

Weld typ. 16 segments

8

5 mm (0.20") weld must be recessed to 

this dimension

32

5

m

m

10 mm (.39")

24 mm (.94")

19 mm

9 mm 100 mm-300 mm

50 mm-150 mm

50 mm-150 mm

16

1

2

3

4

5

6

7

8

(.35") (4"-12")

(2"-6")

(2"-6")

(.75")

(1

2.

8"

)R

EF

segments

Summary of Contents for MP1000

Page 1: ...Nordberg MP Series Cone Crusher ...

Page 2: ......

Page 3: ...e and without incurring obligation Whenever a question arises regarding your Crusher or this publication please consult your Metso Minerals representative for the latest available information This manual is to be used as a general guide concerning technical information All technical information required for correct installation of your crusher must be obtained from the installation drawings and te...

Page 4: ......

Page 5: ...ction 4 Eccentric Assembly Section 5 Socket Assembly Section 6 Head Mantle and Feed Plate Assemblies Section 7 Bowl Bowl Liner and Hopper Assemblies Section 8 This Section Intentionally Left Blank Section 9 Lubricating System Section 10 Operating Instructions Section 11 Hydraulic Systems Section 12 Index Section I The lubrication hydraulic and drive supplements are now integrated in this Technical...

Page 6: ......

Page 7: ...0 3 Machine Safety 0 22 0 3 1 Protective Devices and Accessories for Machine Safety 0 22 0 3 2 Transport 0 25 0 3 3 Towing 0 25 0 3 4 At the work site 0 25 0 4 Safety During Maintenance and Repair 0 26 0 4 1 General Information and Safety Lockouts 0 26 0 4 2 Mechanical Safety During Maintenance and Repair 0 27 0 4 3 Electrical Safety During Maintenance and Repair 0 29 0 4 4 Hydraulic Safety During...

Page 8: ......

Page 9: ... until all potentially moving parts are secured and power has been locked out and tagged out to prevent unexpected movement The Operator is responsible for using care and common sense at all times Remember safety is everyone s business You are responsible not only for your safety but for the safety of those around you Read this manual carefully Know its contents If you have any questions contact y...

Page 10: ...nnot be anticipated hazards associated with a particular work site or hazards covered by special company safety programs The information contained in this manual is not intended to replace safety codes insurance requirements federal state and local laws rules and regulations If you have questions or concerns regarding safety aspects of machinery supplied by Metso Minerals contact us before using o...

Page 11: ...und the machine Be aware of real and potential hazards Only properly trained personnel should operate supervise maintain or service the machine Personnel must carefully study all aspects of the specific machine including operating instructions service trouble shooting and maintenance instructions automated features and motions of the machine specific safety features and instructions 0 2 2 1 Object...

Page 12: ...nts to show safety risks that may exist Figure 0 2 Danger Warning Caution Signs and their Meaning This manual uses another convention to communicate information which if not followed will affect the performance of the equipment or cause damage to the equipment This is indicated by the word NOTICE Figure 0 3 Important notice and its meaning While such conditions and practices do not pose an immedia...

Page 13: ...ncy Stop buttons should be tested on a regular schedule for proper operation as should electrical interlocks and related limit switches Safety defects should be repaired prior to continuing operation and thereafter tested and certified for appropriate operation by skilled personnel 9 Personal protective equipment and safety uniforms safety shoes helmets safety glasses heavy gloves ear protection d...

Page 14: ...rushing plant or screening plants 0 2 2 8 Portable Plants If the Crushing Plant includes of portable equipment i e crushing and screening equipment mounted on trailers trailer footing or cribbing is extremely important for safe operation Your machine must be on as solid and level footing as possible If the ground is not naturally level it must be leveled so that the unit will operate safely and ef...

Page 15: ...ce with the instruction manual After the system is running check all gauges and instruments to see that they are working correctly Check that all controls function normally and properly Listen for unusual noises Shut system down immediately if any component of the system does not operate normally 0 2 3 Typical Risks in Crushing Plant Working Environment Even though every Metso Minerals machine is ...

Page 16: ...nts An ingoing nip is formed by drive devices such as belt and pulley chain and sprocket or gears Similarly a pinch point may be formed by rotating or moving equipment Poor Housekeeping Promote good housekeeping Keep machine environment walkways platforms etc clean and dry and free of debris Oily or wet machine environment walkways platforms steps and hand rails are slippery In cold weather watch ...

Page 17: ...components Do not use impact hammer boom or any other equipment which are not designed for lifting for assembly or disassembly purposes Affix the load securely to its destination Never detach a lifting device from a load until the load is stable and secured from unintended movement When it comes to safety don t compromise Mobile cranes Safe ratings are based on operating the crane on firm level gr...

Page 18: ...rp edges may occur on any metal structures Equipment damage may uncover or produce unexpected sharp edges Sharp edges may inflict deep and serious cuts Wear protective gloves when handling materials parts etc with sharp edges Repair or guard detected sharp edges immediately High Pressure Equipment Hydraulic or Air High pressure oil can be dangerous Relieve all pressure before opening or removing a...

Page 19: ... the operability of these devices The lockout program locks tags and the blocking restraining devices provided are designed for your protection Your responsibility is to follow the program and use the proper equipment Remember Follow procedures Stay alert Do not take anything for granted Verify lockout Each person working on the unit must have his own lock with only 1 key Tag must identify the wor...

Page 20: ...A MSHA or other applicable standards as appropriate One of the most frequently used tools around the Crushing Plant is the cutting torch Crushing Plants which are equipped with hydraulic components and or conveyor belts and or v belts should have these components depressurized and adequately covered with flame proof material so that sparks weld spatter etc cannot reach theses areas Ruptured high p...

Page 21: ... moving parts until the machine has come to a complete stop Regularly inspect the structural elements to maintain safe operation Hot Surfaces and Fires There are hot surfaces on Crushing Plants Protective gloves and coveralls help protect against burns Be aware of hydraulic system hoses fittings and pipes Regularly inspect and observe high temperature lines and fluid lines for leaks or damage On m...

Page 22: ...a poorly ventilated area Store oily rags and other combustible material in a safe place Never use an open flame to check fuel battery electrolyte or coolant levels or to look for hydraulic leaks anywhere on the equipment Use a flashlight Know where fire extinguishers are kept how they operate and for what type of fire Check regularly at least monthly to be sure they are in the working area Do not ...

Page 23: ...ke level may also reduce the amount of dust issuing from the Crushing Plant itself Because the configuration of each rock crushing installation is different Metso Minerals recommends that the Owner and Operator consult Metso Minerals or a dust consultant about possible alternative means of dust reduction WARNING Do not use conveyor belts as walkways Do not climb on them Always stay clear of any fa...

Page 24: ...rator s platform or walkway Unexpected or excessive vibrations may be a sign of wear and or maintenance needs Excessive vibrations associated with a portable crushing or screening plant is frequently caused by improper cribbing It is recommended to regularly monitor vibration levels of machine components including but not limited to bearings shafts rollers structural members including conveyor fra...

Page 25: ...e alert when operating or working at or around the machine Wear proper protective clothing including an approved safety helmet and protective devices Keep all non operating and non trained personnel clear of the Crushing Plant at all times Never walk under any equipment included in loading feeding crushing conveying discharging or stockpiling material 0 2 3 2 Typical Injury Types Crushing In gener...

Page 26: ...rned to operation Never climb or stand on areas of the Crushing Plant not specifically designated for that purpose KEEP THE AREA CLEAN Cutting Do not reach in or enter the movement paths of cutting equipment between moving machine components between moving loads and machine structures Entanglement To avoid entanglement avoid wearing loose clothing that could be caught by rotating shafts conveyors ...

Page 27: ...ng assembly and disassembly operations Removal of tramp iron jammed between the crushing members is extremely dangerous Follow the instructions in the instruction manual Do not stand in front of the feed opening or look into the crushing cavity while the crusher is operating 0 2 4 Personal Protective Equipment and Clothing Personal protective equipment and clothing such as foot protection helmet h...

Page 28: ... protect the health of workers Respiratory protection must be provided by the Owner when such equipment is necessary to protect the health of personnel The Owner shall provide the respiratory protection and training programs which are applicable and suitable for the purpose intended and comply with the latest requirements and recommendations of health authorities and regulatory agencies 0 2 4 4 Fo...

Page 29: ... 2 4 7 Safety Harnesses The Owner should ensure that any person working on elevated areas not protected by railings or on hazardous places must wear suitable safety equipment including safety harnesses if there is a risk of falling Confined spaces may also require safety harnesses 0 2 4 8 Work Clothing The Owner should ensure that personnel wear appropriate clothing to help protect against hazardo...

Page 30: ...ch feature and make sure all of the features are enabled Owners and Operators should never attempt to defeat bypass or disable any safety features If any of the features are defeated or become disabled the machine should not be operated until corrective action is taken and all safety features are restored 0 3 1 2 Emergency Stop E Stop Use the emergency stop when injury may occur or human life is i...

Page 31: ... THAT INTERLOCKING ARRANGEMENTS ARE NOT REMOVED MODIFIED OR BYPASSED AND THAT THEY ARE CORRECTLY ADJUSTED LIMIT SWITCHES AND OTHER SENSORS MUST BE KEPT IN GOOD WORKING ORDER Electric Motors Electric drives and motors may be controlled to stop or reduce speeds as determined by the safety interlocks at a particular location Hydraulic System Components that help protect the hydraulic system include c...

Page 32: ...distance from the machine It is the responsibility of the Owner to ensure that the Crushing Plant is always equipped with required horns and lights Safety Signs and Labels Safety signs have colors to determine the degree of hazard in particular areas These signs must not be removed Temporary placement of safety signs and danger tags should also be used on the control panels to warn of maintenance ...

Page 33: ...e the following minimum precautions at the work site 1 Know the locations of underground and overhead powerlines and other potential hazards 2 Select the work site with care The ground must be firm level and able to support the weight of the entire plant Make sure there is enough room for loading ramps loaders conveyors etc and for safe maneuvering of trucks and loaders 3 Check that cribbing is se...

Page 34: ... to perform the required repairs maintenance or troubleshooting or you are unsure how to safely perform the activity STOP Never attempt to repair maintain or troubleshoot any aspect of the Crushing Plant unless you are thoroughly trained for the activity and understand how to perform the activity in a safe manner Be sure to coordinate all repair and maintenance work with other Crushing Plant opera...

Page 35: ... crushing cavity while the crusher is operating When using a crane to raise or lower a load keep all personnel clear of the area Never walk stand crawl or lay under any load hanging from a crane DANGER Follow all established lockout procedures Refer to the appropriate standards For repair maintenance or troubleshooting work disconnect all devices from electric pneumatic and hydraulic power sources...

Page 36: ...evice in the middle of a production cycle A machine or device that is not in proper condition and that has been left without regular maintenance and inspections is a safety risk to its user For instance without lubrication a bearing may fail bringing a production line down Furthermore the hot bearing may present a fire hazard or cause skin burns Some preventive maintenance suggestions for a machin...

Page 37: ... work is performed Be sure electrical supply voltage is disconnected before drilling into any structural frame members Electrical cables may be inside Verify that electric motors are disconnected before starting any maintenance work thereby preventing the supply of electricity to the motor Generally the disconnects are located in the drive control room Each person performing maintenance work shoul...

Page 38: ...onnections increase current draw which can result in false trips intermittent circuits and burned out components As part of the start up check and retighten as necessary all electrical connections in the electrical enclosure Repeat after the first forty to fifty hours of operation This work must be performed by properly trained personnel NOTICE Improper phasing will damage backstops in conveyor dr...

Page 39: ... have been serviced or repaired Before starting up the pumps make sure that maintenance work is completely finished in all work areas When starting up the pumps stay at a distance from the areas which were repaired Before opening the main valves make sure that there is no one working between any parts of the machine since pressurization of the system may cause machine motion Once the system is in ...

Page 40: ...rea Never detach a lifting device from its load until the load is securely affixed at its designation or steps have been implemented to prevent the load from unintended shifting or falling Never walk stand crawl or lay under any load hanging from a crane or other lifting device Store and secure hazardous materials in restricted areas Mark materials clearly and make sure any federal or other labell...

Page 41: ...the vicinity of the crusher when the engine is running DANGER Moving parts can crush and cut Do not insert tools in the crusher cavity when the engine is running DANGER Moving parts can crush and cut Do not stand in the vicinity of the crusher when the engine is running DANGER Moving parts can crush and cut Use the safety rod to prevent the crusher from closing ...

Page 42: ...s can crush and cut Lock the rotor with a locking pin before entering the crusher WARNING Dropping material Watch out for material dropping from the conveyor WARNING Fall hazard Do not stand on the machine DANGER Moving parts can crush and cut Do not open the hatch when the engine is running ...

Page 43: ...NG Powerful magnet People using pacemakers must not go near the magnet CAUTION Hot surface Contact with skin may cause burns Do not touch CAUTION Powerful magnet Stay away from the magnet DANGER Moving parts can crush and cut Do not go near the feeder when the engine is running ...

Page 44: ...re injury Do not open cover when engine is running DANGER Exposed moving parts can cause severe injury Do not go under the machine when the engine is running DANGER Material can fall out Watch out for material dropping from the bucket DANGER Exposed moving parts can cause severe injury Do not step under the conveyor ...

Page 45: ...G Servicing while pressurized can cause severe injury Lock out source and relieve pressure before servicing DANGER Lung disease hazard Dust protection required DANGER Explosion Hazard Switch off the radio control before blasting CAUTION Risk of head injury Use of helmet required ...

Page 46: ...SECTION 0 SAFETY 0 38 MP SERIES CONE CRUSHER TECHNICAL REFERENCE MANUAL WARNING Risk of eye injury Use of eye protection required CAUTION Hazardous noise level Use of ear protection required ...

Page 47: ...nderstand operating manual before using this machine Failure to follow operating instructions may result in death or serious injury WARNING Exposed moving parts can cause severe injury Do not stop under the conveyor WARNING Dropping material Watch out for material dropping from the conveyor ...

Page 48: ...E MANUAL CAUTION FALLING MATERIAL WEAR HARDHAT WHEN USING THIS EQUIPMENT CAUTION WEAR SAFETY GLASSES WITH SIDESHIELDS WHEN USING THIS EQUIPMENT WARNING EXPOSED MOVING PARTS CAN CAUSE SEVERE INJURY DO NOT OPERATE WITHOUT GUARD IN PLACE LOCKOUT POWER BEFORE STARTING ...

Page 49: ...IES CONE CRUSHER TECHNICAL REFERENCE MANUAL 0 41 WARNING OUTRIGGER CONTACT MAY CAUSE SERIOUS CRUSHING INJURY STAND CLEAR CAUTION REMOVE SHIPPING BRACE BEFORE OPERATING PLANT CAUTION REPLACE SHIPPING BRACE BEFORE MOVING PLANT ...

Page 50: ...O EXCEED 5 MPH DANGER EXPOSED MOVING PARTS CAN CAUSE SEVERE INJURY DO NOT OPERATE WITHOUT GUARD IN PLACE LOCK OUT POWER BEFORE STARTING WARNING TO PREVENT SERIOUS BODILY INJURY DONOTPERFORMMAINTENANCEOR REPAIRWORKOFANYNATUREWHILE MACHINEISINOPERATION REPLACEALLGUARDSBEFOREOPERATING WORK SAFELY AT ALL TIMES DO NOT REMOVE THIS SIGN FROM THIS MACHINE ADDITIONAL SIGNS CAN BE OBTAINED FROM NORDBERG ...

Page 51: ...ety Plates EN Do not stand in the vicinity of the crusher when the engine is running Do not stand on the machine Do not stand in the vicinity of the crusher when the engine is running There are moving parts behind the protecting cover Do not open the cover when the engine is running ...

Page 52: ...TY 0 44 MP SERIES CONE CRUSHER TECHNICAL REFERENCE MANUAL Do not go near the feeder when the engine is running Mind the hot surface Do not go under the machine when the engine is running Mind the high pressure liquid ...

Page 53: ...AFETY MP SERIES CONE CRUSHER TECHNICAL REFERENCE MANUAL 0 45 Stay away from the powerful magnet Do not open the hatch when the rotor is moving Read the user instructions Lock the rotor before entering the crusher ...

Page 54: ... SERIES CONE CRUSHER TECHNICAL REFERENCE MANUAL Watch out for material dropping from the conveyor Rotation direction of the vibrator Watch out for material dropping from the bucket Switch off the radio control before blasting ...

Page 55: ...SECTION 0 SAFETY MP SERIES CONE CRUSHER TECHNICAL REFERENCE MANUAL 0 47 Emergency stop Conveyor emergency stop wire Conveyor emergency stop Do not open the main current switch when the engine is running ...

Page 56: ... 0 48 MP SERIES CONE CRUSHER TECHNICAL REFERENCE MANUAL Close the hatch before lowering the conveyor Do not step under the conveyor Stay away from the crusher cavity Use a safety rod to prevent the crusher from closing ...

Page 57: ...ION 0 SAFETY MP SERIES CONE CRUSHER TECHNICAL REFERENCE MANUAL 0 49 Do not insert tools in the crusher cavity when the engine is running Do not open the hatch when the engine is running Pressure accumulator ...

Page 58: ...h hydraulic connection when the engine is running Tighten the wheel nuts to the specified torque when changing tires Check the tightness of the nuts after 50 km 30 miles and 150 km 93 miles Keep the door closed when the engine is running Use the pin to lock the conveyor before moving the machine ...

Page 59: ...SECTION 0 SAFETY MP SERIES CONE CRUSHER TECHNICAL REFERENCE MANUAL 0 51 Use the pin to lock the conveyor before starting the crushing Oil recommendation Oil Use of respirators required ...

Page 60: ...SECTION 0 SAFETY 0 52 MP SERIES CONE CRUSHER TECHNICAL REFERENCE MANUAL Inspect every 8 hours and tighten every 40 hours Use of hearing protectors required Lock the catch Use of helmet required ...

Page 61: ...SECTION 0 SAFETY MP SERIES CONE CRUSHER TECHNICAL REFERENCE MANUAL 0 53 Greasing point Fuel tank Check every 8 hours Use of eye shields required ...

Page 62: ...SECTION 0 SAFETY 0 54 MP SERIES CONE CRUSHER TECHNICAL REFERENCE MANUAL Engine oil Hydraulic oil Coolant Valve Oil recommendation ...

Page 63: ...SECTION 0 SAFETY MP SERIES CONE CRUSHER TECHNICAL REFERENCE MANUAL 0 55 DANGER Electric shock Fastening flat bar People using pacemakers must not go near the magnet CE mark Conveyor safety switch ...

Page 64: ...SECTION 0 SAFETY 0 56 MP SERIES CONE CRUSHER TECHNICAL REFERENCE MANUAL ...

Page 65: ... Crusher Information 1 1 Introduction 1 1 1 2 Initial Inspection 1 1 1 3 Information Furnished 1 1 1 4 Repair Parts 1 1 1 5 Crusher Terminology 1 1 1 6 Optimizing Crusher Capacity 1 2 1 7 Selection of Proper Liners 1 3 ...

Page 66: ......

Page 67: ...s or informational data that might be required for your specific installation A Parts Manual containing the various assembly drawings pertaining to your Crusher will be sent under separate cover at a later date usually immediately after the Crusher has been shipped This manual illustrates and identifies each and every part used in the assembly of the machine and is to be used when ordering spare o...

Page 68: ...ut of the Crusher computed in tons per hour Open Circuit Operation The type of operation where precise uniformity of product size is not considered to be of prime importance and the feed is run through the Crusher but once Closed Circuit Operation The type of operation where precise uniformity of product size is important and the product is screened after passing through the Crusher and the materi...

Page 69: ...Metso Minerals suggests that the bowl liner and mantle be torch cut open so that the contour of the bowl liner and mantle can be traced onto a sheet of cardboard or heavy paper and the traced contours sent to the factory in order that the exact concentration of wear can be determined refer to Figure 1 1 Another bowl liner and mantle can then be recommended which will have a different contour at th...

Page 70: ...Countershaft box 36 Torch ring 5 Clamping ring 21 Inner countershaft bushing 30 Main frame liner 37 Locking nut 13 Socket 31 Counterweight stationary shield 38 Main frame 6 Wedge bolt assembly 14 Mantle 22 Pinion 39 Accumulator 15 Counterweight 23 Upper and lower thrust bearing 32 T and U seal upper 40 Crusher sheave 7 Adjustment ring 16 Outer countershaft bushing 41 Main frame pin 24 Main shaft 8...

Page 71: ... Eccentric 4 Hopper 11 Clearing Jack 28 Countershaft Box 36 Counterweight Stationary Shield 5 Adjustment Cap 12 Socket Liner 20 Inner Countershaft Bushing 13 Upper Head Bushing 29 Gear 6 Clamping Ring 21 Countershaft 30 Main Frame 37 Release Cylinder 14 Lower Head Bushing 22 Eccentric Bushing 31 Main Frame Liner 38 Accumulator 7 Wedge Bolt Assembly 23 Countershaft Box Guard 32 Arm Guard 39 Bowl 15...

Page 72: ...SECTION 1 GENERAL CRUSHER INFORMATION 1 6 MP SERIES CONE CRUSHER TECHNICAL REFERENCE MANUAL This Page Left Intentionally Blank ...

Page 73: ...V belts 2 18 2 8 9 Percent Elongation Method 2 20 2 8 10 Tensioning Procedure for Standard or Banded V belts for a New Crusher Installation or When a New Countershaft Bushing With New V belts Has Been Installed 2 20 2 8 11 Tensioning Procedure for Standard or Banded V belts When a New Countershaft Bushing Has Been Installed and Using the Existing V belts or Bands 2 20 2 8 12 Tensioning Procedure f...

Page 74: ......

Page 75: ... feeding arrangement such as chuting feed hopper and other auxiliary equipment Adequate clearance should also be provided for the discharge compartment conveyor and related equipment In order to accurately determine crusher clearances Refer to Figure 2 3 and Table 2 1 for the MP800 or for the MP1000 Table 2 3 as well as the mounting and clearance drawing CAD Computer Aided Drafting template files ...

Page 76: ...SECTION 2 GENERAL INSTALLATION INFORMATION 2 2 MP SERIES CONE CRUSHER TECHNICAL REFERENCE MANUAL Figure 2 1 Typical MP800 Mounting and Clearance Drawing 8 ...

Page 77: ...SECTION 2 GENERAL INSTALLATION INFORMATION MP SERIES CONE CRUSHER TECHNICAL REFERENCE MANUAL 2 3 Figure 2 2 Typical MP1000 Mounting and Clearance Drawing 8 ...

Page 78: ...CTION 2 GENERAL INSTALLATION INFORMATION 2 4 MP SERIES CONE CRUSHER TECHNICAL REFERENCE MANUAL Figure 2 3 MP800 Clearance Dimensions V M H O P U L N F E A B D K J G Q T C C R S Bowl Assembly Head Assembly ...

Page 79: ...required for removing countershaft assembly 3881 12 8 13 16 3881 12 8 13 16 K To end of countershaft 2538 8 3 15 16 2538 8 3 15 16 L Maximum height to top of feed hopper 3860 12 8 3752 12 3 3 4 M Inside diameter of feed hopper 2210 7 3 2110 6 11 1 16 N To top of feed plate 2758 9 0 5 8 2758 9 0 5 8 O Overall height of bowl assembly 2133 7 0 1964 6 5 5 16 P Adjustment cap maximum diameter 3170 10 4...

Page 80: ...bowl liner adjustment cap and hopper 26 000 57 340 Head assembly mantle and lifting plate 15 960 35 200 Countershaft box countershaft and crusher sheave 3 195 7 045 Eccentric assembly including counterweight 7 985 17 604 Socket 355 785 Socket liner 235 520 Mantle 6000 13 320 Bowl liner 7460 16 450 Tramp release cylinder assembly including accumulator 453 1000 Hydraulic power unit dry no oil 1 164 ...

Page 81: ...TION 2 GENERAL INSTALLATION INFORMATION MP SERIES CONE CRUSHER TECHNICAL REFERENCE MANUAL 2 7 Figure 2 4 MP1000 Clearance Dimensions V M H O P U L N F E A B D K J G T Q C C R S Bowl Assembly Head Assembly ...

Page 82: ...ed for removing countershaft assembly 4320 14 2 1 16 4320 14 2 1 16 K To end of countershaft 2855 9 4 3 8 2855 9 4 3 8 L Maximum height to top of feed hopper 3926 12 10 9 16 3993 13 1 3 16 M Inside diameter of feed hopper 2530 8 3 5 8 2490 8 2 1 16 N To top of feed plate 3026 9 11 1 8 2935 9 7 9 16 O Overall height of bowl assembly 2186 7 2 1 16 2180 7 1 13 16 P Adjustment cap maximum diameter 355...

Page 83: ... 134 Bowl bowl liner adjustment cap and hopper 33 112 73 000 Head assembly mantle and lifting plate 17 573 38 742 Countershaft box countershaft and crusher sheave 4 113 9 067 Eccentric assembly including counterweight 8 900 19 620 Socket 474 1 045 Socket liner 360 794 Mantle 5 538 12 209 Bowl liner 5 837 12 869 Tramp release cylinder assembly including accumulator 453 1000 Hydraulic power unit dry...

Page 84: ... center of the Crusher and impact into a dead bed rock box which has a feed chute that can be located so that the feed material will impact onto the center of the crusher feed plate This design provides the limit to feed velocity required It also provides the centering of feed into the Crusher and will reduce the segregation of fine versus coarse material due to the mixing in the dead bed rock box...

Page 85: ...ushing cavity should be 300 mm 12 above the top of the feed plate This will ensure uniform spread of feed around the crushing cavity and prevent offset feed conditions from developing It also evens out the power draw to allow a higher average power draw which translates into higher production It is also a fact that a choke fed Crusher will produce a finer product size at the same setting as anothe...

Page 86: ...is to be used the slope of the chute must be more than 45 with the horizontal and if material is very sticky the angle of inclination should be increased There should be sufficient clearance between the main frame and the bottom of the discharge compartment and between the discharge opening or chute and the conveying belt or elevator Adequate clearance at these points will prevent material from cl...

Page 87: ...d to the horsepower shown on the mounting and clearance drawing With the V belt drive slide rails under the jack shaft drive base are required to provide allowance for the V belt take up due to belt stretch and for belt installation If a direct drive is used care should be taken when ordering the motor that the motor shaft extension and bearings are adequately sized for a direct drive application ...

Page 88: ... over tensioning Various methods of tensioning V belts have been established Two simplified methods will be described in the following paragraphs Tension Deflection and Percent of Elongation Either of these two methods will provide satisfactory belt tension Each has certain advantages for a given type of belt The Tension Deflection method should be used on drives with standard V belts The Percent ...

Page 89: ...l Sections 8V 8V Power Band 630 25 thru 1199 47 25 1 1200 47 thru 1999 79 35 1 3 8 2000 79 thru 2749 108 40 1 1 2 85 3 3 8 40 1 1 2 2750 108 thru 3499 138 40 1 1 2 85 3 3 8 45 1 3 4 3500 138 thru 4499 177 40 1 1 2 85 3 3 8 55 2 1 8 4500 177 thru 5499 216 45 1 3 4 90 3 1 2 65 2 1 2 5500 216 thru 6499 256 45 1 3 4 90 3 1 2 85 3 3 8 6500 256 thru 7999 315 45 1 3 4 90 3 1 2 95 3 1 2 8000 315 thru 9999...

Page 90: ... Place a straight edge across the top of both sheaves See Figure 2 10 3 Measure the span length 4 Using a tension device or spring scale at right angles to the center of the span length apply a force to the device or scale great enough to deflect one of the belts the equivalent of 0 016 times millimeters of span length 0 016 times inches of span length Estimate the average deflection for all belts...

Page 91: ... 5 mm 2 03 with a spring force of 13 6 Kg 30 lbs for a properly tensioned drive Callout Description Callout Description 1 Crusher Sheave 6 Straight Edge 2 Motor Sheave 7 Spring Scale 3 Belt 8 Force Per Table 4 Span Length 9 Deflection 0 4 mm 1 64 for each 25mm 1 of Span Length 5 1 2 Span Length 10 Pull Standard Belt Belt Type Belt Section Minimum Tension Maximum Tension Initial Tension Optibelt or...

Page 92: ...etween the MINIMUM and MAXIMUM TENSION shown in Table 2 6 Retension if necessary 2 8 6 Tensioning Procedure for Standard V belts When a New Countershaft Bushing Has Been Installed and Using the Existing V belts 1 Tension the belts to the MINIMUM TENSION shown in Table 2 6 2 Run the Crusher WITHOUT material for a period of 2 hours See INITIAL START UP AND BREAK IN PROCEDURE in Section 11 3 After th...

Page 93: ...or Sheave 5 Tape Reading 3 Belt 6 Pull Standard and Banded Belts Belt Type Belt Section Crusher Minimum Multiplier Percent Maximum Multiplier Percent Standard Optibelt 8V MP800 0 005 0 5 0 006 0 6 MP1000 0 006 0 6 0 007 0 7 Banded Optibelt 8V MP800 0 006 0 6 0 007 0 7 MP1000 0 007 0 7 0 008 0 8 Gates 8V Tension Deflection Method Recommended Other Brand Belts 8V Consult Metso Minerals Table 2 7 Elo...

Page 94: ...allation or When a New Countershaft Bushing With New V belts Has Been Installed 1 Tension the belts or bands to a value that is obtained by using the MINIMUM MULTIPLIER as shown in Table 2 7 2 Run the Crusher WITHOUT material for a period of 2 hours See INITIAL START UP AND BREAK IN PROCEDURE in Section 11 3 After the 2 hour period retension the belts or bands to the MAXIMUM MULTIPLIER as shown in...

Page 95: ...e belts to fail prematurely 5 DO Make V belt drive general inspections on a periodic basis The following points should be checked at each inspection a Loss of crusher speed check tension b Unequal stretch check for internal breaks c Excessive elongation check for overload d Belt softening or swelling check for oil or grease e Belt hardening and cracking check for excessive heat 6 Values from Table...

Page 96: ... 11 Crusher Sheave Installation V belt Drive To install a crusher sheave with a removable bushing see Figure 2 13 and proceed as follows 1 Refer to the oil piping drawing and install all oil piping 2 Remove the split tapered bushing from the sheave by unscrewing the combination take up and back off capscrews if bushing has not been installed 3 Check that the tapered surface and bore of the bushing...

Page 97: ... holes lined up with the tapped holes in the bushing flange 8 Insert the take up bolts through the bolt holes and alternately tighten each bolt a small amount until all bolts are tightened to a final torque value identified in Table 2 8 based on the size of the sheave bushing Do not lubricate the bolt threads or the tapped holes When the sheave is finally positioned a clearance of approximately 10...

Page 98: ...e grip on the bushing cone Remove the sheave 2 Loosen sheave bushing clamp screws 3 If necessary insert a wedge such as a screwdriver into the split in the bushing flange and remove the bushing Figure 2 13 Sheave Assembly NOTICE Should there be difficulty breaking the fit between the sheave and bushing tap the end of the shaft or bushing with a babbitt hammer while maintaining back off bolt pressu...

Page 99: ...conjunction with our recommended V belt drive Figure 2 14 Recommended Jack Shaft Drive Arrangement 2 14 Direct Drive Flexible Coupling Removal Remove the flexible coupling half from the countershaft as described in the coupling manufacturer s instructions Flexible Coupling Installation See Figure 2 15 For the initial installation or when reassembling the flexible coupling on a direct drive arrange...

Page 100: ... been installed on the countershaft See Figure 2 15 7 Align the coupling as described in INITIAL ALIGNMENT OF FLEXIBLE COUPLING NOTICE Do not heat the coupling hub over 135 C 275 F as the flange or gap portion of the coupling could become damaged from excessive heat A chemical marking device which melts at a predetermined temperature should be used to insure uniform and safe heating WARNING Use he...

Page 101: ...d so that all four measured dimensions DO NOT vary more than 0 38 mm 0 015 If any of the four measured dimensions varies more than the 0 38 mm 0 015 it would indicate excessive angular misalignment 2 Check parallel alignment by laying a straight edge across the outside diameter of the coupling halves at four places 90 apart around the circumference of the coupling See Figure 2 16 Align so that the...

Page 102: ...ht against Coupling Half at This Point 6 Use Key Stock for Checking Gap 1 Hold Straight Edge Tight Against Coupling Half at This Point 2 Check with Feeler Gauge for Proper Parallel Alignment on Other Coupling Half at This Point Check at 90 Intervals 1 0 38 mm 0 015 Maximum Parallel Misalignment Figure 2 16 Coupling alignment CORRECT GAP AND ANGULAR ALIGNMENT CORRECT PARALLEL ALIGNMENT 1 Gap 2 0 38...

Page 103: ...stored to the proper condition before assembly After cleaning lightly oil all bearing surfaces and machined surfaces of mating parts with the exception of the Bowl Adjustment Ring and Clamping Ring threads which should be treated with a special thread lubricant supplied by Metso Minerals before applying the special grease with molybdenum disulfide additive shown in Section 11 Due to the size of th...

Page 104: ...sely affect induction hardened parts Localized heating can also create microscopic stress cracks Propane or acetylene equipment that is specifically designed for heating purposes must be used If flame heating must be used to assemble gearing avoid direct flame contact with the induction hardened areas Warm the bore and faces slowly Let the heat soak to the outside When heating parts for removal ap...

Page 105: ...ter of either spiral bevel gear sets or straight bevel gear sets The tool is designed to fit over the end of the countershaft where it exits the side of the Crusher The fit of the tool on the shaft is very close so the end of the shaft as well as the keyway must be clean and free of burrs It also helps to use some light oil to ease the tool on and off the shaft Figure 2 19 shows that the tool has ...

Page 106: ...3 Metric washers shall be inserted if necessary to avoid incorrect loading 4 Per diagram shown above do not lift at any angle less than 60 5 If threaded portion of eyebolt protrudes past the bottom of the plate add washers under the shoulder of the eyebolt so threads are fully engated Refer to head assembly drawing for the requirement of these items VARIOUS SIZES OF METRIC FLAT WASHERS LINE UP STU...

Page 107: ...d Head assembly with mantle and locking nut without feed plate X X X Head assembly with locking nut without mantle and feed plate X X X Upper head bushing X Lower head bushing X Head ball X Locking nut X Socket liner X Socket X Main shaft X Main frame pin X Main frame pin bushing X Lower thrust bearing X Upper thrust bearing X Clamping ring X Counterweight X Counterweight guard X Eccentric bushing...

Page 108: ...3 Metric washers shall be inserted if necessary to avoid incorrect loading 4 Per diagram shown above do not lift at any angle less than 60 5 If threaded portion of eyebolt protrudes past the bottom of the plate add washers under the shoulder of the eyebolt so threads are fully engated Refer to head assembly drawing for the requirement of these items VARIOUS SIZES OF METRIC FLAT WASHERS LINE UP STU...

Page 109: ...d assembly with locking nut with or without mantle without feed plate X X X Upper Head Bushing X Lower Head Bushing X Head Ball X Locking Nut X Socket Liner X Socket X Main Shaft X Main Frame Pin X Main Frame Pin Bushing X Lower Thrust Bearing X Upper Thrust Bearing X Countershaft X Clamping Ring X Counterweight X Eccentric Bushing X Eccentric without Counterweight X X X Eccentric Assembly X X X G...

Page 110: ...SECTION 2 GENERAL INSTALLATION INFORMATION 2 36 MP SERIES CONE CRUSHER TECHNICAL REFERENCE MANUAL Figure 2 19 Backlash Measuring Tool Tool Number Here Measure Motion Perpendicular to this Surface ...

Page 111: ... outer surface of the main shaft and all exposed surfaces of the pinion with rust preventive oil Remove the countershaft box oil feed hose from the side of the countershaft box Place a funnel in the hole at the countershaft box and pour oil into the countershaft box while rotating the countershaft Approximately 20 liters 5 U S gallons will be required to coat the entire countershaft box area Some ...

Page 112: ...and drain lines The oil adhering to the metal surfaces is all that is needed for proper rust protection 2 21 Storage of a Crusher Where it is necessary that the Crusher be shipped or stored dismantled the various subassemblies must be protected more thoroughly as the procedures described in Protecting the Crusher Against Rust Corrosion earlier in this section are for metal surfaces that are not di...

Page 113: ...flange and gasket on the bottom of the main shaft wipe off any excess oil and coat the exposed surfaces of the main shaft with CRC Industries SP 400 corrosion inhibitor or equivalent Pack waste rags soaked in Mobilarma 522 or equivalent into the open holes of the main shaft If the main frame is to be left outdoors exposed to the elements it is recommended that the main shaft be covered to prevent ...

Page 114: ...assembly with CRC Industries SP 400 corrosion inhibitor or equivalent Replace the mounting bracket and place the assembly in a crate on its side with the accumulator facing up Store the crate indoors 5 Eccentric Assembly Remove the counterweight and gear from the eccentric assembly Coat all surfaces with CRC Industries SP 400 corrosion inhibitor or equivalent Because these parts are in the normal ...

Page 115: ... 5 2 kg 4 4 lbs packages of desiccant inside the lube oil tank on top of the screen basket 11 Package Air Cooler Systems Plug all 1 2 pipe ports with metal pipe plugs Replace the 2 bottom and 1 top 3 inch lines with SAE 150 blind flanges with gaskets Replace the other top 3 inch line with an SAE 150 blind flange and gasket with 1 female NPT threads in the center of the blind flange Install 1 close...

Page 116: ...he protective coatings and any area that has had the coating rubbed off must be recoated with 4 mils 0 10 mm 0 004 inches 2 coats of CRC Industries SP 400 corrosion inhibitor or equivalent All components are to be stored indoors except for the main frame adjustment ring head assembly and bowl and hopper assembly The components to be stored outdoors must first have any plastic wrap removed the corr...

Page 117: ...eneral Information 3 9 3 4 2 Main Frame Seat Liner Wear 3 11 3 4 3 Main Frame Seat and Fulcrum Bar Installation 3 14 3 4 4 Tramp Release Cylinder and Accumulator Removal 3 17 3 4 5 Tramp Release Cylinder and Accumulator Installation 3 19 3 4 6 Clearing Jack Removal 3 21 3 4 7 Clearing Jack Installation 3 22 3 4 8 Accumulator Replacement 3 22 3 4 9 Accumulator Bladder Replacement 3 25 3 4 10 Main F...

Page 118: ...g Tramp Release and Clearing Jack Assemblies Callout Description Callout Description 1 Clamping ring 5 Main frame 2 Adjustment ring 6 U seal 3 Main shaft 7 Lower thrust bearing 4 Mainframe liner 8 Main frame pin 1 2 8 5 4 6 7 3 ...

Page 119: ...iginal position A thrust bearing is bolted to the main frame around the base of the main shaft It supports the weight of the eccentric assembly Two RTDs are field installed to monitor the temperature of the oil exiting the lower end of the eccentric bushing These RTDs are located just inside the inner diameter of the lower thrust bearing Shims inserted under the thrust bearing determine gear and p...

Page 120: ...tioned under the frame machined pads tack weld the shims and spacers to the steel structure so they cannot vibrate out 7 Tighten the Crusher firmly to the structure The anchor bolts used should be sufficient length to pass through the full depth of the support beams 18 free length or greater 8 After tightening the Crusher firmly to the structure recheck if the Crusher is level 9 The anchor bolts s...

Page 121: ...l the arm guard A replacement main frame liner will be shipped in sections These sections are hung on blocks on the inside of the main frame shell A bolt through the liner clamp holds the liner in place 3 Figure 3 1 Eccentric Bushing RTD Installation Callout Description Callout Description 1 Main shaft 4 Main frame 2 Lower thrust bearing 5 RTD cable 3 RTD Sensor 6 Drain line WARNING Do not weld li...

Page 122: ...ing and equipment 3 3 3 Lower Thrust Bearing and Shim Replacement To replace a damaged or worn lower thrust bearing or to add shims to restore proper gear and pinion backlash and or root clearance proceed as follows and refer to Figure 3 3 1 To gain access to the thrust bearing it will first be necessary to remove the Bowl Head Socket and Eccentric Assemblies Refer to the appropriate sections that...

Page 123: ...tional shims to be added are placed on the top of the existing shim stack If a new thrust bearing is to be installed remove the ring bolts from the old bearing and install them in the new bearing Lower the thrust bearing in place making sure that all holes are properly aligned with the holes in the main frame hub Make sure bearing is fully and squarely seated on the shims 7 MP800 and MP1000 models...

Page 124: ...e in the frame this release agent must be completely removed 4 Before gluing the segments into the frame first place three of the segments in the groove as the fourth segment will have to be trimmed on one end to fit into the remaining space Make sure the end of the segment is cut square to the end of the adjacent segment to insure a strong bond when gluing the segments into the frame Figure 3 5 I...

Page 125: ...ll electrical power supplied to the power unit and Crusher and depressurize the clamping and tramp release circuits by opening the clamping cylinder and tramp release cylinder needle valves located on the side of the hydraulic power unit at the hose connection area 2 Remove the pin covers to inspect the pin bushings for wear If the pin bushings show excessive wear continue with the replacement pro...

Page 126: ...from the underside of each main frame pin to be replaced 3 Force the worn pin out through the top of the main frame using a hydraulic jack centered under the pin Heating of the frame boss may be required If the pin can not be removed by this method then cut out the center of the pin with a lance then retry step 3 4 Heat the pin boss on the frame to ease installation Drive the new pin in the main f...

Page 127: ...bbing action between the adjustment ring and main frame seat liner there is a certain amount of wear Should there be an excessive amount of adjustment ring movement this wear could be increased Refer to Figure 3 8 The fulcrum bar is very important as it permits the adjustment ring to tilt and recenter properly when the ring raises due to a piece of tramp iron passing through the crushing cavity Ca...

Page 128: ...NCE MANUAL Figure 3 7 Lifting Adjustment Ring Figure 3 8 Main Frame Seat Liner and Fulcrum Bar Callout Description 1 Install Shackles and attach lifting slings four places Callout Description 1 Adjustment ring 2 Main frame fulcrum bar 3 Bronze main frame seat liner 4 Main frame MP1000 MP800 1 2 3 4 ...

Page 129: ...aring the two sets of dimensions will show at a glance how much wear has taken place and if the wear is even all the way around the Crusher Due to casting and machining variations this is the only accurate method in which wear can be determined 4 When any one of the four check dimensions measures more than the initial recorded dimensions by the amount shown on Table 3 1 the seat liner and fulcrum ...

Page 130: ...he way around the Crusher Due to casting and machining variations this is the only accurate method in which wear can be determined 4 When any one of the four check dimensions measures less than the initial recorded dimensions by the amount shown in Table 3 1 the seat liner and fulcrum bars need replacing This much vertical wear means that only 5 mm 0 19 of material is left on the seat liner The 8 ...

Page 131: ...3 13 Figure 3 10 Determining Seating Surface Wear MP800 Callout Description Callout Description 1 Main frame fulcrum bar 4 Measure wear here 2 Adjustment ring 5 Release cylinder 3 2 mm 0 080 to 5 mm 0 196 gap required after new main frame fulcrum bars and seat liner are installed 6 Main frame 1 2 3 5 4 6 ...

Page 132: ...seat liner fulcrum bar replacement and possible adjustment ring rework is as follows MP1000 For the following procedure refer to Figure 3 11 1 Remove worn bronze main frame seat liner and fulcrum bar 2 The replacement main frame seat liner and fulcrum bar will be shipped in segments 3 Position the seat liner at the dimension shown and weld using 4 mm 0 16 weld rod which meets AWS E Cu AL A2 or R C...

Page 133: ...segments 2 The replacement main frame seat liner and fulcrum bar will be shipped in segments 3 Position the seat liner at the dimension shown and weld using 4 mm 0 16 weld rod which meets AWS E Cu AL A2 or R Cu AL A2 specification Do not butt vertical joints 4 When using these 4 mm 0 16 weld rods reverse polarity and use between 130 to 190 amps The main frame seat and seat liner must be preheated ...

Page 134: ... the clay ball thicknesses are more than 5 mm 0 196 the maximum distance shown in Figure 3 10 then the adjustment ring fulcrum surface is to be built up with weld and machined to obtain at least the maximum clearance If weld build up is required then contact Metso Minerals for weld and machining procedures Figure 3 13 MP800 Main Frame Seat Liner and Fulcrum Bar Callout Description 1 4 Segments 2 B...

Page 135: ...these holes in the drive ring contact Metso Product Support Department for instructions on how and where to add the holes Example MP800 2 0 mm 0 080 Minimum clearance required between new main frame fulcrum bars and adjustment ring fulcrum surface from Figure 3 10 1 0 mm 0 040 Thickness of clay balls 1 0 mm 0 040 The amount of material to be machined off the adjustment ring fulcrum surface to obta...

Page 136: ...ircuit and PI 2 for the tramp release circuit read zero pressure 3 Disconnect the release circuit hoses on both sides of the tramp release cylinder If the release cylinder to be removed has the hose from the power unit connected to it remove the hose from the elbow on front of the cylinder as well Refer to Figure 3 15 Cap or plug open ports and hose ends to prevent loss of oil and entry of dirt Fi...

Page 137: ... the tramp release cylinder and accumulator as an assembly Install a new or repaired cylinder as follows 1 Index the drive ring so that one of the two 50 mm 1 97 diameter holes in the drive ring is above and directly in line with the mounting location of the tramp release cylinder that is being installed On more recent Crushers these holes have been provided in the drive ring for handling the tram...

Page 138: ... end until it bottoms out on the bearing cone 9 Lower the tramp release cylinder until the bearing cone seats in the bearing cup and the lifting sling slackens Disconnect the lifting sling and unscrew the eyebolt from the end of the cylinder rod Plug the threaded hole at the end of the cylinder rod with an M20 bolt or with grease to protect the threads and keep the hole from filling up with dirt 1...

Page 139: ...er Plug and cap open ports to prevent loss of oil and prevent the entry of dirt 3 Attach a sling around the cylinder and attach the free end of the sling to a suitable lifting device Take up the slack in the sling 4 Attach a pipe strap wrench around the cylinder head of the clearing jack and turn the jack in a counterclockwise direction as seen from below the cylinder and as shown in Figure 3 16 5...

Page 140: ... properly Oil which is normally displaced from the tramp release cylinder into the accumulators when uncrushable material or overloads are encountered cannot compress the nitrogen gas within the accumulator bladders thereby creating excessive forces within the crusher s components The accumulator gas pressure should be checked every 200 hours 1 month If the accumulator gas pressure is not at its n...

Page 141: ...that the bladder has ruptured and all nitrogen gas has escaped it is still recommended to go through the procedure of releasing any residual pressure left in the accumulator 4 Remove the valve guard from the bottom of the accumulator and then the valve cap from the gas valve stem as shown in Figure 3 17 Figure 3 17 Depressurizing the Accumulator Bladder 5 Obtain the charging and gauging assembly f...

Page 142: ...n the bottom of the accumulator 10 Due to the physical size and weight of the accumulator it is necessary to remove the tramp release cylinder and accumulator as an assembly Refer to Tramp Release Cylinder and Accumulator Removal earlier in this section 11 After removing the tramp release cylinder and accumulator lay the assembly in a horizontal position on a flat surface 12 Remove the hex nuts lo...

Page 143: ...inside the pinion well toward the outside 3 Clean frame bore inspect and measure diameters Convey this information to Metso Product Support Department for possible rework requirements 4 Clean the new frame ring O D with Loctite Safety Solvent 75559 alcohol or acetone 5 Cool ring to at least the temperature difference between ring and frame defined in Figure 3 19 6 Install ring into frame Allow tem...

Page 144: ...direction so the main frame pin bushings in the adjustment ring touch the main frame pins as shown in Figure 3 21 Then lower the ring in this position and allow it to seat on the frame Figure 3 19 Temperature Differences Required to Install Frame Ring Figure 3 20 Adjustment Ring Assembly MP800 MP1000 56 C 101 F 50 C 90 F Callout Description Callout Description 1 Adjustment cap seal 5 Clamping cyli...

Page 145: ...s 2 When ring bounce is detected select the highest analog value and use that as your alarm setpoint Calculate a value that is 10 less than the alarm setpoint to establish the warning setpoint 3 Next program the control to take the following corrective actions based on the four analog signals a Instantaneously indicate which of the four sensor signals reach the established warning set point This s...

Page 146: ...move the bowl assembly as instructed in Section 8 2 If the clamping ring is to be removed from the adjustment ring then first remove the dust shell from the adjustment ring by removing the series of capscrews and lockwashers installed around its lower flange and then lift the shell off the ring If the clamping ring is not to be removed from the adjustment ring then proceed to step 6 3 Remove the h...

Page 147: ... shell and the parts are held together by capscrews and hex nuts shown in Figure 3 20 7 If the adjustment ring is to be taken off the frame all the tramp release cylinders have to be removed from the Crusher as described under Tramp Release Cylinder and Accumulator Removal in this section Also disconnect the following hoses plug or cap all open ports MP1000 a The clamping cylinder supply hose at t...

Page 148: ...lbow from the top of the cylinder Refer to Figure 3 24 4 Put blocking between the floor and the clamping cylinder that is being removed The blocking is required so the cylinder will not fall out of the clamp ring as the cylinder is free to slide out of the ring when the bolts are removed in step 5 Figure 3 24 Clamping Cylinder Removal Figure 3 25 Clamping Cylinder Callout Description 1 Tee 2 Hose ...

Page 149: ...he fitting connections 4 To mount the clamping ring onto the adjustment ring follow the procedure under Adjustment Ring Assembly in this section 3 4 16 Adjustment Ring Assembly After inspection repairs or replacement of parts the adjustment ring is placed back on the main frame and the associated parts are assembled as follows 1 If the adjustment ring was removed liberally coat the adjustment ring...

Page 150: ...d six on the MP800 Refer to Figure 3 23 7 Connect the elbow to the hose that runs from the top of the adjustment ring and up through the clamp ring Then connect the hose between the first cylinder and elbow 8 Reassemble the dust shell to the adjustment ring by aligning the matching holes and installing the lockwashers and attaching capscrews ...

Page 151: ...ER TECHNICAL REFERENCE MANUAL 3 33 Figure 3 26 Clamping Cylinder Hose Connections Callout Description Callout Description 1 Centerline of countershaft 4 Hose 2 Ø 50 mm 2 hole in clamp ring 5 Adjustment ring 3 Clamping cylinders 6 Hose guard MP800 MP1000 1 4 3 2 5 1 4 3 2 5 6 ...

Page 152: ...SECTION 3 M FRAME ADJ RING TRAMP REL CLRNG JACK ASSY 3 34 MP SERIES CONE CRUSHER TECHNICAL REFERENCE MANUAL This Page Left Intentionally Blank ...

Page 153: ...e Removal 4 8 4 2 4 Flexible Coupling Removal 4 8 4 3 Maintenance 4 8 4 3 1 Countershaft Box Disassembly 4 8 4 3 2 Pinion Replacement 4 10 4 3 3 Countershaft Bushing Removal 4 11 4 3 4 Inspection Prior to Bushing Installation 4 13 4 3 5 Countershaft Bushing Installation 4 14 4 3 6 Countershaft Box Assembly 4 15 4 3 7 Oil Leakage from Drive End of Countershaft Box 4 18 4 3 8 Oil Leakage from Pinion...

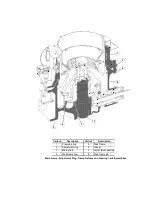
Page 154: ...Countershaft and Countershaft Box Callout Description 1 Countershaft 2 Countershaft box 1 2 ...

Page 155: ...flinger cover are shipped fully assembled to make up the countershaft box assembly Also mounted on the sheave end of the countershaft is either the tapered sheave bushing or a safety set collar for these Crushers that are direct drive driven Even though the end float was factory set sometimes during shipping the end float is lost Therefore the end float is to be checked before the countershaft box...

Page 156: ...ke wear ring that is to be installed in a groove on the countershaft box The wear ring eliminates fretting that can occur between the countershaft box and main frame This wear ring is split Place the wear ring in the groove in the pinion end of the countershaft box and hold the ring in position by gluing each end of split to countershaft box Using Eastman 910 adhesive or equivalent There may be a ...

Page 157: ...ntershaft box assembly and carefully insert it into the frame as far as possible Then lower the box and allow the countershaft box pinion end flange to rest on the frame 5 Remove the sling from the pinion end of the box Then lower the sling just removed through the inside of the frame to raise the pinion end of the box 6 Slide the box toward the inner frame fit as far as possible keeping the box c...

Page 158: ...tershaft Countershaft Box and Sheave Assembly MP1000 Callout Description Callout Description 1 Pinion 8 Countershaft 2 Wear ring 9 Countershaft box 3 O ring 10 Oil flinger 4 Box guards 11 Flinger housing 5 Box shield 12 Rectangular seal 6 Bushing 13 Countershaft bushing RTD 7 Sheave assembly 1 3 2 12 4 5 6 13 7 11 10 9 8 6 ...

Page 159: ... Callout Description 1 Main frame 6 Frame ring 2 Coat this surface with a thin film of grease 7 Rectangular seal 3 O ring 8 Coat this surface with Silastic before mounting seal onto countershaft box 4 Countershaft box 9 Coat this surface of seal with Silastic just prior to installing box into frame 5 Wear strip MP800 MP1000 9 5 mm 1 6 4 2 3 1 6 4 3 2 9 8 7 5 5 ...

Page 160: ... small amount to prevent binding until there is a 50 mm 2 0 gap between box flange and main frame as shown in View 2 of Figure 4 7 10 Remove the two pull in capscrews and place spacers or a stack of washers 50 mm 2 0 thick onto the capscrews Reinstall them into the frame Again alternately tighten each bolt until a 20 mm 0 75 space between the countershaft box flange and main frame is obtained as s...

Page 161: ... Check that the tapered surface and bore of the bushing the tapered bore of the sheave and the countershaft are clean and free of burrs scratches and all foreign matter such as paint dirt and lubricants 4 Gently tap the sheave key into the countershaft keyway with a light hammer if key and bushing has not been installed 5 Loosen the clamp screw and slide the bushing onto the countershaft aligning ...

Page 162: ...Using the two capscrews as back off bolts exert pressure by tightening them against the flange of the bushing breaking the sheave grip on the bushing cone Remove the sheave 2 Loosen sheave bushing clamp screw 3 If necessary insert a wedge such as a screwdriver into the split in the bushing flange and slide the bushing off the countershaft 4 2 4 Flexible Coupling Removal Remove the flexible couplin...

Page 163: ...igure 4 9 Then pull up on the sling to obtain a slight tension This sling is required so the box will not drop when the outer countershaft box turn is pulled out of the frame 8 Install the special jacking screws that are furnished with the machine into the three equally spaced tapped holes in the outer flange of the box 9 Alternately tighten each jackscrew a small amount to prevent binding in the ...

Page 164: ...e to tooth breakage Also running on a worn pinion could lead to structural damage in other parts due to vibration Excessively worn pinions should be replaced To get maximum benefit from new parts it is recommended that gear and pinion be replaced at the same time If a new pinion is run with a worn gear the root clearance must be checked as instructed under Checking or Adjusting Backlash and Root C...

Page 165: ...e the countershaft bushings that have such a press fit or those that have seized in the box because of a build up of heat due to inadequate lubrication or from overloading the Crusher proceed as follows 1 Remove the countershaft box from the main frame and the countershaft from the countershaft box as described under Countershaft Box Disassembly Callout Description 1 Countershaft 2 Pinion 3 Wood b...

Page 166: ...he bushing remain tight within the countershaft box the following alternate method utilizing a jacking procedure is suggested to remove bushings Refer to Figure 4 14 and proceed as follows 7 Using the same centering device as previously described and in the same manner except for a much longer rod and steel bar place wooden blocking between the steel bar and the countershaft box flange 8 Using the...

Page 167: ... be remachined to meet these limits An excessive interference fit can cause the bushing to collapse or the bushing bore to become smaller thereby reducing the clearance between countershaft and bushing If the bore is found to be smaller than when originally machined this bore shrinkage can usually be attributed to extreme heat Check the shaft itself for straightness or run out With the shaft betwe...

Page 168: ... as described in step 2 and proceed as follows 1 Both countershaft bushings inner and outer are identical However their position in the bore may differ Determine the proper location of the bushing oil groove in relation to the countershaft box as follows Bushing Sheave End When standing looking at the crusher sheave end of the box the countershaft box bushing that is to be assembled to the sheave ...

Page 169: ...t the pinion is clamped to the countershaft box flange as shown in Figure 4 15 An alternate method for holding the countershaft would be to place the pinion against a firm bearing wall or similar support Figure 4 15 Holding the Countershaft Assembly 4 The oil flinger is equipped with a piston ring to provide an oil seal between the flinger and the flinger housing Check that the piston ring can be ...

Page 170: ...e flinger is properly installed when it is tight against the face of the outer countershaft bushing 6 MP1000 Apply a light coat of grease to one side of the flinger housing gasket Stick the greased side of the gasket against the countershaft box aligning the holes in the gasket with the tapped holes in the box MP800 Using a sealant Silastic RTV732 as a gasket apply it to the face of the countersha...

Page 171: ...t Description 1 Countershaft box bushing 4 Flinger key 2 Countershaft box 5 Countershaft 3 Oil flinger 6 Piston ring Callout Description Callout Description 1 Countershaft 6 0 8 mm 0 030 to 1 5 mm 0 060 end float 2 Outer countershaft bushing 7 Countershaft box 3 Oil flinger 8 Inner countershaft bushing 4 Piston ring 9 Tight 5 Sheave bushing 10 Pinion 3 3 4 5 2 3 1 6 1 2 3 4 5 9 7 8 10 6 ...

Page 172: ...worn replace the frame ring as outlined under Main Frame Ring Replacement in Section 3 3 Remove the front O ring wear ring and rectangular seal from the countershaft box Remove all the Silastic that was used to hold the rectangular seal in place Any Silastic in the main frame bore should be removed also 4 Inspect the countershaft box surfaces on both sides of the wear ring groove If the wear ring ...

Page 173: ...ountershaft Box Seals Callout Description Callout Description 1 O ring 7 Countershaft box 2 Wear ring 8 No space on worn area 3 Main frame 9 Worn wear ring 4 Frame ring 10 New wear ring 5 Rectangular seal 11 Excessively worn wear ring 6 Clearance MP1000 MP800 4 10 11 11 10 3 7 3 7 5 5 4 4 6 6 6 6 4 8 8 8 8 1 2 2 1 1 9 9 1 ...

Page 174: ...SECTION 4 COUNTERSHAFT CTRSHAFT BOX SHEAVE ASSEMBLIES 4 20 MP SERIES CONE CRUSHER TECHNICAL REFERENCE MANUAL This Page Left Intentionally Blank ...

Page 175: ...g Replacement 5 8 5 3 5 Seal Replacement 5 10 5 3 6 Eccentric Bushing 5 11 5 3 7 Eccentric Bushing Removal 5 12 5 3 8 Inspection of Eccentric Bore 5 12 5 3 9 Inspection of Mainshaft 5 14 5 3 10 Installing the Eccentric Bushing 5 14 5 3 11 Repouring Bushing Lock 5 15 5 3 12 Adjusting Gear Backlash for Wear 5 16 5 3 13 Replacing Gear 5 16 5 3 14 Counterweight and Gear Removal 5 16 5 3 15 Gear and Co...

Page 176: ...Eccentric and Counterweight Assemblies Callout Description 1 Eccentric 2 Counterweight 3 Upper thrust bearing 4 Eccentric bushing 5 Gear 6 T U seals 7 Counterweight guard 2 3 4 5 6 7 1 ...

Page 177: ... by a set of thrust bearings the upper thrust bearing is bolted to the bottom of the eccentric and the stationary lower thrust bearing is bolted to the main frame Backlash and root clearance between gear and pinion teeth are maintained in this assembly by the addition or subtraction of shims inserted beneath the lower thrust bearing The counterweight installed on the eccentric has a light and heav...

Page 178: ...c Install two ring bolts also furnished with the special tools into the lifting ring Refer to Figure 5 3 for correct lifting of eccentric assembly Apply a light coat of oil to the main shaft eccentric bushing and both thrust bearings 6 Connect a suitable lifting device to the ring bolts and carefully lower the eccentric assembly over the main shaft The beveled edge of the eccentric bushing will he...

Page 179: ...rinding any ridge that may have formed to provide clearance for the tip of the teeth to pass To check or adjust backlash or root clearance proceed as follows 5 2 2 1 For Spiral Bevel Gear Sets Because of the spiral cut on the gear teeth it is not possible to measure the backlash at the center of the tooth face with feeler gauges The only acceptable way to measure the backlash on spiral bevel gear ...

Page 180: ...gh to measure the clearance at the center of the gear and pinion tooth face Note that a feeler gauge of at least 6 inches 152 4 mm in length will be required to reach the center of the tooth Refer to Tables 5 3A MP800 and 5 2C MP1000 for the acceptable level of backlash and minimum root clearance 3 Then measure and note the root clearance 4 If the backlash and or root clearance is found to be less...

Reviews: