25
CHAPTER 7
M’elodie loudspeakers feature Meyer Sound’s
QuickFly rigging system with rugged, reliable and
simple components. QuickFly facilitates deploying the
loudspeakers in a variety of applications. M’elodie is
designed to be rigged using professional components,
and its custom front and rear GuideALinks rigidly couple
the individual M’elodie enclosures for flying, stacking,
or transporting in stacks while still in various splayed
positions. The rigid connections created by the QuickFly
rigging hardware allow easy adjustment of the array
tilt, eliminating the need for pull-back straps in flown
configurations.
This chapter gives an overview of rigging and accessories.
For complete information on load ratings and how to set up
and use the rigging accessories, refer to the MG-M’elodie
Assembly Guide at www.meyersound.com.
CAUTION:
All Meyer Sound products
must be used in accordance with local,
state, federal and industry regulations. It is the
owner’s and/or user’s responsibility to evaluate the
reliability of any rigging method for their application.
Rigging should be carried out only by experienced
professionals.
CAUTION:
Always use properly rated rigging
hardware.
CAUTION:
It is important to inspect rigging
hardware regularly and replace worn or
damaged components immediately.
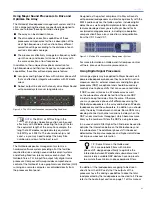
M’ELODIE GUIDEALINKS
The M’elodie loudspeaker’s captive QuickFly rigging
hardware features rigid GuideALinks contained within
recessed guides in the bottom front and rear corners of the
enclosure. A slot and convenient pinned knob allow each
link to be moved and pinned using quick release pins, for
arraying and storage. In use, the front links are used as the
pivot point, and the splay between enclosures is introduced
with the rear links.
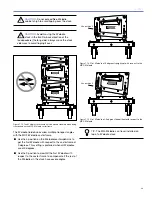
Figure 7.1 M’elodie front and rear GuideALinks
CAUTION:
Always use M’elodie quick
release pins (5/16" x 0.63")to secure each
GuideALink. The knobs are for moving the links up
and down and avoid rotation of the links.
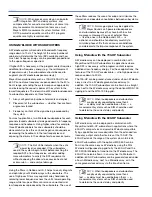
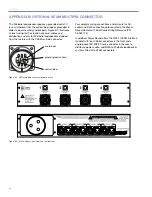
Front GuideALinks
In use, the front links are used as the pivot point, and the
splay between enclosures is introduced with the rear links.
To stow the front link, the knob is moved all the way up in
the slot.
Figure 7.2.
M’elodie front GuideALinks
CHAPTER 7: QUICKFLY RIGGING
Summary of Contents for M'elodie
Page 8: ...2 INTRODUCTION ...
Page 20: ...14 CHAPTER 3 ...
Page 42: ...36 APPENDIX C ...
Page 43: ......

