background image

67

DESINFECTION

For  desinfection  you  should  use

agents on a water basis such as Terra-

lin, Quartamon Med or Sagrotan Orig-

inal Concentrate.

+

In doing so the manufacturers in-

structions are to be observed.

+

Note:

Before desinfection the upholstery

and handles are to be cleaned.

REINSTALLMENT

Before reimplementation the wheel-

chair is to undergo a complete inspec-

tion according to the service manual.

+

Note:

The measures required for reimple-

mentation are to be carried out in

correspondence with the validat-

ed hygienic plan.

REPAIRS

You  can  trustingly  contact  your  au-

thorised workshop for any necessary

maintenance. Personnel there are well

trained to carry out the work required.

CUSTOMER SERVICE

In case you have any questions or need

help  please  contact  your  specialist

dealer who can assume counselling,

service and repairs.

DISPOSAL

The vehicle packing material can be

disposed of as recyclable material.
The metal parts can be disposed of as

recyclable scrap metal.
The plastic parts can be disposed of

as recyclable plastic.
Electrical  parts  and  printed  circuit

boards can be disposed of as electri-

cal scrap.
The disposal must occur in accordance

with the respective national regula-

tions.
Please  enquire  about  local  disposal

arrangements at your municipal au-

thority.

Summary of Contents for 1.594

Page 1: ...1 ELECTRIC WHEELCHAIR CHAMP MODEL 1 594 CHAMP LIFT MODEL 1 594 27 CHAMPI MODEL 1 594 603 OPERATING MANUAL The Motivation GB...

Page 2: ...irs more than 6 km h 10 CE regulations 11 Driving 12 Safety informations 12 First driving exercises 13 Driving in street traffic 13 Functional checks 13 Braking the wheelchair 13 Emergency off 14 Brak...

Page 3: ...module 28 Mounting the arm supports 29 Fitting of the operating module 29 Height adjustment of the arm supports 29 Seat 30 Removing the seat cushion 30 Placing the seat cushion 31 Adjustment of seat w...

Page 4: ...45 Height adjustment of the headrest 45 Positioning the headrest 45 Seat height adjustment 46 Safety informations 47 Operation 47 User instructions before seat height adjustment 48 User instructions a...

Page 5: ...nfection 67 Reinstallment 67 Repairs 67 Customer Service 67 Disposal 67 Spare parts 68 Batteries 69 Battery instructions for storage 69 Battery instruction during extended pauses of use 69 Maintenance...

Page 6: ...g module brochures together with a parent or supervising accompa nying person before their first drive and thereafter observe the contents ACCEPTANCE All MEYRA products are checked for faultsinthefact...

Page 7: ...fthe Safe ty information brochure You can drive over obstacles of up to 50 mm in height depending on the adjustmentofthelegsupportlength Note Please observe the Technicaldata SAFETY INFORMATIONS Clean...

Page 8: ...Drive 10 Drive wheel 11 Brake release lever 12 Adjustment screw back support 13 Operating module 14 Support wheel 15 Direction indicator light rear light OVERVIEW CHAMP MODEL 1 594 MODEL 1 594 27 The...

Page 9: ...9 Drive 10 Drive wheel 11 Brake release lever 12 Operating module 13 4 way seatbelt 14 Seat lock 15 Direction indicator light rear light OVERVIEW CHAMPI MODEL 1 594 603 The model shown in fig 1a and 2...

Page 10: ...6 km h but is nevertheless recom mendable Electronicvehiclessuchasscooters electronic wheelchairs auxiliary drives electro mobilesthatachieve amaximumspeedofnomorethan 6 km h are included in the priv...

Page 11: ...uipment with a high danger potential and or life sup porting function or in the proxim ity of diagnostic equipment Contact your insurance office first There you will receive an insurance li cence plat...

Page 12: ...cessories components alters the driving behaviour DRIVING Drive especially carefully during your first journey Bearing this in mind set the pre se lectable final speed to the lowest set ting Caution...

Page 13: ...s on the wheelchair push the brake release lever to the drive position and switch off the operating module Accident risk resulting from in advertentmovementofthewheel chair FIRST DRIVING EXERCISES A l...

Page 14: ...side of the wheelchair Also observe the signs affixed to the left and right of the brake release le ver Caution Danger of crushing between the drive wheel and frame The safety magnetic brakes are im...

Page 15: ...s an uneven or impaired braking effect take it immediately to your specialist workshop for repair Releasing the brake Pull the knob on the brake release le ver and pull the brake release lever back as...

Page 16: ...type fuse The blade type main power fuse is lo catedinthefuseholderundertheseat A fig 5 in the battery case POSITION OF THE OPERAT ING MODULE The operating module should be po sitioned in such a way t...

Page 17: ...ff and the brake release lever has been placed into the for ward position Inadvertently knocking the con trol lever will set the wheelchair in motion without control Danger of accidents Only actuate t...

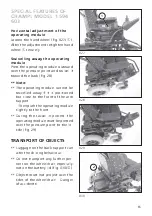
Page 18: ...he arm supports Folding up the footplates Benefits Easy transfer into and out of the wheelchair Leg region free no stumbling Handling Switch off the wheelchair and movethebrakereleaselevertothe drive...

Page 19: ...ts the wheelchair from rolling away accidentally Remove lower leg strap if present Remove both feet from the foot plates Fold up footplates fig 9 Pullorpressthelockingleverback ward A fig 10 Leg suppo...

Page 20: ...This prevents the wheelchair from rolling away accidentally Remove lower leg strap if present Remove both feet from the foot plates Fold up footplates fig 9 Pullorpressthelockingleverback ward A fig...

Page 21: ...hexagonal stud wrench width 4 mm Switch off the wheelchair and movethebrakereleaselevertothe drive position This prevents the wheelchair from rolling away accidentally Removetheclampingscrew A fig 14...

Page 22: ...chair raise or lower the leg support fig 14 2 to the desired height via the operatingmodule Selectthecor responding function by pressing the MODE key Caution Observethecontentsofthe Safe ty informatio...

Page 23: ...stud wrench width 4 mm Switch off the wheelchair and movethebrakereleaselevertothe drive position This prevents the wheelchair from rolling away accidentally Loosen the respective clamping screw A fi...

Page 24: ...nts the wheelchair from rolling away accidentally Remove both feet from the foot plates Fold up footplates Pullorpressthelockingleverback ward B fig 14 4 Leg supports have now been released Turnlegsup...

Page 25: ...ion This prevents the wheelchair from rolling away accidentally Assembly of the electric leg support is done in reverse order to the removal of the electric leg supports Caution Afterreplacingthelegsu...

Page 26: ...ts Adjusting screws prevent the arm supportsfrominadvertentlysliding out Mudguard Wind protection Lateral support for body Relaxation of the shoulder muscles due to padded height adjustable arm suppor...

Page 27: ...m support in an up wards direction fig 15 This is carried out by loosening the rele vant adjusting screw A fig 16 on the clamping guide Note Thecablemustbewithdrawncare fully in the case of an arm sup...

Page 28: ...remove the operating module loosen the clamping screw B fig 16 1 and pull the operating mod ule out to the front For safe transport of the operat ing module it can be inserted into the holder of the...

Page 29: ...nsert the operating module from the front into the holder Adjust the operating module to the desired position and tighten clamping screw B fig 17 1 HEIGHT ADJUSTMENT OF THE ARM SUPPORTS Switch off the...

Page 30: ...hair Move the brake release lever into the drive position This prevents the wheelchair from rolling away accidentally Note Remove the leg supports if neces sary To lift the seat cushion grab under nea...

Page 31: ...drive position This pre vents the wheelchair from rolling away accidentally Place the seat cushion onto the guide rails A fig 21 and push it back fig 22 Caution When swivelling down the seat cushion...

Page 32: ...ion This prevents the wheelchair from rolling away accidentally Push the arm support outwards inwards Loosen the clamping screw A fig 24 of the clamp guide Caution Only move the arm support out wards...

Page 33: ...shionobserve the chapter Removing the seat cushion Loosen screwed connections A fig 24 1 on both sides Adjust the back support equally to the desired depth Retighten the screws A fig 24 1 on both side...

Page 34: ...h one hand to prevent it from falling down Danger of crushing To adjust the seat turn the clamp ing screw B fig 26 out as far as possible Adjust the framework to the de siredpositionandscrewtheclamp i...

Page 35: ...tronic wheelchairs Adjusting the seat angle via the CAN bus operating module Swivelling the edge of the seat up positive seat inclination Press the plus key or steer the joystick to the right or activ...

Page 36: ...eg supports must lie on the driving surface fig 27 2 Switch off the operating module before transfer out of into the wheelchair Danger of accidents byaccidentallymovingthejoystick With activated risin...

Page 37: ...ally Screw out the securing screws un til the back support is released A fig 28 Remove the back support in an upward direction fig 29 FITTING THE BACK SUP PORT Switch off the wheelchair Move the brake...

Page 38: ...fig 31 Manual back support adjust ment Option The continuous angle adjustment of the back support is achieved through two pneumatic springs Switch off the wheelchair Move the brake release lever into...

Page 39: ...sing the MODE key Caution Observethecontentsofthe Safe ty information brochure An inclination of the back support causes a change in the driving be haviour but does not result in a speed reduction Dan...

Page 40: ...he brake release lever on the side of the wheelchair is used to switch the electromagnetic brake from drive mode to push mode Controlled braking is not possible PUSH MODE Switch off the wheelchair bef...

Page 41: ...events user from falling forward out of the wheelchair depending on degree of disability Continuous adjustment to suit the user s needs Attention The retaining strap is not part of theretainingsystemf...

Page 42: ...painful pressure points Opening the seatbelt To open the seatbelt press the red unlocking button inside the buck le fig 34 1 Adjustment of belt length Note The lap seatbelt should not be too tight Dep...

Page 43: ...ndant con trol fig 35 2 is swivel proof height adjustable and removable Attention Observe the changed wheelchair dimensions especially while turn ing or driving backwards Adjusting the position of the...

Page 44: ...s prevents the wheelchair from rolling away accidentally Adjusting the angle Loosen the clamping screws fig 35 3 Turn the operating module to the desired angle Tightentheadjustingscrewsagain Horizonta...

Page 45: ...witch off the wheelchair and movethebrakereleaselevertothe drive position This prevents the wheelchair from rolling away accidentally Note Retighten the clamping screws af ter the adjustment Height ad...

Page 46: ...27 The seat height adjustment fig 36 1 raises the seat height continuously up to 30 cm Note The seat height adjustment is not designed for short subsequent lift ing motions Only conduct re quired lift...

Page 47: ...eonslopesorinclinations as well as obstacles in the lowest seat height adjustment Danger of overturning sWith activated seat height adjust ment only conduct minor straight forward rolling motions on l...

Page 48: ...may only be used with fastened safety belt sFor a seat height adjustment suffi cient free space must be available above the wheelchair Danger of accidents e g through door frames lamps fig 36 3 sThe f...

Page 49: ...ur as well as the driving speed is automatically re duced for safety reasons sRaised seat height adjustment re adjusted seat inclinations and leg supportsthatareswivelledupward the turning radius of t...

Page 50: ...d before lifting Danger of squash ing hands inserted into spokes Transport in vehicles The following items may be necessary due to lack of space for the transport in vehicles fig 37 1 Taking off the l...

Page 51: ...elchair by way of elasticated straps Push the brake release lever for ward as far as it will go Only fasten the elasticated belts to parts of the car envisaged for this pur pose and to the frame tubes...

Page 52: ...porting the wheel chair ask your car dealer how to secure it without risk to the exist ing fixtures or other safety fittings Attention Makesurethattheoperatingmod ule is switched off and the brake rel...

Page 53: ...ansport vehicle sThe manufacturer s information for the ramp or lifting equipment Attention Themaximumbearingheightspec ified for the ramp must be greater than the height h from the ground to the load...

Page 54: ...when a split ramp is used sEnsure that the wheelchair can roll back for a short distance neutral zone if forward motion on the ramp is interrupted or when set tinginmotionatthebottomofthe ramp sCars...

Page 55: ...f injuries of inner organs Simple clear and quick operation through the driving service and good accessibility within the trans port vehicle The power knot system is a firm ret rofitable element on th...

Page 56: ...pace and secured with the corresponding securing system Loose object are to be stored se curely Note The headrest on the wheelchair serves as a support for the posture of the head not as a transport s...

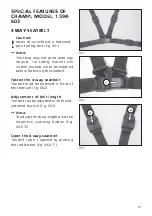
Page 57: ...ckets are to be emptied before fastening the seatbelt Fasten the 4 way seatbelt The belt must be fastened in front of the stomach fig 002 Adjustment of belt length The belt can be adjusted with the ad...

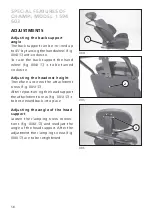
Page 58: ...eel fig 004 is to be turned clockwise Adjusting the headrest height Therefore unscrew the attachment screw fig 005 After repositioning the head support the attachment screw fig 005 is to be screwed ba...

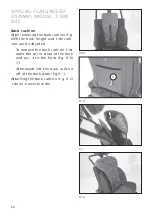
Page 59: ...lock fig 007 in the centre Theseatdepthisadjustableafterloos ening the front attachment screws fig 008 The rear guide screws fig 008 may not be set too tight for this After the adjustment the attachme...

Page 60: ...009 the back height and side cush ions can be adjusted To remove the back cushion first open the velcro strap at the back and pull it to the front fig 010 Afterwards left the back cushion off of the b...

Page 61: ...To remove the seat cushion you previously need to open the velcro strapsoftheleglatchesinthefront underneaththeseatplate fig 014 Afterwards lift the seat cushion to ward the back off of the seat plate...

Page 62: ...e to be reassembled Adjusting the side cushions Loosenthethreeclampingscrews fig 018 to adjust the side cushions Note Adjust the side cushions evenly the adjustment the respective clamp ing screw is t...

Page 63: ...er the adjustment the respective clamp ing screw is to be retightened LEG SUPPORT Adjust to length of lower leg After disassembly of the screwed con nectionsonbothsides fig 021 the footboardcanberepos...

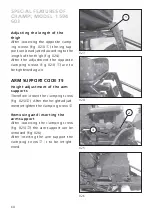
Page 64: ...adjustment the opposite clamping screws fig 023 are to be tightened again ARM SUPPORT CODE 79 Height adjustment of the arm supports Therefore loosen the clamping screw fig 025 After the height adjust...

Page 65: ...operating module cannot be swivelled away if it is positioned too close to the front of the arm support Then push the operating module slightly to the front During the swivel in process the operating...

Page 66: ...ic can be washed with a commercially available washing powder for delicate fabrics Spots can be removed with a sponge or a soft brush Note Do not use aggressive cleaning agents e g solvents or hard br...

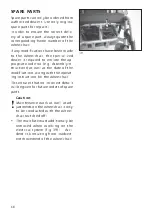
Page 67: ...RS You can trustingly contact your au thorised workshop for any necessary maintenance Personneltherearewell trainedtocarryouttheworkrequired CUSTOMER SERVICE Incaseyouhaveanyquestionsorneed help pleas...

Page 68: ...d to enclose the ap propriate code no e g Assembly In structions as well as the date of the modifications along with the operat ing instructions for the wheelchair This ensures that no incorrect detai...

Page 69: ...rvice life of the batteries Pull out the main fuse after the charging and re insert it into the fuse holder the other way round This prevents the fuse being lost Battery instructions for storage Befor...

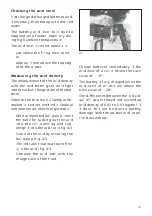
Page 70: ...entally Insertthebatterychargerpluginto the operating module A fig 40 Insert the mains plug of the bat tery charger into an appropriate mains socket The battery is now charging Therefore observe the o...

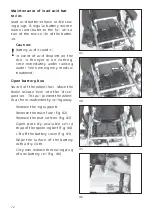
Page 71: ...ralinforma tion on electrical systems and Service Note Watercancollectinthebatterybox when driving in rain in unfavoura ble conditions Collected water should only be removed by a spe cialist workshop...

Page 72: ...ediately under running water Seek emergency medical treatment Open battery box Switch off the wheelchair Move the brake release lever into the drive position Thiswillpreventthewheel chair from inadver...

Page 73: ...led General information on electrical systems With compressed ball pump insert the tube for sucking out the acid into the cell opening and sub mergeitintotheacid asinfig 47 Suck out the acid by releas...

Page 74: ...ed in the same wheelchair mod el 1 Switch off the wheelchair Move the brake release lever into the drive position Thiswillprevent the wheelchair from inadvertently rolling away 2 Detach the leg suppor...

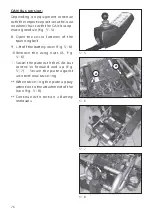
Page 75: ...pe for the seat lock fig 51 2 6 Swiveltheseatupwardtothefront fig 51 3 Note Checktheseatlockafterswivelling it back inward 7 Pushingthearmsupportsoutward Therefore observe chapter Ad justing the seat...

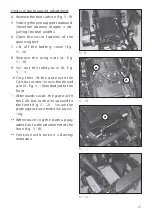
Page 76: ...the velcro fastener of the spanning belt 9 Lift off the battery cover fig 51 6 10 Remove the wing nuts A fig 51 6 11 Swivel the plate with the CAN bus controller forward and up fig 51 7 Secure the pl...

Page 77: ...ing nuts A fig 51 10 9 Pull out the safety wire B fig 51 11 10 Only then lift the plate with the CAN buscontrolleroverthethread pins A fig 51 10 andadjusttothe front 11 Afterwards swivel the plate wit...

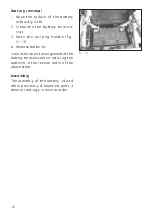
Page 78: ...lips 3 Raise the carrying handle fig 51 13 4 Remove batteries Ensurethecorrectarrangementofthe battery terminals when installing the batteries in the reverse order of the above steps Assembly The asse...

Page 79: ...lease lever to drive mode It should now be impossi ble to push the wheel chair If this is not the case have the magnetic brake repaired by a spe cialist workshop Carryouttestyourselfor with a helper E...

Page 80: ...y 6 months dependingonfrequen cy of use Every 2 months or more frequently de pending on charging frequency and ambient temperature Maintenance the bat teries open batteries acid level acid density cle...

Page 81: ...ining one in front blinks at double frequency Headlight setting The headlights should be set in such a way that the light cone is visible on theroad Theloweredgeofthelight cone should be set at distan...

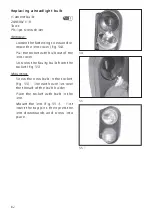
Page 82: ...g 54 Pullthesocketwithbulboutofthe lens cover Unscrew the faulty bulb from the socket fig 55 Mounting Screw the new bulb in the socket fig 55 The earth wire lies over the thread of the bulb holder Pla...

Page 83: ...bulb slightly inwards turn and remove from the socket Mounting Insert a new spherical bulb Push the side pins bayonet catch into the recesses of the bulb holder press lightly against the spring and t...

Page 84: ...lty spherical bulb slightly inwards turn and remove from the socket Mounting Insert a new spherical bulb Push the side pins bayonet catch into the frame exert slight pressure against the spring and tu...

Page 85: ...screws and remove the lens cover fig 59 Pressthefaultybulbagainstahold ing frame and remove Mounting Insert a new bulb Place one tip into one hole on the fixture then the other tip into the other hole...

Page 86: ...fthesafetyfuseblowsagain takethe battery to your specialist dealer for repair Main safety fuse for the battery circuit The blade type fuse for the battery current is located in the fuse holder under t...

Page 87: ...the following table We recommend that an inspection is carried out every 2 years to permit the early recognition and clearance of faults which are not listed in the ta ble The following inspection cer...

Page 88: ...ulb defective Lighting or electronics fuse defective Malfunction in the elec tronics The main fuse for the battery circuit is defec tive blade type fuse or not inserted deep enough Replace fuse Moveth...

Page 89: ...n for 15 sec min Blade type fuses 60 0 A Main fuse Filament bulbs Headlights Spherical bulb 24V 3W E10 Rear light Festoon bulb 24V C5W S8 5 Front indicator Spherical bulb 24V 10W BA15s Rear indicator...

Page 90: ...WHEELCHAIR Attention Read the operating manuals and oth er provided documentation Drive mode Do not lift the wheelchair at the arm supports or leg supports Detachable parts are not suitable for carryi...

Page 91: ...bly impaired by uphill travel poor battery charge condition low ambient temperature e g in winter frequent acceleration and braking e g in city traffic aged sulphated batteries frequently necessary st...

Page 92: ...e output 250 W on 6 km h 300 W on 10 km h Lighting option 24 Volt Dimensions Champ 1 594 Length incl footplates max 109 cm Width 64 to 66 cm Height 102 cm Seat depth 39 to 48 cm Seat width 38 to 51 cm...

Page 93: ...r 36 51 psi Drive wheel 2 1 2 5 bar 31 36 psi Transport dimensions Champ 1 594 Length without footplates 85 cm Width without arm supports 64 cm Height without back support 57 cm Champ Lift 1 594 27 Le...

Page 94: ...5 h at 6 km h approx 40 km Drive batteries acid 60 Ah 5 h at 10 km h approx 35 km Champ Lift 1 594 27 Drive batteries gel 50 Ah 20h at 6 km h approx 30 km Drive batteries gel 50 Ah 20h at 10 km h app...

Page 95: ...ted axle load rear 140 kg Max permissible user weight 120 kg Empty weight with 50 Ah gel batteries approx 119 5 kg Empty weight with 50 Ah gel batteries electrical adjustments approx 134 kg Transport...

Page 96: ...ety inspection at least every 12 months Stamp of authorised dealer Next safety inspection in 12 months Date Place date Signature Recommended safety inspection at least every 12 months Stamp of authori...

Page 97: ...ry 12 months Stamp of authorised dealer Next safety inspection in 12 months Date Place date Signature Recommended safety inspection at least every 12 months Stamp of authorised dealer Next safety insp...

Page 98: ...dout without our prior consent will lead to a general loss of guarantee and product liability Note This operating manual as a part of the product is to be handed out in case of a change of owner GUARA...

Page 99: ...99 Vehicle ID No Fz I Nr view type plate Guarantee Date of delivery Delivery note no Model designation GUARANTEE COUPON Fill in the details If necessary copy and return Stamp of the authorized dealer...

Page 100: ...amp of the authorized dealer MEYRA Wilhelm Meyer GmbH Co KG Company address Meyra Ring 2 D 32689 Kalletal Kalldorf Telephone 49 0 5733 922 311 Fax 49 0 5733 922 143 Email info meyra de Internet http w...

Reviews: