MFJ-949E Versa Tuner II
4
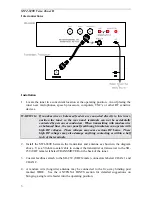
5. A balanced feedline (twin lead, open wire, or twin-axial line) may be connected to the
two binding posts marked BALANCED LINE. Connect a jumper wire from the WIRE
binding post, as indicated by the dotted line on the MFJ-949E, to one of the
BALANCED LINE posts. This connection activates the internal 4:1 balun.
NOTE:
Do not connect wire and balanced antenna's to the MFJ-949E at the same time,
unless you want to apply power to both antennas at the same time. If a longwire
or single wire feeder is used, be sure to remove the WIRE to BALANCED LINE
jumper connection.
Using The MFJ-949E
CAUTION: Never change the ANTENNA or INDUCTOR selector switch position
while transmitting! Never apply more than 300 Watts to the MFJ-
949E!
In any conventional "T" network tuner, maximum power handling and the smoothest
tuning occurs when the capacitance in the network is as large as possible. In this tuner the
TRANSMITTER and ANTENNA MATCHING controls have maximum capacitance at
position 0 (fully meshed), and minimum capacitance at position 10 (fully open). Be sure to
use the highest possible capacitance for each band. This will provide the smoothest tuning,
highest efficiency, and greatest power handling capability. The chart in the tuning
instructions shows typical capacitor settings that can be used for each amateur band.
The INDUCTANCE switch in the MFJ-949E has maximum inductance in position "A",
and minimum inductance in position "L". Less inductance is needed as the frequency is
increased. If too little inductance is used, the tuner may not match the load properly. If too
much inductance is used, the tuner will be "touchy" and power handling will be
compromised. The chart in the tuning instructions shows typical INDUCTANCE switch
settings for each amateur band.
NOTE:
If your transmitter uses an adjustable output circuit it must be properly tuned into
a 50 ohm load at the operating frequency. Proper tuning can be accomplished by
placing the ANTENNA SELECTOR switch in the fully clockwise
BYPASS
DUMMY LOAD position. Adjust the transmitter according to the manufacturer's
instructions into the 50 ohm dummy load
before
adjusting the tuner.
Most modern solid state transceivers do not require adjustments. If the transceiver has a
built in antenna tuner, be sure it is turned off or disabled.
After properly preparing the transmitter, place the MFJ-949E ANTENNA SELECTOR
switch in the desired antenna position in the BYPASS area. If the SWR is low (very little
or no reflected power), the tuner can be left in this position.
If the SWR is higher than desired, place the ANTENNA SELECTOR switch in the proper
TUNED area that selects the desired antenna. Adjust the tuner as described below to
obtain the best SWR. Do NOT change the transmitter's tuning (plate) or loading (antenna)
controls until after the tuner has been fully adjusted. The transmitter can be "touched up"
(if necessary)
after
the MFJ-949E is fully tuned.


