background image

7

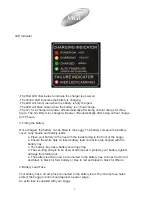
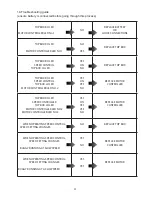
-The Red LED illuminates to indicate the charger is power on.

-The Yellow LED indicates the battery is charging.

-The LED will turn Green when the battery is fully charged.

-The LED will flash Green when the battery is on float charge.

-The 12v SLA charger will power off automatically after being on float charge for three 

hours. The 12v lithium ion charger will power off automatically after being on float charge 

for 18 hours.  

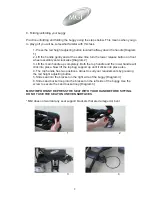
3. Fitting the battery

Once charged, the battery can be fitted to the buggy. The battery comes with a battery 

cover, carry handle and battery leads.


a. Place your battery in the tray with the leads facing to the front of the buggy.


b. Ensure the white dots on fused battery lead connection are aligned with the    


battery tray


c. The battery tray has a battery securing strap.


d. The securing strap is to be used at all times as it protects your battery against   


damage from falling out.


e. The battery lead can now be connected to the battery tray. Connect red to red   


and black to black for SLA battery or blue to red and black to black for lithium. 

4. Battery Lead Fuse

Your battery has a 30 amp fuse connected to the battery lead. The 30 amp fuse helps 

protect the buggy’s control board against a power surge.

An extra fuse is supplied with your buggy.

LED Indicator

Summary of Contents for Hunter R200

Page 1: ...Instruction Service Manual ...

Page 2: ...ice Problem 1 5 Warranty Policy 1 6 Warranty Exclusions 2 7 Parts Installed During Warranty 2 8 Preventative Maintenance Program 2 9 Cleaning Your Buggy 2 10 Rear Wheel Axles 2 11 Clutches 3 12 Upper Lower Bag Straps 3 13 Correcting the Alignment of Your Buggy 3 14 MGI Service Schedule 4 15 Service Record 5 ...

Page 3: ...e Battery 7 4 Battery Lead Fuse 7 5 Fail Safe Connection 8 6 Attaching Removing Wheels 8 7 Free Wheeling Gear System 8 8 Folding Unfolding the Buggy 9 9 Fitting your Golf Bag 10 10 Assembling the Umbrella Holder 10 11 Operating the Digital Top Box 10 11 12 Frequently Asked Questions 11 13 Further information 12 14 Troubleshooting Guide 13 ...

Page 4: ...i golf com Important To locate your serial number look underneath the top control box or underneath the battery tray It will begin with the letters AR Example AR1B21104101047 4 Warranty Service Problem Purchase date of the motorised buggy must be given before warranty is accepted for processing In the event of a need for warranty service either refer to the list of authorised service centres on ou...

Page 5: ... owner and authorised service centres To properly maintain the warranty of your MGI motorised buggy it is essential that this work is carried out If the work carried out by the authorised service centre is to replace parts that are part of the maintenance schedule the owner will be charged for the parts and labour If the work to be carried out is part of warranty MGI will bear the cost 9 Cleaning ...

Page 6: ...eft and right hand straps form the upper bag support 2 Undo and remove the screws holding the strap in position on the bag support 3 Remove and replace both bag straps 4 Insert bag strap securing screws 13 Correcting the Alignment of your Motorised Buggy If during use you find that the buggy veers to the right or left please follow the instructions below to correct this problem 1 If the buggy veer...

Page 7: ...icate rear wheel stub axles BO Check rear wheel clutches function correctly BO Check tighten nuts bolts BO SC Check tighten handle pivots BO SC Check alignment of buggy ensure that it runs straight BO SC Replace rear wheel clutches BO SC Replace fused battery leads BO SC Replace speed controller On Off switch assembly BO SC Replace rear and front wheels BO Replace upper lower bag straps BO Replace...

Page 8: ...corded on the service record 6 month inspection Date Invoice Serviced by Signature 1 year inspection Date Invoice Serviced by Signature 1 year inspection Date Invoice Serviced by Signature 2 year inspection Date Invoice Serviced by Signature 2 year inspection Date Invoice Serviced by Signature 3 year inspection Date Invoice Serviced by Signature 3 year inspection Date Invoice Serviced by Signature...

Page 9: ...r chargers otherwise the warranty on each item will be void Plug the charger into a powerpoint and attach the battery lead to the charger matching the connections properly Always recharge the battery as soon as possible after use no matter how short the period of use Your battery will charge best lying flat in a warm and air flowing location Note In winter it is best charged off any concrete floor...

Page 10: ... carry handle and battery leads a Place your battery in the tray with the leads facing to the front of the buggy b Ensure the white dots on fused battery lead connection are aligned with the battery tray c The battery tray has a battery securing strap d The securing strap is to be used at all times as it protects your battery against damage from falling out e The battery lead can now be connected ...

Page 11: ...sh the release button across and push the wheel on as far as it can You will notice you need to match up the female slots of the wheel and the male of the axle When placed in position simply release the but ton You will notice you hear a click when the wheel is properly secured To check that the wheel is properly in position pull on the wheel If it is properly in position it will not move 7 Free w...

Page 12: ...ly Both the top handle and the lower handle will click into place Now lift the top bag support up until it clicks into place also 4 The top handle has two positions Adjust to suit your requirements by pressing the red height adjusting button 5 Slide seat into the bracket on the right side of the buggy Diagram 3 6 Slide sand bucket loop into the bracket on the left side of the buggy Use the screw t...

Page 13: ... your car you may need to do that prior to folding the buggy down Your umbrella holder can be adjusted both to the side and backwards and forwards The umbrella is secured inside the umbrella holder by tightening the plastic bolt located near the top of the holder DO NOT LEAVE YOUR UMBRELLA UP IN THE UMBRELLA HOLDER IN WINDY CONDITIONS If the wind catches the umbrella it could cause your buggy to t...

Page 14: ...l number for your buggy is located underneath the top handle scorecard compartment Question How often should my battery be charged Answer Your battery should be left on charge in between use After playing put your battery back on charge as soon as possible Leaving your battery in a discharged state will shorten its life Question Should I discharge my battery fully to remove memory Answer NO Both g...

Page 15: ...olf courses and retailers MGI invests large amounts of capital into advancing the mechanical and electronic features of its range of buggies Should you have any feedback or suggestion which would further enhance the performance of our buggies we would welcome your correspondence If you have any concerns relating to the use of your motorised golf buggy do not hesitate to email us at info mgi golf c...

Page 16: ... SPEED CONTROL TOP BOX LH LED MOTOR CONTROLLER LED NO 2 YES ON YES NO REPLACE MOTOR CONTROLLER TOP BOX RH LED SPEED CONTROLLER TOP BOX LH LED MOTOR CONTROLLER LED NO 2 MOTOR CONTROLLER LED NO 3 YES ON YES YES NO REPLACE MOTOR CONTROLLER WHEN OPERATING SPEED CONTROL SPEED SETTING CHANGES NO REPLACE TOP BOX WHEN OPERATING SPEED CONTROL SPEED SETTING CHANGES BUGGY RUNNING AT SLOW SPEED YES NO REPLACE...

Reviews:

Related manuals for Hunter R200