background image


MAINTENANCE  SERVICE MANUAL


1. Foreword


Congratulations  on the purchase of your Navigator G800 buggy.


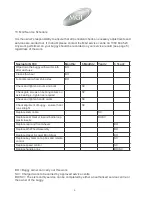
To ensure continued efficiency of your MGI motorised buggy, regular maintenance  at periodic 
intervals is essential. For guidance, this booklet contains a schedule applicable to the 
maintenance required at the appropriate times and a service record.


2. Important


If operating in conditions such as those mentioned below, speed controls, clutches, frame


alignment, adjustment,  tightening and axle alignment should be serviced at more frequent 
intervals than specified in this booklet:


a. playing more than twice a week


b. damp or wet conditions


c. rough, dusty or sandy conditions


d. hilly conditions


3. Warranty Registration


Warranty registration  can be made on-line at www.mgi-golf.com


Important: To locate your serial number, look underneath the top control box or underneath


the battery tray. It will begin with the letters AN.


Example: AN1BLi104101047


4. Warranty Service Problem


Purchase date of the motorised buggy must be given before warranty is accepted for


processing. In the event of a need for warranty service, either refer to the list of authorised


service centres on our website or email servicecentre@mgi-golf.com
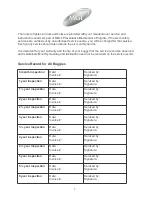
 

5. Warranty Policy


Navigator G800 is covered for a period of 24 months from date of the purchase, MGI or an


authorised service centre or person will repair or replace free of charge any parts found to be


defective in materials or workmanship under normal use provided that:


1. The Navigator G800 has been properly used, maintained and regularly serviced


2. The replacement or repair is performed by an authorised MGI service centre or 
the owner with MGI approval.


1


Summary of Contents for Navigator G800

Page 1: ...Instruction Service Manual ...

Page 2: ...vice Record 1 1 1 1 1 2 2 2 2 3 3 3 4 5 INSTRUCTION MANUAL PAGE 1 Charging and care of the Battery 2 Connecting the Battery 3 Fitting the Battery 4 Battery Lead Fuse 5 Fail Safe Connection 6 Attaching Removing Wheels 7 Front wheel suspension system 8 Engaging the 4th wheel 9 Free Wheeling Gear System 10 Folding Unfolding the Buggy 11 Fitting your Golf Bag 12 Assembling the Umbrella Holder 13 Guide...

Page 3: ...nit Metres or Yards 28 Registration 29 Reset unit 30 Competition Mode 31 Pair Remote 32 Buggy Mode 33 Playing Golf 34 Understanding the icons 35 Scoring 36 Mapping a course 37 Demo 38 Upgrade your membership 39 Editing a course 40 Deleting a course 41 Analyse a game 42 Deleting a game 43 Automatic Course Recognition 44 Selecting a course manually 45 Frequently Asked Questions 46 Further informatio...

Page 4: ...n be made on line at www mgi golf com Important To locate your serial number look underneath the top control box or underneath the battery tray It will begin with the letters AN Example AN1BLi104101047 4 Warranty Service Problem Purchase date of the motorised buggy must be given before warranty is accepted for processing In the event of a need for warranty service either refer to the list of autho...

Page 5: ... of parts under warranty will not extend the warranty of the buggy or parts 8 Preventative Maintenance Program To properly provide for the continued operation of your motorised buggy MGI has introduced its Preventative Maintenance Program PMP The PMP consists of work to be carried out by both the owner and authorised service centres To properly maintain the warranty of your MGI motorised buggy it ...

Page 6: ...bag strap can be replaced by 1 Removing the left and right hand straps form the upper bag support 2 Undo and remove the screws holding the strap in position on the bag support 3 Remove and replace both bag straps 4 Insert bag strap securing screws 12 Correcting the Alignment of your Motorised Buggy If during use under Top Box control you find that the buggy veers to the right or left please follow...

Page 7: ...service centre or the owner of the buggy 4 Navigator G800 Monthly 6 Monthly Yearly 3 Yearly Wipe down the buggy with warm cloth after each use BO Clean 4th wheel BO Lubricate rear wheel stub axles BO Check and tighten all nuts and bolts SC Check grub screws on bearing collars on axle bearings tighten as required SC Check and tighten handle pivots SC Check alignment of buggy ensure that it runs str...

Page 8: ...rded on the service record Service Record for All Buggies 5 6 month inspection Date Invoice Serviced by Signature 1 year inspection Date Invoice Serviced by Signature 1 year inspection Date Invoice Serviced by Signature 2 year inspection Date Invoice Serviced by Signature 2 year inspection Date Invoice Serviced by Signature 3 year inspection Date Invoice Serviced by Signature 3 year inspection Dat...

Page 9: ...nnecting the battery Place battery in tray with leads facing the front of the buggy Secure the battery with the battery strap Connect the battery lead to the battery tray Do NOT connect unmatched batteries or chargers otherwise the warranty on each item will be void Always recharge the battery as soon as possible after use no matter how short the period of use Your battery will charge best lying f...

Page 10: ...battery in the tray with the leads facing to the front of the buggy b Ensure the white dots on fused battery lead connection are aligned with the battery tray c The battery lead can now be connected to the battery tray Connect blue to blue and black to black for 24v Li battery 4 Battery Lead Fuse Your battery has a 30 amp fuse connected to the battery lead The 30 amp fuse helps protect the buggy s...

Page 11: ...el can swivel 360 degrees The main advantage of this is that your buggy is highly manouverable You only need to turn the buggy handle and your buggy will turn The suspension helps reduce the amount of shock the buggy will take when going over hills bumps ruts etc 8 Engaging the 4th wheel To avoid damage to your buggy always engage the 4th wheel prior to playing golf regardless of the terrain you a...

Page 12: ... height adjusting button located halfway down the handle Diagram 1 2 Lift the handle gently and at the same time turn the lower release button on front wheel assembly anti clockwise Diagram 2 3 Lift the main handle up completely Both the top handle and the lower handle will click into place Now lift the top bag support up until it clicks into place also 4 The top handle has two positions Adjust to...

Page 13: ...m of the golf bag 12 Assembling the Umbrella Holder Your buggy comes with an umbrella holder The umbrella holder needs to be bolted into position When not in use the umbrella holder can be turned to its side If you take your buggy home in your car you may need to do that prior to folding the buggy down Your umbrella holder can be adjusted both to the side and backwards and forwards The umbrella is...

Page 14: ...ht down keys Left right down keys Speed control dial stop go Menu key Remote dock Sureshot Buggy Mode toggle 14 Guide to using your Remote Control Forward Increase speed Nav Off red light Nav On Charging indicator Right green light Left Reverse Decrease Speed Stop USB Port for charging and PC 11 ...

Page 15: ...control The speed setting is red when the buggy is stopped and white when the buggy is moving 16 Change your PIN The default PIN on your buggy is 1111 The buttons are numbered as per the diagram To change your PIN go to Sureshot Homepage Features Buggy Remote Maintenance Change PIN 17 Set your local time Your G Series buggy has a real time clock which sets the time using satellites Ensure you are ...

Page 16: ... the bottom of the remote control Ensure that the orientation of the plug matches the socket in the remote control unit Turn on the power to the AC adapter You should allow six hours to fully charge the battery You cannot over charge the battery so you can leave it charging in between use You can also charge the remote control using the supplied USB cable and connecting it to a computer Note that ...

Page 17: ...of the remote To unlock the Remote press the top left button once and the green LED will flash 3 times Suggestion do not send the buggy off using the buggy top box control when the remote is locked The remote needs to be unlocked before it can control the buggy If you do try to use the Remote Control when it is locked the red LED will flash 3 times 20 Registering Online To begin using your Navigat...

Page 18: ...to maneuver the buggy The mode light on the handlebar will turn red when navigation turns off When you switch between using the handlebar controls and the remote control the buggy remem bers if the remote was in Nav On or Nav Off If the last command on the remote was Nav On the first command using the remote will also be Nav On You can change this by pressing Nav Off to switch off the navigation s...

Page 19: ...g received but it is not used in the position calculation 26 Navigation Displays velocity heading and odometer Sureshot Homepage Features Status GPS Information Navigator 27 Setting the measurement unit metres or yards Go to Sureshot Homepage Features Setup Metres Yards Choose Metres or Yards Press the Menu Key to go to the main menu 28 Registration Go to Sureshot Homepage Features Status Registra...

Page 20: ...Play soft key One of two viewing screens will be displayed To switch between the two screens press the View soft key Details of the chosen course will be displayed Press the Play soft key If hazards have been mapped for the hole the Hazard Screen will be displayed If there are no hazards for the hole the Green Screen will be displayed Press the View soft key to change between the Green Screen and ...

Page 21: ...ight arrow key to go to the next hole Press the left arrow key to display the previous hole If scoring is enabled at any time during the game press and hold down the down arrow key to display the current score Press the Done soft key to return to the game Press the Menu key at the end of the game If scoring is enabled press the Yes soft key to save the score Press No to discard the score and retur...

Page 22: ...itched On or Off from the Sureshot Homepage Features Setup Scoring To begin scoring first select the hole you are hitting off from If hitting from the 5th hole press the left arrow key until Hole 5 is displayed then follow the following steps If scoring is switched Off the Fairway Green Putts and Sand soft keys are not displayed 19 ...

Page 23: ... back of the hazard press the Carry soft key The Sureshotgps will count down from 10sec while it locks in the GPS position Once complete press the Done soft key Repeat this process for each hazard After the last hazard use the up down arrow keys to select the Green icon and press Select Walk to the front of the green press the Front soft key The Sureshotgps will count down from 10 seconds while it...

Page 24: ...ership entitles you to unlimited uploads and downloads and your Navigator G800 can hold up to 40 golf courses at any time You can purchase a Gold Platinum or Platinum Plus Membership for one two or three years Lifetime Membership For a one off fee you can access the map database for the entire lifetime of your buggy holding up to 40 courses at any one time 39 Editing a course You can edit a course...

Page 25: ...ce GPS lock is acquired 44 Select your course manually Go to the Sureshot Homepage and select Play Golf Use the up down arrows to select desired course and then press the Select soft key Details of the chosen course will be displayed Press the Play soft key One of two viewing screens will be displayed the Hazard Screen or Green Screen To switch between the two screens press the View soft key If ha...

Page 26: ...ontrol Answer a The battery inside the remote may need replacing b Is your Remote paired to the Top Box Go to Main Menu Features Buggy Remote Pair Remote check if serial number is listed c If the battery is OK and your buggy works in the manual mode please contact a service centre 46 Further information In Melbourne you can bring your buggy to our main service centre at head office 11 Maurice Cour...

Reviews: