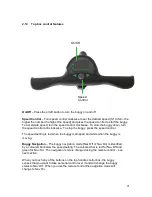
background image


23 

2.16 

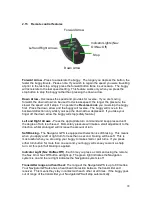
The Navigation System 

– How it works 

Navigation on [Nav On]


– By pressing Nav On the navigation system is turned on.  The 

indicator light under the Nav On button will illuminate green each time you use a 
command whilst navigation is on. 
 
The navigation system ensures the buggy maintains its direction regardless of the 
terrain.  The buggy will automatically brake or accelerate either wheel to maintain its 
direction. 
 

Useful hint:

  On a steep incline, the gradient may force the buggy off line.  You do not 

need to adjust the buggy.  The buggy will work its way back on course.  In addition, if the 
buggy hits a tuft of grass or other object, the buggy will momentarily be forced off 
course.  Do not be concerned.  The buggy knows where to go and will get back on track 
quickly. 
 

Navigation off [Nav Off] - 

By pressing “Nav Off”, the navigation system is turned off.  

The indicator light under the Nav Off button will illuminate red each time you use a 
command whilst navigation is off. 
 

Important:


When you use the controls on the buggy‟s handlebar, the navigation system 

turns off automatically.  This will enable you to maneuver the buggy.  The mode light on 
the handlebar will turn red when navigation turns off. 
 
When you switch between using the handlebar controls and the remote control, the 
buggy remembers if the remote was in “Nav On” or “Nav Off”.   If the last command on 
the remote was “Nav On”, the first command using the remote will also be “Nav On”.  
You can change this 

by pressing “Nav Off“ to switch off the navigation system. 

 
When your buggy is turned on, the remote control can be used in the same way as the 
controls on the handlebar. 
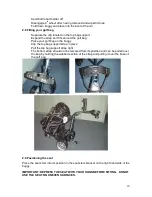
 

2.17 

Cart tracking 

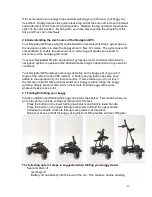
Your NavigatorGPS is designed to track straight on level ground in the Nav On mode. 
The twin motors are synchronized with your buggy at production.  If your buggy does not 
track straight (for example your golf bag is not evenly weighted), adopt the following 
procedure. 

Go to 

Sureshot Homepage > Features > Buggy/Remote > Maintenance > Motor 

Trimming 

Using your remote: 

Press the forward arrow. 
The cart will now move forward. Watch how straight the buggy goes. 


If the cart moves to the left it means that the R/H motor is running quicker than the L/H 
motor.  


Summary of Contents for NAVIGATOR GPS

Page 1: ...1 NAVIGATOR GPS MAINTENANCE SERVICE MANUAL INSTRUCTION MANUAL ...

Page 2: ...ontrol dial stop go Scroll within Buggy Mode Sureshot Buggy Mode toggle On off key Centre soft key Right soft key Remote dock Left soft key Up arrow mark ball key Left right down keys Menu key The Sureshotgps part of the NavigatorGPS is extremely easy to use Most operations can be performed with the press of one or two keys The soft keys change their function depending on the screen display The fu...

Page 3: ...cons 10 1 18 Scoring 11 1 19 Mapping a course 11 1 20 Editing a course 12 1 21 Deleting a course 12 1 22 Analyse Game 12 1 23 Demo 13 Section 2 Buggy Instruction Manual 2 1 Charging and care of the battery 14 2 2 Fitting the battery 15 2 3 Battery lead fuse 15 2 4 Fail safe connection 16 2 5 Attaching Removing wheels 16 2 6 Understanding the electronics of the NavigatorGPS 17 2 7 Folding Unfolding...

Page 4: ...9 Rear wheel axles 29 3 10 Upper and lower bag straps 29 3 11 Correcting the alignment of your NavigatorGPS 30 3 12 NavigatorGPS top handle protection 30 3 13 Charging and caring for your remote control lithium ion battery 31 3 14 MGI Service Schedule 32 3 15 Service record for your NavigatorGPS 34 3 16 Technical and product support 35 3 17 Frequently asked questions 35 3 18 Who can help me with t...

Page 5: ...1 2 Registering Online To begin using your NavigatorGPS the product must first be registered online Registering will activate your warranty period and enable course map downloads DO NOT CONNECT YOUR REMOTE CONTROL TO YOUR PC UNTIL PROMPTED You will need to have an internet connection You need to go to www mgikaddy com Click on the My Buggy button Click on Register and follow the prompts 1 3 Upgrad...

Page 6: ...ive minutes before you wish to use it Can I use my NavigatorGPS inside the home or office The Sureshotgps function will not generally gain reception inside For best accuracy your NavigatorGPS unit should have an unimpeded view of the sky 1 6 Checking for GPS Signal Before checking the status of your GPS signal ensure you have clear sky above your buggy and the NavigatorGPS unit has been on for at ...

Page 7: ...to Sureshot Homepage Features Setup Scoring Choose On or Off Press the Menu Key to go to the main menu 1 11 Registration Check for ownership Go to Sureshot Homepage Features Status Registration Displays the software version unique electronic serial number registration date model and owner details 1 12 Reset Unit Go to Sureshot Homepage Features Status Reset Unit This enables you to reset your Navi...

Page 8: ...irst unit must be registered See how to download courses under How to download a course map a Ensure that your NavigatorGPS has been turned on for at least five minutes with clear access to the sky before you begin playing your game of golf b From the Sureshot Homepage use the up down arrows to select Play Golf and then press the Select soft key c Use the up down arrows to select the desired cours...

Page 9: ... fairway hit Press the Green soft key to set greens in regulation o If there are no hazards mapped for a hole and scoring is enabled the View soft key is used only for the scoring options p If scoring is enabled press and hold the View soft key to display penalties and green up downs on both the Green and the Hazard Screens Press the Pens soft key to increment the penalty count Hold down the Pens ...

Page 10: ...he left displays the distance from you to the front centre and back of the green These measurements are displayed in metres or yards depending on your preference see instructions under Setup 1 17 Understanding the Icons The greens and hazards are all represented in easy to read icons The distances are displayed in the following format ...

Page 11: ...or the Sureshotgps to lock in to the available satellites b Press the Menu key c Select Map Course using the down arrow d Select Start Mapping and enter the full course name for example Commonwealth Golf Club Select the desired letters using the up down and left right arrow keys Press Save once complete e Press the Map soft key to map the course or the Back soft key to return to the previous displ...

Page 12: ...ing hazards ensure you have regard to where you would have come from that is the tee off area and where you are going that is the green 1 20 Editing a course You can edit a course that is on your NavigatorGPS You may like to add a layup point or a reference point or add a hazard that was not included in the original mapping Go to Sureshot Homepage Map Course Edit Course 1 21 Deleting a course You ...

Page 13: ...ame or the No soft key to return to the game list without deleting the game 1 23 Demo To view the demonstration screen on the NavigatorGPS Go to Sureshot Homepage Features Demo This will provide a rolling demonstration of how the NavigatorGPS shows distances when in the Play Golf mode By pressing the View soft key the two viewing screens per hole can be seen ...

Page 14: ...e In winter it is best charged in a warm location and off any concrete floor During play minimise the drain on the battery by avoiding taking your buggy into the rough whenever possible Avoid using the buggy to pull you up hills In between use always leave the charger connected to the battery with power on If you are not playing golf for some time you may disconnect the battery once it is charged ...

Page 15: ...ray has a battery securing strap c The securing strap is to be used at all times as it protects your battery against damage from falling out d The battery lead can now be connected to the battery tray Connect red to red and black to black 2 3 Battery lead fuse Your NavigatorGPS has a 40 amp fuse connected to the battery lead The 40 amp fuse helps protect the buggy s control board against a power s...

Page 16: ...ith the wheels off they should be placed in position prior to unfolding To put the wheels on you will need to align the four slots on the inside of the wheel with the same four on the drive dog on the axle To engage the rear wheel depress the quick release catch until the wheel is in place Align the four slots on the wheel with those on the drive dog teeth Depress the quick release catch whilst pu...

Page 17: ...itions Your NavigatorGPS employs auto range detection so the buggy will not go out of range of the remote control 80 metres A battery saving feature has also been added to the operation of your remote control If some reason you do not touch the remote control for three minutes whilst your buggy is within range the buggy will stop Simply press a command on the remote and the buggy will resume whate...

Page 18: ...on the buggy Clip the top bag support strap in place Pull the top bag support strap tight The bottom strap should not be removed from its position and can be pulled over the bag by holding the webbed section of the strap and pulling it over the base of the golf bag 2 9 Positioning the seat Place the seat stem into its position in the seat stem bracket on the right hand side of the buggy IMPORTANT ...

Page 19: ...o its side If you take your buggy home in your car you may need to do that prior to folding the buggy down Your umbrella holder can be adjusted both to the side and backwards and forwards The umbrella is secured inside the umbrella holder by tightening the plastic bolt located near the top of the holder DO NOT LEAVE YOUR UMBRELLA UP IN THE UMBRELLA HOLDER IN WINDY CONDITIONS If the wind catches th...

Page 20: ... itself into position The 4th wheel should be cleaned regularly Remove the 4th wheel by pulling on the spring loaded locking pin and slide the 4th wheel all the way out of its housing The 4th wheel can then be cleaned with a cloth Then reinsert the 4th wheel into its housing and pull on the spring loaded locking pin 2 13 The front wheel and suspension system Your buggy has a unique front wheel sys...

Page 21: ... control The speed setting is red when the buggy is stopped and white when the buggy is moving Buggy Navigation The buggy navigation mode Nav Off or Nav On is identified by a coloured bar below the speed setting The coloured bar is red for Nav Off and green for Nav On The navigation mode is changed using the remote control see next section When you touch any of the buttons on the top handle contro...

Page 22: ...ssed until the degree of turn is achieved Momentary pressure will make a small adjustment to the direction whilst prolonged will increase the amount of turn Soft Braking The Navigator GPS is equipped with electronic soft braking This means when you apply a left or right turn for less than a second braking will be soft This is most useful when you are using your buggy to make small or part turns If...

Page 23: ...e the controls on the buggy s handlebar the navigation system turns off automatically This will enable you to maneuver the buggy The mode light on the handlebar will turn red when navigation turns off When you switch between using the handlebar controls and the remote control the buggy remembers if the remote was in Nav On or Nav Off If the last command on the remote was Nav On the first command u...

Page 24: ...is recommended that the remote is not used Your NavigatorGPS has a range of up to 80 metres Golf etiquette is essential at all times Do not operate your Navigator GPS in the vicinity of people playing their shots Trust your NavigatorGPS When operating in Nav On mode you do not need to constantly adjust the NavigatorGPS s direction If the NavigatorGPS is diverted from its course by uneven surfaces ...

Page 25: ...tery connector parts for dirt or damaged contacts If OK re connect the battery and check the buggy s operation again Check to see if the remote control has not been locked To unlock the remote control press the top left Nav On button two times within a second The unlocking is verified with three quick flashes of the green led in the Nav On white button If the remote still does not operate contact ...

Page 26: ... that visit most golf courses and retailers Question My buggy does not track in a straight line Answer a Ensure that the cart is in the Nav On mode See Using your Navigation System b See Cart Tracking Adjustment Procedure c If problem persists please contact the service centre Question My buggy turns in circles Answer a Ensure that each rear wheel is locked in position b If the wheels are locked i...

Page 27: ... buggy do not hesitate to call us at 1300 644 523 Thank you for your assistance and continued support Most importantly please provide us with your email address so that we can forward to you technical updates and other information Please email MGI on support mgikaddy com ...

Page 28: ...f 12 months or 1000kms whichever comes first in respect of the electronics remote control wheels clutches drive dogs axles battery charger frame motor and gearbox MGI or an authorised service centre or person will repair or replace free of charge any parts found to be defective in materials or workmanship under normal use provided that The NavigatorGPS has been properly used maintained and regular...

Page 29: ...d labour If the work to be carried out is part of warranty MGI will bear the cost 3 8 Cleaning your motorised buggy See Maintenance Schedule To maintain good operation your buggy requires care and attention Keep your buggy clean by using a cloth with warm water and a mild detergent Do not hose down your buggy under any circumstance as your buggy has electronic components Ensure that the seat stem ...

Page 30: ...he right face the front wheel of the buggy and use the Allen key provided to screw the left bolt clockwise or the right bolt anti clockwise Test run the buggy and repeat the process until the buggy runs straight 3 12 NavigatorGPS top handle protection Keep your top handle dry Rain humidity and all types of liquids or moisture can contain minerals that will corrode electronic circuits If your top h...

Page 31: ...ttery There are two ways to charge the lithium ion battery inside the remote control Both methods connected to the remote control via the USB port on the base of the unit AC World charger with USB cable provided USB cord via the PC provided DO NOT USE ANY OTHER CHARGERS You can check the status of the remote battery capacity by going to Buggy Mode The Nav On soft key will light up when charging It...

Page 32: ... and bolts SC Check grub screws on bearing collars on axle bearings tighten as required SC Check and tighten handle pivots SC Check alignment of buggy ensure that it runs straight SC Replace handle grips BO SC Replace rear wheel drive dogs BO SC Replace rear wheel spring latches BO SC Replace rear wheel drive hubs BO SC Replace seat bracket sand bottle loop plastic inserts BO SC Replace fused batt...

Page 33: ...ed out by an authorised service centre and you will be charged for that service Each yearly service should also include the six monthly service It is important for your warranty and the life of your buggy that the service record be observed and maintained Monthly cleaning and lubrication need not be recorded on the service record ...

Page 34: ...ATE SERVICED BY INVOICE NO SIGNATURE 3 YEAR INSPECTION DATE SERVICED BY INVOICE NO SIGNATURE FOUR YEAR INSPECTION DATE SERVICED BY INVOICE NO SIGNATURE 4 YEAR INSPECTION DATE SERVICED BY INVOICE NO SIGNATURE FIVE YEAR INSPECTION DATE SERVICED BY INVOICE NO SIGNATURE 5 YEAR INSPECTION DATE SERVICED BY INVOICE NO SIGNATURE SIX YEAR INSPECTION DATE SERVICED BY INVOICE NO SIGNATURE ADDITIONAL SERVICE ...

Page 35: ...game of golf providing a local rule has been passed by the Golf Club MGI encourages you to ask prior the club prior to using your NavigatorGPS What do I do if my course is not on the database We designed the NavigatorGPS with a simple to use mapping capability A course can be mapped while it is being played or simply by walking the course prior to a round and mapping the required co ordinates Mapp...

Page 36: ... This product contains embedded software You have a non exclusive non transferable right to use the software only as embedded in the hardware and may not copy disassemble or attempt to reverse engineer the software or use it on any other hardware The software includes software supplied to SS by third parties Suppliers which is provided without warranty by such Suppliers The software is owned by SS...

Page 37: ...37 ...

Reviews:

Related manuals for NAVIGATOR GPS