background image

20

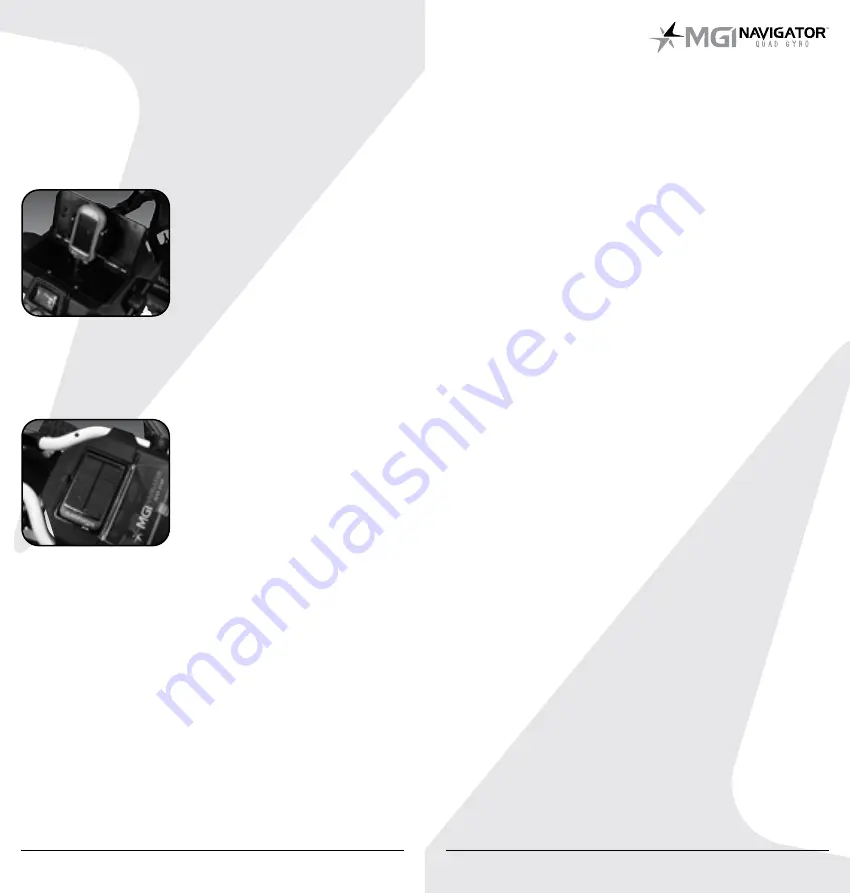
12.0 Integrated GPS Holder  

and Compartment

In the top handle compartment is an integrated GPS/mobile device 
holder. To open the holder the holder always press the Coloured 
button at the top of the holder. Place the GPS into the cradle, then 
close the holder by squeezing the two sides closer together.

13.0 Integrated Solar Charging

An optional Solar Charger accessory is available to fit into the top 
handle of the MGI Navigator Quad Gyro. Once installed, the MGI 
Navigator Quad Gyro is fitted with a charging cable located in 
the top hand compartment.

On the purchase of a Solar Charger, 
you will receive adapters to use 
this cable to recharge any GPS or 
mobile device while sitting in the 
GPS holder.

14.0 Warranty 

14.1 Warranty Policy

The MGI Navigator Quad Gyro is covered by a Limited* 
manufacturer’s warranty from the date of purchase. Duration of 
this warranty is:

• 

2 years on parts*

• 

2 years on Lithium batteries and chargers

* MGI or an authorised service centre will repair or replace any 
parts found  to be defective in materials or workmanship under 
normal use provided that:

1.  The MGI Navigator Quad Gyro has been properly used, 

maintained and regularly serviced [see section 12]

2.  The replacement or repair is performed by an authorised MGI 

service centre or the owner with MGI approval.

3.  The model has been registered online.

14.2 Warranty Exclusions 

The following events will void warranty:
• 

Any alteration performed by non-authorised people or 
companies.

• 

Fitting of parts or accessories not recommended by MGI.

• 

Any damage caused by continued operation of the unit 
after it is known to be defective.

• 

Damage to seat and/or seat support bracket on the model 

• 

Damage caused by ingress of water into motor/gearbox 
and other major components

• 

Damage caused by the model going into bunkers and other 
course hazards

All implied warranties [save those preserved by statute] are 
excluded. Liability for consequential damages under any and all 
warranties are excluded to the extent exclusion is permitted by 
law.

14.3 Parts Installed During Warranty

Warranty coverage for components installed during the unit’s 
warranty period  shall consist of the duration of the unit’s warranty 
period, provided the warranty installation is performed by MGI, 
an authorised service centre or the model owner on approval. 
Replacement of parts under warranty will not extend the warranty 
of the model or parts.

15.0 Preventative Maintenance Program

To properly provide for the continued operation of your MGI 
Navigator Quad Gyro, MGI has introduced its Preventative 
Maintenance Program [PMP]. The PMP consists of work to  be 
carried out by both the owner and authorised service centres. 
To properly maintain the  warranty of your MGI Navigator Quad 
Gyro, it is essential that this work is carried out. If the work carried 
out by the authorised service centre is to replace parts that are 
part of the  maintenance schedule, the owner will be charged 
for the parts and labour. If the work to be carried out is part of 
warranty, MGI will bear the cost.

15.1 Cleaning Your MGI Navigator Quad Gyro [See Maintenance 

Schedule]

For years of good operation, your model requires care and 
attention. 
• 

Keep your unit clean by using a cloth with warm water and a 
mild detergent. 

• 

Do not hose down your unit under any circumstance, as your 
model has electronic components. 

• 

Ensure that the seat stem bracket is free from sand.

• 

Do not submerge your model in water as it will cause 
irreparable damage.

MGI Navigator™ Quad Gyro 

User Manual


21

Summary of Contents for NAVIGATOR QUAD GYRO

Page 1: ...User Manual VERSION 1 2 ...

Page 2: ... 3 Rear Wheel Positions 06 3 4 Unfolding 07 3 5 Folding 08 3 6 Positioning the Seat 09 3 7 Positioning the Sand Bucket Loop 09 3 8 Attaching the Umbrella Holder 10 4 0 Battery Care 10 4 1 Charging Your Battery 10 4 2 Tips and Looking After Your Battery 11 4 3 Plugging in the Battery 11 5 0 Battery Lead Fuse 12 6 0 Front Wheels 12 6 1 Removing the Front Wheels 12 6 2 Adjusting and Aligning the Fron...

Page 3: ... 0 4mm Allen Key for aligning front wheel as required 4 x Rubber Gaskets for the rotating front wheel housing see front wheel maintenance section 6 3 3 0 Assembling Your Unit 3 1 Attaching the Front Wheels The two front wheels need to be attached to your MGI Navigator Quad Gyro There is no difference between each front wheel so either can be placed on the left or right side Simply line up the silv...

Page 4: ...the wheel forward If you feel resistance then the wheel is now in drive position and ready to use Repeat for both wheels ii Free wheel Lock the wheel into the groove furthest from the battery tray To do this while sliding the release button across on the wheel push the wheel on to the axle and release the release button onto the groove To test for free wheel position try rolling the wheel forward ...

Page 5: ...eat and sand bucket loop are added For personal choice these accessories can be placed on either side of the MGI Navigator Quad Gyro 08 Step 1 Open the fold lever 2 to release the handle Step 2 Press the button shown while applying pressure down to close Step 3 Lower the unit down flat and close fold lever 2 to lock handle Step 1 Using the bracket provided feed it through as shown in the picture S...

Page 6: ... is there is a fault with the charger 4 2 Tips and Important information about Charging your Battery Always recharge the battery as soon as possible after use no matter how short the period of use Leaving your battery uncharged will only reduce the life of the battery Your battery will charge best lying flat in a warm and air flowing location In winter it is best charged off any concrete floor and...

Page 7: ... In the unlikely event the MGI Navigator Quad Gyro is not tracking straight the front wheels can be adjusted to regain straight tracking as follows 1 Start the unit using the manual controls on a straight flat path Do not start using the remote otherwise the Navigation system will start Watch the unit to see if it veers left or right 2 Now turn the wheel you want to adjust until you see the two ad...

Page 8: ...GI Navigator Quad Gyro is designed so the lower bag strap is no longer required However the lower strap has been included for your own preference It is easily attached by clipping each end of the strap into the eyelets on the lower bag support 9 0 Operating the Digital Top Box 1 Control button 1 2 Control button 2 3 Speed Control ON OFF button 4 Speed indicator 5 Battery level indicator 6 S SLA ba...

Page 9: ... simply press the Control button left side 1 for 3 seconds until the reading displays 0 2 Distance Total cannot be reset as it is the Odometer for the life of the model This feature will assist with service reminders which are recommended at each 500kms 300mi or 6 months periods 9 6 Competition Mode In the unlikely event the club you are playing at does not allow the use of distance devices you wi...

Page 10: ...t prolonged pressure will increase the amount of turn and speed of the turn 10 5 Speed Control Manually and Remotely Under manual control you can adjust the speed by turning the speed control button to the left or right When changing to the remote control irrespective of the speed level indicated on the display the unit will always start at speed 1 10 6 Keypad Unlock and Lock The remote control ha...

Page 11: ...t bracket on the model Damage caused by ingress of water into motor gearbox and other major components Damage caused by the model going into bunkers and other course hazards All implied warranties save those preserved by statute are excluded Liability for consequential damages under any and all warranties are excluded to the extent exclusion is permitted by law 14 3 Parts Installed During Warranty...

Page 12: ... 2 15 5 MGI Service Schedule It is the owner s responsibility to ensure that all periodical checks necessary adjustments and services are carried out If in doubt please contact the MGI service centre on 1300 644 523 Any work performed on your unit should be recorded on your service record see page 5 regardless of the work MGI Navigator Quad Gyro Monthly 6 Monthly Every 2 yrs Every 3 yrs Wipe down ...

Page 13: ...and New Zealand To find your nearest Service centre visit www mgigolf com For warranty repairs to be authorised you MUST provide proof of purchase Please keep this with you as well as your Serial number you can record in this manual 17 0 Purchasing Parts and Accessories You are welcome to service your model out of warranty by purchasing parts direct from MGI Please call or email to discuss the rig...

Page 14: ...r have a lower bag strap A The MGI Navigator Quad Gyro has been designed so the lower bag strap is no longer required If you would prefer one for personal reasons the lower bag strap is included with the spare parts when the model was purchased Q I would like to have my MGI Navigator Quad Gyro serviced Who do I call A visit www mgigolf com to find your nearest Service centre using your postcode wi...

Page 15: ... MGI USA T 1800 617 2990 E salesusa mgigolf com SERVICE 1888 391 0200 SERVICE serviceusa mgigolf com MGI GLOBAL E globalsales mgigolf com Follow us on Absolute attention has been taken to ensure this manual is correct at time of printing Specifications images and statistics may change at any time Visit www mgigolf com for the most current model information Version 1 2 ...

Reviews: