

Thank you for purchasing the Game
Changing MGI Zip X4 motorised buggy.
To get the most out of your buggy please
follow these quick steps before use.
•
Register your buggy online [section 1.0]
•
Assembling the buggy [section 3.0]
•
Charge the battery [section 4.0]
For Customer Support, please contact MGI directly
for immediate and professional advice.
Email:
LIVE Chat:
Toll Free within Australia:
1300 644 523 (excludes mobiles)
Western Australia / International Phone: +61 3 8872 6700
Local Service Centres:
to locate
your local service centre.
NOTE:
This user manual was correct at time of printing. The online
version is the most up-to-date and must be referred to as the
correct version. To download the most current user manual
please visit www.mgigolf.com. Images shown throughout this
manual may not be of the particular model you have purchased.
Contents
MGI Zip X4
User Manual
03
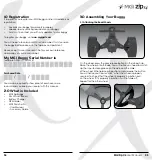
1.0 Registration
04
2.0 What Is Included
04
3.0 Assembling Your Buggy
05
3.1
Attaching the Rear Wheels
05
3.2
Rear Wheel Positions
06
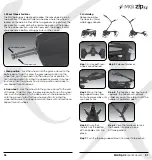
3.3
Unfolding
07
3.4
Folding
08
3.5
Fourth Foldable Rear Wheel
09
3.6
GPS Holder and Top Handle
Compartment
09
3.7
Inverting Rear Wheels
09
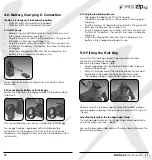
4.0 Battery Charging & Connection
10
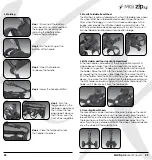
4.1
Initial Charge
10
4.2
Connecting the Battery onto the Buggy
10
4.3
Charging the Battery after Use
11
5.0 Fitting the Golf Bag
11
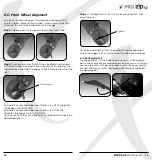
6.0 Front Wheel Alignment
12
6.1
USB Charging Point
13
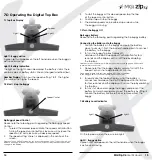
7.0 Operating the Digital Top Box
14
7.1
Top Box Display
14
7.2
Start / Stop the Buggy
14
7.3
Turn the Buggy Off
15
7.4
Battery Level Indicator
15
7.5
Electronic Park Brake
16
7.6
Downhill Speed Control
16
8.0 Warranty
17
8.1
Warranty Policy
17
8.2
Warranty Exclusions
17
8.3
Parts Installed During Warranty
17
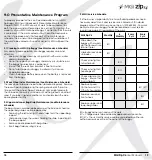
9.0 Preventative Maintenance Program
18
9.1
Cleaning Your MGI Zip Buggy
18
9.2
Rear Wheel Axles Maintenance
18
9.3
Upper and Lower Bag Strap
18
9.4
MGI Service Schedule
19
9.5
Service Record for All Buggies
20
10.0 Service and Repair Centres
21
11.0 Purchasing Parts and Accessories
21
12.0 Contacting MGI
21
13.0 Contacting Local Agent
21
14.0 Frequently Asked Questions
22
Summary of Contents for ZIP series
Page 1: ...User Manual VERSION 1 0 ...