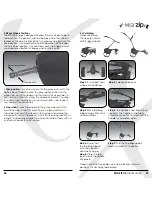
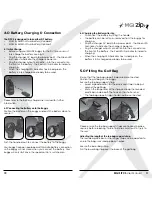


3.2 Rear Wheels Positions
The MGI ZIP buggy is designed to allow the rear wheels to be in
two positions. The position is determined by where the wheel is
locked on the axle in either of the two grooves [see picture]. The
drive position is used during the normal operation of the buggy.
The free wheel position is used to freely push the buggy should
you experience battery or buggy issues on the course.
i. Drive position
– Lock the wheel onto the groove closest to the
battery base.
To do this, press the grey release button on the
wheel hub, push the wheel on to the axle as far as possible. To
test for drive position try rolling the wheel backwards. If you feel
resistance then the wheel is now in drive position and ready to
use. Repeat for both wheels.
ii. Free wheel
–
Lock the wheel into the groove
closest to the
end of the axle. To do this, press the grey release button on
the wheel hub, push the wheel on to the axle and release the
release button onto the groove. To test for free wheel position try
rolling the wheel backwards. The wheel should spin freely with no
resistance. Repeat for both wheels.
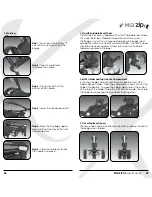
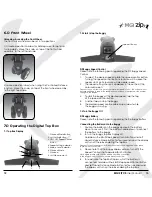
3.3 Unfolding
Please see below
the steps to unfold
a ZIP Buggy Handle.
Please note that the handle can only be locked into one
position – it is not height adjustable.
MGI ZIP X5
User Manual
07
06
Free wheel position
Drive position
Step 1:
Ensure both rear
wheels are attached.
Step 2:
Release Fold Lever.
Step 3:
Move Top Bag
Support away from front
wheel assembly.
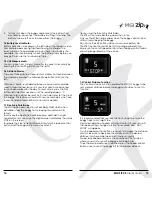
Step 4:
The handle is now free to pull
upwards. The handle will naturally
unfold as you continue to pull until the
handle is completely open.
Step 5:
Ensure that
the Top Bag Support
is moved upwards
as far as it can go.
Step 6:
Close the fold
lever to lock the handle
into place.
Step 7:
Push the Top Bag support
down to move it into position.
Summary of Contents for zip X5
Page 1: ...User Manual VERSION 1 3 ...