background image

40

Battery Installation

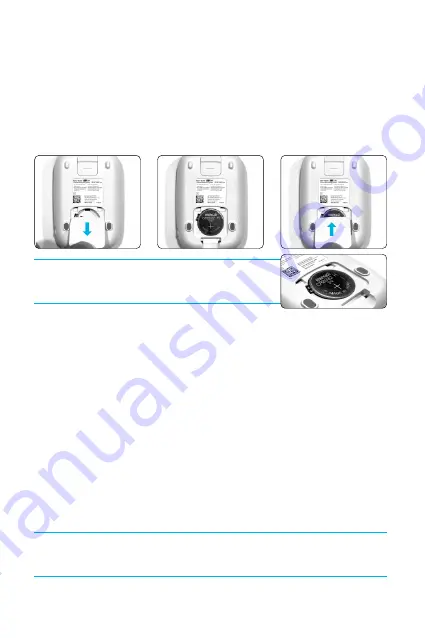
To begin, place the meter on a flat surface and take the battery cover off of  
the back of the meter. The battery is to be inserted into the meter with the 
Positive (+) side of the battery facing upward, away from the prongs.  
Replace the battery cover. The battery will lock into place once the battery  
cover is replaced.

NOTE: Make sure the Positive (+) side of the 
batteries face upward, away from the prongs.

Low Battery/Battery Replacement

The low battery icon will appear in the upper left corner of the LCD display to alert 
you when the battery power is running low, indicating new battery is needed.

Your EasyTouch® BluLink® meter uses only one 3V coin battery (CR2032), which 
is included. When replacing the battery, only CR2032 or equivalent coin battery 
should be used.

After changing the battery, please be sure to recheck your meter settings.

Follow-up Action

1.  Check your meter with the glucose control solution.
2.  Perform your test again.
3.   If you are experiencing symptoms that are not consistent with your blood 

glucose test results, call you healthcare professional.

NOTE: Verify the date and time are correct after changing your batteries.  
Re-set the date and time if necessary.

Summary of Contents for EasyTouch BluLink

Page 1: ...Instructions for Use...

Page 2: ...tic use only If you have any questions regarding the EasyTouch BluLink Blood Glucose Monitoring System please call us at 877 358 4342 toll free MHC Customer Support is available Monday thru Friday 9 t...

Page 3: ...d only be used with fresh capillary whole blood samples It is designed for in vitro diagnostics use only and should not be used for any purpose other than monitoring blood sugar levels It should not b...

Page 4: ...Update 11 29 2010 http www fda gov medicaldevices safety alertsandnotices ucm224025 htm CDC Clinical Reminder Use of Fingerstick Devices on More than One Person Poses Risk for Transmitting Bloodborne...

Page 5: ...ls or in any other container 16 Immediately replace the vial cap and close tightly after removing any test strips from the vial 17 Make a note of the discard date which is three months from the date y...

Page 6: ...rtip 20 Disposing of your test strips and lancets 25 Reviewing your results Reviewing your blood sugar 26 Reviewing your averages 26 Alternate site test 27 Performing a blood test with an alternate si...

Page 7: ...uLink Blood Glucose Monitoring System does not include the test strips and Control Solution thus each much be purchased separately Please call toll free for 877 358 4342 for purchase MHC Customer Supp...

Page 8: ...disposal of electrical and electric equipment Consult instructions for use Keep out of direct sunlight EasyTouch BluLink Meter Test Strip Port Insert the EasyTouch BluLink test strip Display Screen D...

Page 9: ...nfirmation window LowBatteryWarningSymbol AlarmSymbol TroubleshootingSymbol AverageTestResultSystem AfterHavingaMeal BeforeHavingaMeal AfterTakingMedication AfterSportActivity ControlSolutionSymbol Bl...

Page 10: ...to another allow 30 minutes for the meter to adjust to the new temperature before testing Make sure that the EasyTouch BluLink meter and test strips have adjusted to the temperature of the location f...

Page 11: ...ing range it could result in a false high blood sugar Repeat the test in warmer environment with a new test strip as soon as possible For additional information on possible limitations for accuracy on...

Page 12: ...date time designate the number of days for your glucose average calculation and set up to five daily alarms Power On Press for at least 3 seconds User Activity Option After pressing and releasing eith...

Page 13: ...releasing either the or buttons to set the number of days 1 99 for average calculation confirm by pressing Repeat this step for averages 2 and 3 Alarm on off After pressing and releasing either the o...

Page 14: ...ntly defaulted at 7 14 and 21days CAUTION 1 If are having difficulty setting up your meter please call us at 877 358 4342 Toll free Mon Fri 9am 5pm EST 2 The correct units of measure in the U S are mg...

Page 15: ...125 This is a very convenient function preventing the inconvenience of setting the code number on the meter every time CAUTION 1 Do not bend the test strip to prevent automatic code recognition failur...

Page 16: ...confirm you are receiving accurate results The Glucose control solution should be used Whenever you suspect the blood glucose test meter or blood glucose test strip are not functioning properly If yo...

Page 17: ...on a clean dry surface e g the lid of the test strip vial Dip the test strip into the control solution Results will appear in 5 seconds Compare the result to the range printed on the test strip vial t...

Page 18: ...25 and 345 CAUTION The ranges in the picture above are examples only Please refer to your test strip vial label for the exact ranges NOTE It is recommended that glucose control solution is stored at 4...

Page 19: ...esults still fall out of range please call customer support toll free 877 358 4342 Mon Fri 9am 5pm EST Follow up Action Check your meter and test strips with the glucose control solution Repeat steps...

Page 20: ...t the test stripupside down Whenyouinserttheteststripinto the meter the power automatically turns on displaying the code and temperature Make sure the code number matches the code on yourstrip vial Th...

Page 21: ...er to Page 41 Step 2 Performing a blood test with your fingertip WARNING EasyTouch BluLink meter and reusable lancing device are for single patient use only Do not share them with anyone including oth...

Page 22: ...skin 4 6 for average skin and 7 9 for thick or calloused skin Pull the end of the lancet device back To prick your finger push the center button CAUTION If the blood smears or runs do not use that sam...

Page 23: ...blood to the test strip and do not take off your finger until you get the completion sound CAUTION If the countdown does not start do not add more blood to the glucose test strip Discard the test stri...

Page 24: ...or button to select the activity that correlates with your result then press and release the button If you do not select to use the activity option during set up press the button Record the result val...

Page 25: ...ovetheteststripfromthemeter Usedteststripsmaybeconsideredbiohazardouswastein yourarea BesuretocontactyourHealthcareProviderfor instructionsondisposingofyourteststrips Disposing of your twist lancet Pu...

Page 26: ...nt result appears first Note the time and day of your blood sugar result Press and release the button and your previous result will appear on the display Reviewing your averages Press and release the...

Page 27: ...uLink meter You may test your blood sugar from your forearm upper arm palm ventral palm or dorsal hand fingertips thigh or calf using the AST tip It is recommended that alternate site testing be used...

Page 28: ...g a sample from your fingertip Ventral palm Dorsal hand Choose a fleshy area on the palm below your thumb or pinky finger Select a spot without any visible veins and away from any deep lines This may...

Page 29: ...uffering from hypoglycemia unawareness To ensure accurate results when lancing your arm forearm or upper arm leg calf or thigh or palm ventral palm or dorsal hand clean the test site with soap and wat...

Page 30: ...Hold the clear cap down against a fleshy area on the alternate site and press the release button Do not lift up Continue to hold the lancing device and gradually increase pressure for several seconds...

Page 31: ...f bruising occurs at an alternative site or you have difficulty getting a sample consider sampling from a fingertip instead You may want to review the choice of sites with your Healthcare Professional...

Page 32: ...he cleaning is to remove soil and dirt on all surfaces of the devices while the disinfecting is to kill the bloodborne pathogen stated above Materials needed Cleaning and disinfecting can be completed...

Page 33: ...2 Remove the wipe from the container 3 Make sure the meter is turned off 4 Wipe the outside of the meter carefully 3 passes horizontally and 3 passes vertically To clean the meter wipe it with a Cavi...

Page 34: ...forming cleaning and disinfecting procedures 2 Remove the wipe from the container 3 Make sure the used lancet is removed prior to cleaning 4 Wipe the outside of the reusable lancing device carefully 3...

Page 35: ...cting cycles which represents cleaning and disinfecting once per day for 3 years The meter can withstand cleaning and disinfecting 7 times per week over the 3 year life of the device NOTE 1 After clea...

Page 36: ...C Temperature Store your test strips in their original vial only Do not store in other types of containers Store test strip packages in a cool dry place Keep away from direct sunlight and heat After...

Page 37: ...mhcmed com products easytouch diabetic products blulink glucose monitoring system and purchase the computer cable from our sales representative The cable is sold separately Bluetooth Connection EasyT...

Page 38: ...the required information Step 3 Once your BluLink app is setup click the button or tap the My page button and select Sync Meter to establish a connection with your device Step 4 Ensure your meter is s...

Page 39: ...er will now transfer all glucose test results to your BluLink app When the data transfer is complete your meter will automatically switch to sleep mode Note Ejecting your test strip will attempt to tr...

Page 40: ...per left corner of the LCD display to alert you when the battery power is running low indicating new battery is needed Your EasyTouch BluLink meter uses only one 3V coin battery CR2032 which is includ...

Page 41: ...e meter by removing and then replace the battery while no test strip is inserted Contact customer support if the problem persists Test strip may be contaminated or reused Please insert a new test stri...

Page 42: ...emperature is less than 50 F 10 C Place the meter at a temperature between 50 104 F 10 40 C for more than 10 minutes and test again The ambient temperature is over 104 F 40 C Place the meter at a temp...

Page 43: ...lycemia high blood glucose You should inform your Healthcare Professional immediately There are no readings stored in the meter Not enough readings in the memory to display designated averages The glu...

Page 44: ...irst and test after High Glucose Results if your test result is higher than 180 mg dL it may mean hyperglycemia high blood sugar If you are uncertain about your test results consider testing again You...

Page 45: ...ts LLC has no knowledge of the performance of the device when the test strip is altered or modified in any manner For Warranty Service Purchaser must contact the customer service department of MHC Med...

Page 46: ...Altitude Up to 10 000 feet 3048 meter OperatingTemperature 50 104 F 10 40 C Operating Humidity 10 90 Strip StorageTemperature Store 36 86 F or 2 30 C and keep out of direct sunlight Do not Freeze Dis...

Page 47: ...47...

Page 48: ...Questions or Comments Call 877 358 4342 MHC Medical Products LLC 8695 Seward Road Fairfield Ohio 45011 www MHCmed com AD 121420 2...

Reviews: