03.
Fixing the gearmotor to the post (fig. 15).
a)
-
Place the gearmotor against the post (
*
) aligning its central vertical
axis with the vertical line previously traced on the post. Then align the
upper edge of the rear gearmotor bracket with the previously traced
horizontal line on the post (paragraph 3.4).
In this phase, ensure that the gearmotor is perfectly level; an offset
gearmotor could cause malfunctions of the automation.
(
*
)
Warning!
- If the post surface width is between 80 and 135 mm,
before proceeding with installation, the rear gearmotor fixing bracket
must be turned through 90°. Then follow the instructions in
fig. 21
.
b)
-
Mark the fixing points, drill the holes in the post and insert the plugs;
then secure the gearmotor using adequate screws and washers.
Note
- The screws are not included in the kit as their type depends
on the material and thickness of the post in which they are fixed.
c)
-
For increased stability of the gearmotor, adjust its rear feet so that
they are placed against the post. This adjustment can be made later,
when the control unit is removed from its seat for the first time (para-
graph 5.4).
04.
Shortening the length of the slotted arm (fig. 16).
a)
-
Loosen the nut of the slotted arm, remove the stop and move the two
pins apart, checking that the distance between them is the same as
the obtained
value C
. Then tighten the nut, but only provisionally.
05.
Checking that the length of the slotted arm is sufficient (fig. 17
and 18).
a)
-
Move the gate leaf to the maximum leaf closing position against the
travel limit stop.
b)
-
Extend the arm and move it up towards the leaf, placing the fixing
bracket on the arm. Then,
firmly press the curved arm against
the leaf (fig. 17-1a), until the two arms are completely
extended; apply force at the joining point (elbow fitting).
Caution! - the arms are completely extended only when the
elbow blocks against its stop.
c)
-
Ensure that the gearmotor arm is level (
fig. 17-1b
) and use a pencil to
mark
the centre
of the slots on the bracket (
fig. 17-2
), to enable sub-
sequent fine adjustments of leaf closure.
d)
-
Then provisionally fix the bracket on the leaf with a clamp or adhesive
tape and move the leaf to the maximum opening position, against the
floor-mounted travel stop.
e)
-
With the leaf in this position, check the gate as shown in
fig. 18-1
:
stretch a piece of string passing exactly above the two pins of the
slotted arm through to the leaf hinge pin. If the string is found
between the hinge pin and post in the area of the hinge pin (position
“BB” in
fig. 18-2
),
extend
the slotted arm by a few millimetres (value
“C”) and repeat the check. Repeat the procedure several times if nec-
essary until the string is located between the gate transit zone and
the leaf hinge pin (position “AA” in
fig. 18-2
), and until the arm no
longer comes into contact with the fixed obstacle behind the post.
06.
Cutting the slotted arm (fig. 19).
After ensuring correct operation of the entire arm, cut the excessive
part of the slotted arm as described below.
a)
-
Trace a line on the slotted arm in the exact position specified in phase
1 in
fig. 19.
Then remove the arm from the bracket and cut the
excess section of the arm.
b)
-
After removing any burrs found after cutting, re-assemble the arm
components with reference to
fig. 7
.
07.
Fixing the arm on the leaf (fig. 20).
a)
-
Drill the leaf at the marked points; remove the bracket from the arm
and fix it to the gate leaf with adequate screws.
Note
- The screws
are not included in the kit as their type depends on the material and
thickness of the post in which they are fixed.
b)
-
Fix the arm to the bracket, inserting the pin and stop benzing.
Impor-
tant
- Check that the bracket and arm are perfectly level. If neces-
sary, loosen the bracket screws and level as required.
c)
-
Permanently anchor the travel stops to the floor, in the same position
as established at the beginning of paragraph 3.4.
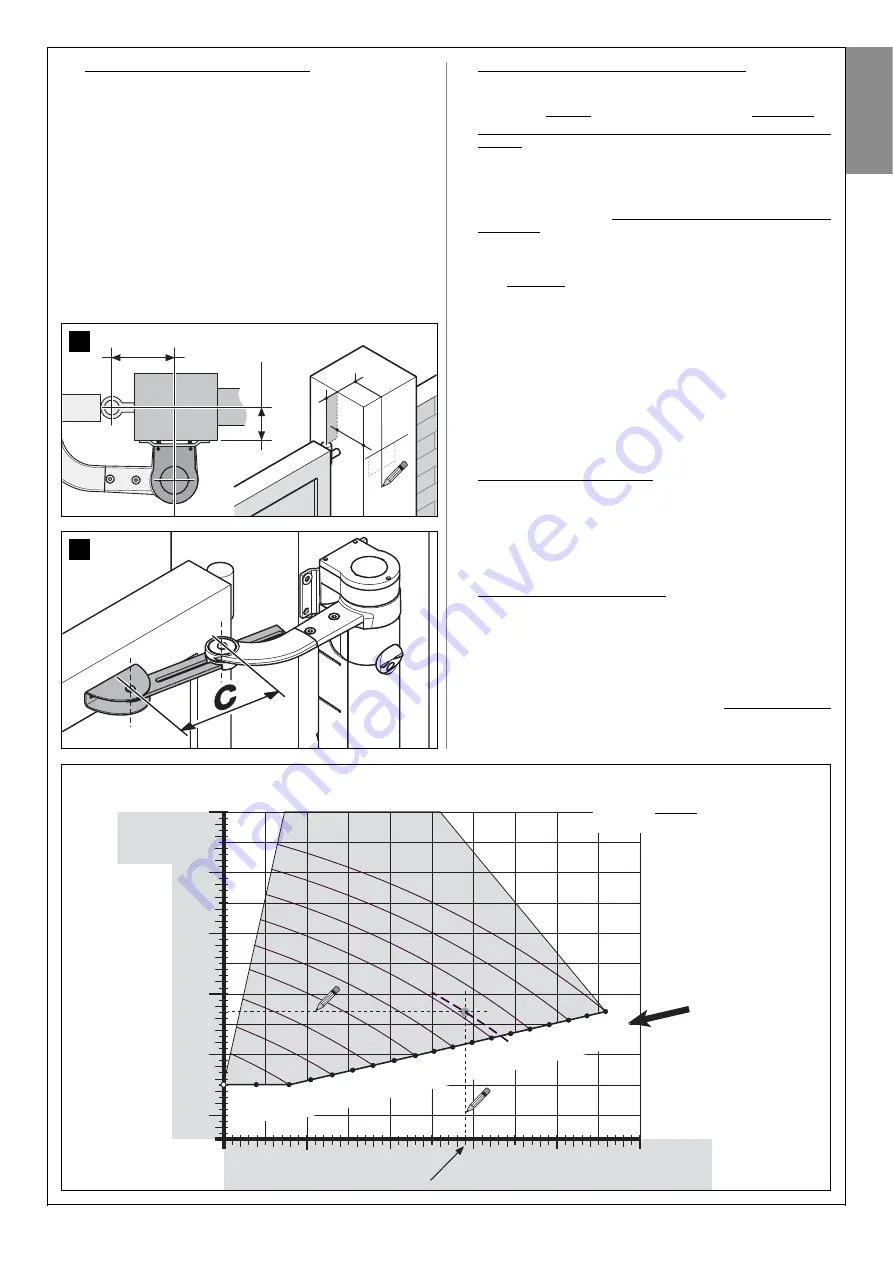
A
0
50
100
150
200
250
B
C
3
00
250
200
150
100
50
80
100
120
140
160
180
200
220
240
260
mm
B
= 145
GRAPH 4
(see paragraph 4.1B)
EXAMPLE:
if
value B
on the gate post
is measured at
145
mm and
value A
is
135 mm
value C
will be 210 mm
14
A
B
A
B
11
English
English –
11
Summary of Contents for WT1S
Page 11: ...1 2 3 4 45 3 1 2 a c b OK b a a b c d b a 5 6 7 8 9 10 11 12 13 13 English 10 English...
Page 14: ...OK b a 1 2 17 AA ok BB no OK 18 1 2 16 3 4 2 1 English English 13...
Page 15: ...b a 1 2 3 4 5 6 20 a b 1 2 3 4 19 English 14 English...
Page 36: ...Technical Documentation English English 35...
Page 37: ...English 36 English...
Page 39: ...English 38...
Page 41: ...English 40 English...
Page 44: ...Goniometer English English 43...
Page 45: ...44 English English Goniometer...


