background image

9

stoking should burn down to embers before new 
logs are added. 
To obtain the best possible combustion, you 
should regulate the effect/heat output with the 
fuel and Air. Burning small logs provides more 
powerful combustion than burning large logs 
as the surface area is greater and more gas is 
released. 
The amount of wood in the combustion chamber 
is another factor that affects combustion. The 
optimum combustion is achieved by placing two 
logs in the stove. If you want an enhanced effect, 
you can add more logs. 
The ideal heat output is reached by burning 
approx. 1,5 kg per hour.

3.5 LIGHTING A FIRE WHEN USING WOOD

The fire lighting method is very important for 
starting combustion quickly and efficiently. 
1.  Open all  the Air control fully. 
2. Place a small log of wood crosswise in the 

combustion chamber and put 2 firelighters 
close to the log. Put a new small log close to the 
firelighters and place several sticks of kindling 
at an angle above it in a cross hatch shape. Air 
must be able to reach the firelighters, but the 
logs should be touching to “warm” each other. 
Light the firelighters with a match.

3. Keep the door approx. 1 cm ajar, until the glass 

is too hot to touch. Then close the door. When 
there are distinct, visible flames and the fire has 
taken hold. 


Warning:

 The control and handles will get warm 

when the wood burning stove is in use. Please 
use the glove provided when you operate the 
wood burning stove.

4. Once the first charge of wood has burnt away 

leaving a glowing bed of embers you should 
be able to shut of the primary air controls. 
Slowly open the stove door using the glove 
provided and re-stoke the fire with the desired 
amount of wood. Close the door and open the 
secondary  air control to maximum  for a few 
minutes to allow the new wood to catch fire 
then slowly push the air control back into the 
stove until the desired effect is reached.

In order to avoid the quenching of the stove 
fire by use of oversized logs we recommend a 
maximum wood fuel size of 4” (10cm) diameter 
by 10” (25cm) length split seasoned logs, with a 
maximum moisture content of 20%. 

This appliance is designed to operate with the 
door closed, except for lighting and reloading, 
failure to close the door during operation can 
result in fume spillage.

Warning:

 Properly installed, operated and 

maintained this appliance will not emit fumes 
into the dwelling. 
Occasional fumes from re-fuelling may occur. 
However, persistent fume emission is potentially 
dangerous and must not be tolerated. If fume 
emission does persist, the following immediate 
actions should be taken: 
Open doors and windows to ventilate room then 
leave the premises. Let the fire go out or eject and 
safely dispose of fuel from the appliance. 
Check for flue or chimney blockage, and clean 
if required. Do not attempt to relight the fire 
until the cause of the fume emission has been 
identified and corrected. If necessary seek expert 
advice

3.6 IMPORTANT INFORMATION FOR  


WOOD BURNING 

With a full load of wood and burning near 
nominal output the stove will need to be refuelled 
approximately every 1-1.5 hours. One or two large 
logs will burn longer than a number of smaller 
ones. 
Care must be taken that logs do not touch the 
baffle or the glass panel. Do not stack logs above 
the level of the tertiary air inlet profiling in the rear 
vermiculite firebox liners at the back of the stove.
Always make sure that flames are visible above 
the wood after re-fuelling for cleanest burning. 
Burning without flames above the fuel will create 
unnecessary smoke. After re-fuelling open the 
primary air control fully for 3 minutes or until the 
logs are fully blackened to achieve full flames 
above the fuel. 
Wood burns best on a bed of ash and it is 
therefore only necessary to remove surplus ash 
from the stove occasionally. Burn only dry, well-
seasoned wood, which should have been cut, split 
and stacked - under cover from rain - for at least 
12-24 months with free air movement around the 
sides of the stack to enable it to dry out. 
Burning wet or unseasoned wood will create tar 
deposits in the stove and chimney and will not 
produce a satisfactory heat output. Wood that 
is not properly dry (‘dry’ is considered to be less 
than 20% internal moisture content) uses up 
energy from the burn process to evaporate the 

Summary of Contents for 137-LMF-TBOX

Page 1: ...n Manual Version_2_06_2021_Tinderbox MF www mi fires com BS EN 13240 2001 A2 2004 Tested as intermittent appliances burning wood logs MODEL Small Tinderbox Multifuel Medium Tinderbox Multifuel Large Tinderbox Multifuel ...

Page 2: ... used in smoke controlled zones only when the stop is in place and installed in accordance with the current building control regulations Please note this is a Multi fuel stove your new stove has been specifically designed for the combustion of wood 20 Moisture and approved wood bricks The use of approved manufactured Smokeless mineral fuels is also allowed The appliance should not be used as an in...

Page 3: ...my wood burning stove 8 3 5 Lighting a fire in the wood burning stove 9 3 6 Important Information for wood burning 9 3 7 Lighting a fire using smokeless fuel 10 3 8 Important Information for burning smokeless fuel 10 4 CLEANING AND MAINTENANCE 4 1 Chimney Sweeping 11 4 2 Combustion chamber 11 4 3 Glass 11 4 4 Gaskets 11 4 5 Ash 11 4 6 Cleaning the stove 11 4 7 Spare Parts List 11 5 WARRANTY RECORD...

Page 4: ...kW 5 0 kW 5 0 kW Mean CO emission at 13 O2 0 09 0 07 0 11 Mean flue gas temperature 290 ºC 272 ºC 274 ºC Flue gas mass flow 3 1 g s 3 4 g s 3 8 g s Mean CnHm emission at 13 O2 71 Nmg m3 43 Nmg m3 90 Nmg m3 Mean NOx emission at 13 O2 89 Nmg m3 112 Nmg m3 97 Nmg m3 DIN Plus particulates at 13 O2 12 Nmg m3 7 Nmg m3 10 Nmg m3 SMOKELESS MINERAL FUELS RESULTS PARAMETER SMALL TINDERBOX MF MEDIUM TINDERBO...

Page 5: ...hen installing the stove such that the requirements of the Health and Safety at Work Act are met 2 2 POSITION OF THE STOVE DISTANCE REQUIREMENTS The wood burning stove must be installed in a suitable and physically possible position You need to be sure that the position complies with local regulations Please ensure if the stove is placed in a fireplace recess it is advised that there is at least 5...

Page 6: ...d you will have to seek the advice of a flue and chimney specialist to carry out a BS EN13384 Chimney Calculation to see if the chimney will work If the stove is being fitted into a brick chimney or clay concrete chimney it must be swept before installation and checked for soundness and suitability A B D C G C G F E The chimney must also be free from cracks and blockages We advise you take the adv...

Page 7: ...s suitable for use in smoke control areas when burning wood logs The appliances have been factory fitted with a modification to fix the air controls at the correct minimum position to comply with the smoke control requirements This appliance must not be used in a shared flue system The minimum flue draft is 12 Pascal s at nominal output 2 4 VENTILATION FRESH AIR SUPPLY In order for the wood burnin...

Page 8: ...ded when you operate the wood burning stove 3 2 THE FIRST TIME A FIRE IS LIT The first few times the stove is used there may be some smoke and unpleasant odours from the wood burning stove which is fairly normal This is caused by the heat resistant paint hardening Make sure there is sufficient ventilation during this stage It is also important not to let the fire burn too fiercely the first 2 3 ti...

Page 9: ... seasoned logs with a maximum moisture content of 20 This appliance is designed to operate with the door closed except for lighting and reloading failure to close the door during operation can result in fume spillage Warning Properly installed operated and maintained this appliance will not emit fumes into the dwelling Occasional fumes from re fuelling may occur However persistent fume emission is...

Page 10: ...e primary air slider Care should be taken to ensure that the firebox is not overfilled with smokeless fuel it should be no higher than the log guard 3 8 IMPORTANT INFORMATION FOR BURNING SMOKELESS FUEL When re fuelling the stove always refuel onto a bed of hot embers fully open the secondary and primary air controls until the new fuel is well alight before adjusting the air controls for the desire...

Page 11: ...above it This will overheat the grate and cause distortion and premature wear 4 6 CLEANING THE STOVE The stove s surface is treated with a heat resistant Senotherm paint which will stay at its best just by being vacuumed with a small soft mouthpiece or dusted with a soft dry cloth Do not use spirit or other solvents as they will remove the paint MI Fire stoves are painted with a heat resistant pai...

Page 12: ...mmended fuels The Warranty registration form is found at the rear of the Installation instruction Manual For the context of the warranty an MI Flues flue liner or chimney system is described as a complete flue system purchased from MI Flues Ltd or one of its distributors The complete system must comprise exclusively of the correct components taken from the MI Flues product range 5 2 INSTALLER DETA...

Page 13: ...13 5 3 ANNUAL SERVICE SWEEPING RECORD DATE ENGINEER SWEEP NAME CERTIFICATE RETAINED ...

Page 14: ...Park Mitcham Road Blackpool Lancashire FY4 4QN Your Details Name Address Postcode Contact Number Email Model name Serial number Installation date Installer name Installer HETAS Registration No Fast Clean Scratch Free Clear View Available on line at www mi fires com or from all good retailers THE BEST STOVE GLASS CLEANING SPONGE Perfect dry cleaning for all stove glass ...

Page 15: ...15 6 STOVE DIMENSIONS SMALL TINDERBOX MULTIFUEL ...

Page 16: ...16 MEDIUM TINDERBOX MULTIFUEL ...

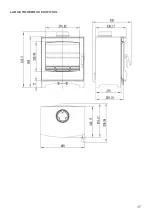
Page 17: ...17 LARGE TINDERBOX MULTIFUEL ...

Page 18: ...www mi fires com MI Flues Ltd Taymin Business Park Mitcham Road Blackpool Lancashire FY4 4QN sales mi flues com sales mi fires com ...

Reviews: