background image

       Rotary Surface Cleaner Manual (18 Inch) 2000                    


                        9

NOZZLE SELECTION & INSTALLATION:

1.  Your Rotary Surface Cleaner will come installed with one set of 2502.5  


 nozzles.


a.  The minimum orifice size to be used in your Rotary Surface Cleaner is  


half that which is being used in your pressure washer.  Example:  If your  


pressure washer uses a size 5 orifice, you will need to use a size 2.5  


orifice in your Rotary Surface Cleaner.  (Two nozzles are inserted in the  


Rotary Surface Cleaner, therefore;  two nozzles x size 2.5 orifice = size  


5 orifice.)


b.  The nozzles being used should have a 15°-25° spray pattern; anything  


less than a 15° spray pattern can damage the area being cleaned.   


Anything more than 25° may not allow the bar to rotate.

2.  Nozzles should be screwed into the rotating bar.  The spray fan should be 

parallel to the Rotating Bar.  (See figure at right.)

UNIT ASSEMBLY:

1.  Line up the holes on the lower part of handle (7) with the holes on the cover 

assembly (4).

2.  Insert the clevis pins (5) through the handle and cover holes and attach to the 

bridge pins (6).

3.  Attach the upper handle (9) by lining up the hole in the upper and lower handle. 

Push the clevis pin (8) through the aligned hole and attach to the bridge pin (6).

4.  Quick connect the Rotary Surface Cleaner hose assembly to the handle center 

and to the swivel located on the unit base.

SET-UP:

1.  Locate the high pressure discharge hose on your pressure washer and  

ensure it is securely  connected to the water outlet of the pressure washer.  

Quick connect the other end of the high pressure discharge hose to the gun on 

the Rotary Surface Cleaner.

2.  Connect the water supply hose, one end to your pressure washer, the other end 

to a pressurized water supply.

SURFACE PREPARATION:

1.  Clear any loose debris from the area to be cleaned.

2.  Never attempt to clean surface with objects that protrude from the surface being 

cleaned. Striking any raised obstacle during operation will damage machine. If 

contact does occur and results in vibration when operating machine, STOP and 

replace spray bar.

INSTALLATION & PREPARATION

1/4 MEG

2503

Nozzle

Spray Pattern

(Parallel to Bar)

Rotating Bar

CAUTION

Risk of Injury or damage to machine!!

NEVER OPERATE THE UNIT IF IT BEGINS TO VIBRATE!

Shutdown the unit and tighten the rotating bar, bolts and fittings.

Summary of Contents for AW-7020-8000

Page 1: ...Y SURFACE CLEANER AW 7020 8000 OPERATING INSTRUCTIONS AND PARTS LIST CAUTION RISK OF INJURY READ MANUAL BEFORE OPERATING THIS MANUAL IS AN IMPORTANT PART OF THE CLEANER AND MUST REMAIN WITH THE UNIT WHEN YOU SELL OR RENT IT 37 0423 072718 Copyright 2000 Mi T M Corporation ...

Page 2: ...EPARATION 9 10 NOZZLE SELECTION INSTALLATION 9 UNIT ASSEMBLY 9 SET UP 9 SURFACE PREPARATION 9 PRE START INSPECTION PROCEDURES 10 OPERATION 12 START UP 12 SHUT DOWN 12 TROUBLESHOOTING 13 PARTS LIST 14 17 WARRANTY 19 WARNING This product can expose you to chemicals including Lead which is known to the State of California to cause cancer and birth defects or other reproductive harm For more informati...

Page 3: ...SIBILITY OF PERSONAL INJURY TO THE OPERATOR Unbox the unit and inspect for signs of obvious or concealed freight damage Be sure that all damaged parts are replaced and the mechanical problems are corrected prior to the operation of the cleaner Write in the serial number in the space provided below SERIAL NUMBER_________________________________ If you have questions contact your Customer Service Re...

Page 4: ... IPM 3 0 10 0 11 36 37 85 Maximum Temperature F C 212 100 Maximum RPM 2500 Unit Net Weight lbs Kg 19 8 62 Unit Net Dimensions IN CM L18 75 x W18 75 x H71 25 L47 6 x W47 6 x H181 0 Unit Shipping Weight Ibs Kg 25 11 34 Unit Shipping Dimensions IN CM L35 0 x W19 75 x H10 25 L88 9 x W50 2 x H26 0 SPECIFICATIONS ...

Page 5: ...t Label and the Material Safety Data Sheet MSDS provided with your detergent High pressure hoses should be inspected daily for signs of wear If evidence of failure exists promptly replace all suspect hoses to prevent the possibility of injury from the high pressure spray If a hose or fitting is leaking NEVER PLACE YOUR HAND DIRECTLY ON THE LEAK Before using rotary surface cleaner or when quick con...

Page 6: ...acid type cleaners with this rotary surface cleaner Protective equipment such as rubber suits gloves and respirators are advisable especially when using cleaning detergents Keep all detergents out of the reach of children ALWAYS wear protective goggles when operating the unit to shield the eyes from flying debris and detergents DO NOT direct spray toward fragile materials such as glass for shatter...

Page 7: ...vent accidental discharge the trigger gun should be securely locked when not in use Always wear eye and ear protection when using the Rotary Surface Cleaner Other protective clothing such as a rubber suit gloves respirator etc may be necessary when using detergents Never make adjustments on the machine while in operation DO NOT leave pressurized unit unattended Shut off the pressure washer and rel...

Page 8: ...8 Rotary Surface Cleaner Manual 18 Inch 2000 FEATURES 0MGEN272 112197 DCE 1 Box 2 Insert 3 Insert 4 Cover Assembly 5 Clevis Pin 6 Bridge Pin 7 Handle Lower 8 Clevis Pin 9 Handle Upper ...

Page 9: ... lining up the hole in the upper and lower handle Push the clevis pin 8 through the aligned hole and attach to the bridge pin 6 4 Quick connect the Rotary Surface Cleaner hose assembly to the handle center and to the swivel located on the unit base SET UP 1 Locate the high pressure discharge hose on your pressure washer and ensure it is securely connected to the water outlet of the pressure washer...

Page 10: ...s If found DO NOT USE HOSE Replace damaged hoses before starting 4 Unlock the trigger gun and squeeze the trigger Water will begin flowing from the nozzles of the Surface Cleaner Ensure nozzles are not clogged and spray pattern is not erratic Change nozzles before proceeding if problems exist 5 Be sure that all damaged parts are replaced and that the mechanical problems are corrected prior to oper...

Page 11: ...G AND MAINTENANCE INSTRUCTIONS DO NOT ATTEMPT TO OPERATE THIS ROTARY SURFACE CLEANER UNTIL YOU HAVE READ AND UNDERSTOOD ALL SAFETY WARNING AND INSTRUCTIONS LISTED IN THIS MANUAL INCORRECT OPERATION OF THIS UNIT CAN CAUSE SERIOUS INJURY DO NOT ALTER OR MODIFY THIS EQUIPMENT IN ANY MANNER ...

Page 12: ...ge nozzles before proceeding if problems exist 5 Walk slowly behind the unit cleaning as you go If striping occurs slow down the pace Do not allow machine to remain stationary on soft surfaces such as wood 6 Check weep holes on top of the swivel periodically Water will seep slowly If it shoots out shut down the unit and replace seals and or main seal SHUT DOWN 1 Turn the Pressure Washer off 2 Turn...

Page 13: ... dislodged Do not use Contact your Customer Service Seal malfunction Do not use Contact your Customer Service Bearing failure Do not use Contact your Customer Service Excessive vibration of Nozzle clogged Clean or replace Surface Cleaner OR Cleaner base is creating a Rotating bar bolts or fittings Tighten suction to the surface loose Rotating bar or swivel rotor Replace bent Streaked cleaning patt...

Page 14: ...14 Rotary Surface Cleaner Manual 18 Inch 2000 18 INCH ROTARY SURFACE CLEANER AW 7020 8000 0MGEN269 083017JRC ...

Page 15: ...Assembly 33 0289 1 6 Quick Connect 17 0007 1 7 Clips 33 0477 12 8 Skirt 33 0476 1 9 Rivots 33 0478 12 10 Cover Assembly 33 0290 1 11 Mi T M Decal 34 2188 1 12 Decal Warning 24 0845 1 13 Handle Base 56 0027 2 14 Screw 27 8912 8 15 Nut 30 0136 8 16 Bridge Pin 43 0096 3 17 Clevis Pin 43 0097 2 18 Lower Handle 7 0147 1 19 Quick Connect 17 0006 1 20 High Pressure Hose Four Feet Required 15 0337 1 21 Cl...

Page 16: ...16 Rotary Surface Cleaner Manual 18 Inch 2000 SWIVEL ASSEMBLY 33 0289 33 0289 061213 RAG ...

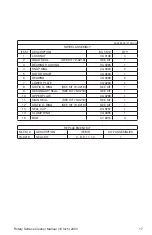
Page 17: ...94 2 5 ROTOR SHAFT 33 0284 1 6 BEARING 48 0068 2 7 LOWER PLATE 33 0283 1 8 STATIC O RING SEE KIT 70 0218 SEE KIT 1 9 SECONDARY SEAL SEE KIT 70 0218 SEE KIT 1 10 UPPER PLATE 33 0286 1 11 MAIN SEAL SEE KIT 70 0218 SEE KIT 1 12 STATIC O RING SEE KIT 70 0218 SEE KIT 1 13 SEAL CAP 33 0287 1 14 CLAMP RING 43 0095 1 15 BOLT 27 8916 4 REPLACEMENT KIT Mi T M DESCRIPTION ITEMS OF ASSEMBLIES 70 0218 SEAL KIT...

Page 18: ...18 Rotary Surface Cleaner Manual 18 Inch 2000 NOTES ...

Page 19: ...misapplication misuse accidents operation at other than recommended speeds pressures or temperature improper storage or freight damage Parts damaged or worn because of the use of any type of detergents or by operation in abrasive or corrosive environments are not warranted Failure to follow recommended operating and maintenance procedures also voids warranty 3 The use of other than Genuine Mi T M ...

Page 20: ...20 Rotary Surface Cleaner Manual 18 Inch 2000 ...

Reviews: