

2
3
13
6
5
11
10
4
9
8
7
12
14
15
16
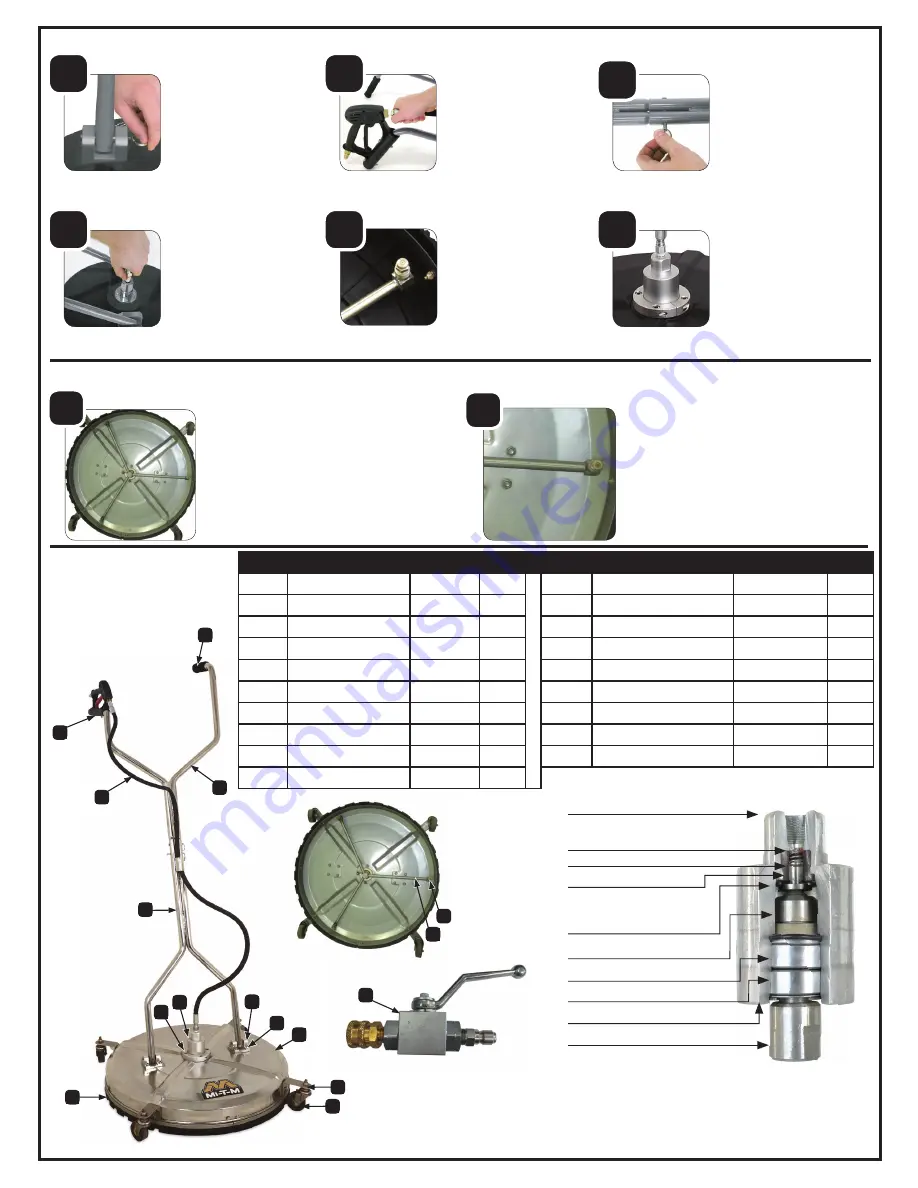
AW-7020-8007
Ref. # Description
Part #
Qty.
Ref. # Description
Part #
Qty.
1
Ball Valve Kit
50-0210
1
10
Cover
33-0552
1
2
Spray Gun
16-0465
1
11
Mounting Blocks
56-0072
2
3
Hose, 62” x 3/8”
15-0326
1
12
Pin and Ring Set
43-0140
1
4
Handle, Lower
7-0244
1
13
Handle, Upper
7-0243
1
5
Rotary Head*
33-0535
1
14
Hand Grip
7-0237
1
6
Collar
33-0534
1
15
Rotary Arm
33-0553
1
7
Nylon Brush
33-0551
1
16
Nozzle, 25 Deg. 020
18-0298
3
8
Caster
14-0135
4
*
Head Rebuild Kit
70-0598
1
9
Caster Bracket
13-0228
4
SET UP PROCEDURES
TROUBLE SHOOTING
PARTS LIST
1
2
3
We recommend that
you first fit the lower
portion of the han-
dle into the mounting
brackets on the cover
and secure with the
bolts or the pins & clips.
Next, tighten the
“fixed” hose end into
the gun mounted onto
the upper portion of the
handle. Use teflon tape
on the hose ends and
tighten with a wrench
until snug. Do not
overtighten.
Once this is complete,
join the two sections of
the handle together and
secure with the bolt or
the pin & clip.
4
5
6
Next, tighten the swivel
end of the hose with a
wrench into the top of
the rotary head until
snug.
Turn the cover over
and check to ensure
that the nozzle tips are
securely tightened and
the spray pattern is in
line with the rotary arm.
The factory presets the
height of your rotary
head from the ground
based on peak perfor-
mance. If you choose to
lower or raise the height
of the head, loosen the
tension bolt in the collar.
1
2
Rotary Arm doesn’t spin:
• Remove, inspect and clean nozzles.
Replace if damaged
• Ensure there is no water leaking
excessively from the weep holes on
the rotary head (water will normally
seep out of these holes).
Leaves striping:
• Ensure nozzles aren’t damaged or
plugged.
• Ensure rotary arms are straight.
• Ensure nozzle groove is in align-
ment with arm.
** Note that lowering the head too far may result in the rotary arm hitting the surface and damaging it.
1
WARRANTY
The rotary head has a six-month warranty from the date of purchase. Should you
encounter problems with the rotary head within that time period, simply return the
defective part for warranty to the place of purchase.
There is no warranty on the nylon brush ring. All other components of the surface
cleaning system have a 90-day warranty against manufacturer’s defects only.
Hose connection inlet
Stainless steel inlet valve
with Carbide seat (22-0488
includes oring)
Stainless steel bearings
Stainless steel rotating shaft
Aluminum housing
Stainless steel spring
Viton O-Ring (25-0679)
Viton O-Ring (25-0677)
WHIRL-A-WAY ROTARY HEAD BREAKDOWN
Stainless steel sleeve
Viton O-Ring (25-0678)


