22
Operator's Manual
STORAGE & MAINTENANCE
MAINTENANCE-EVERY 3 MONTHS CONT.:
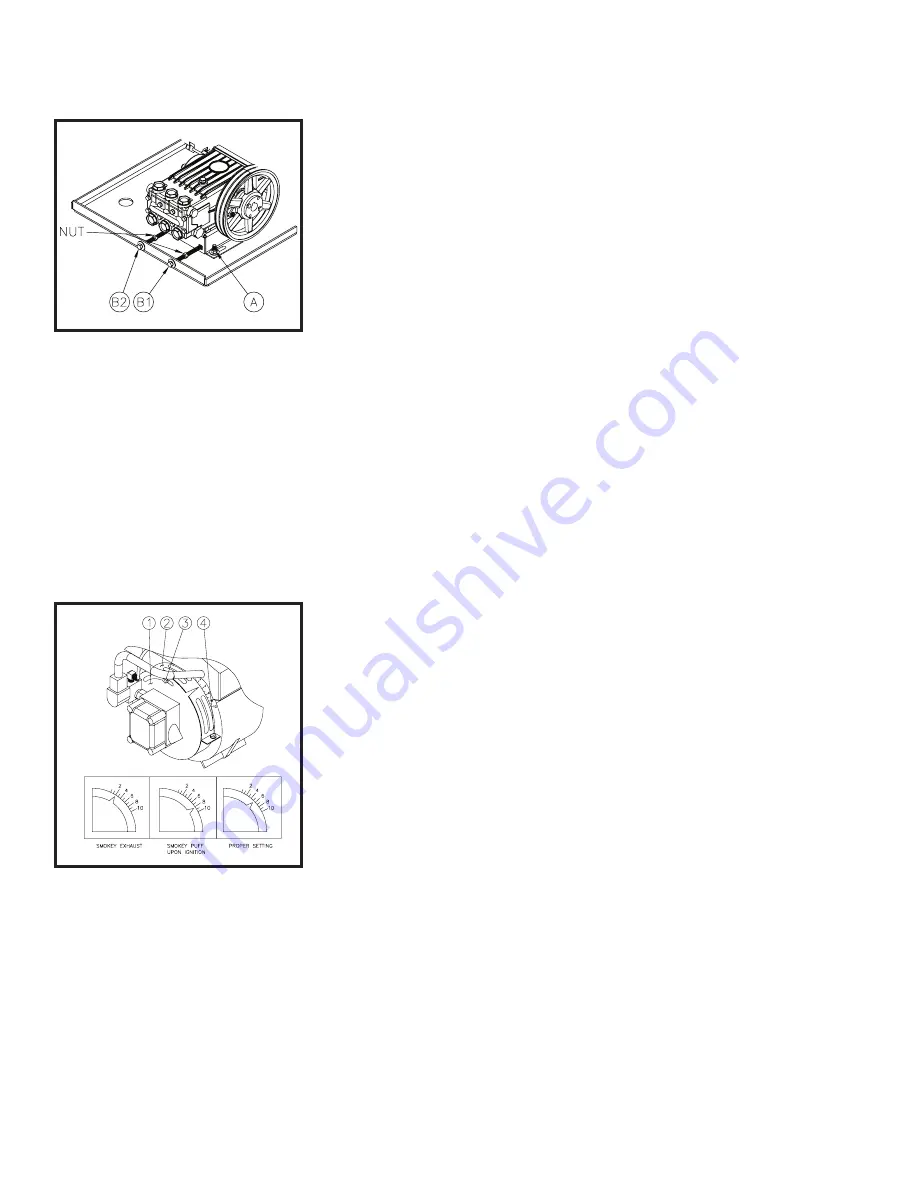
BELT INSPECTION: Ensure unit is off and remove the beltguards. Inspect the
v-belt for wear and tightness. If the v-belt needs to be replaced or tightened,
follow the procedures listed below:
Replacement:
. Loosen the four pump mounting bolts (A).
2. Loosen the two alignment nuts approximately one inch on the
alignment bolts (B & B2).
3. Slide the pump toward the engine to loosen belts.
4. Remove and replace belt.
Tighten:
(If v-belt was not replaced, you will need to loosen the nuts on the
alignment bolts B and B2 before proceeding.)
. Tighten B2 alignment bolt. The pump will shift to the left until there
is tension on the belt. Then tighten B2 nut.
2. Tighten B1 alignment bolt, until sheaves are straight. (Use a
straightedge for alignment.)
3. Push on the v-belt to check belt deflection for tension. There should
be 1/4" to 1/2" deflection for correct tension.
4. If sheaves are straight and tension is correct, tighten B1 nut and
the four pump mounting bolts (A).
5. If tension is not correct, repeat steps 6 and 7 until correct alignment
and tension is achieved. Tighten the four mounting bolts (A) when
completed.
6. Loosen B2 nut, tighten B2 bolt, tighten B2 nut.
7. Loosen B1 nut, tighten B1 bolt, tighten B1 nut.
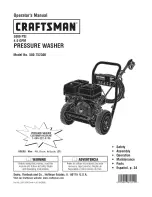
BURNER AIR ADJUSTMENT: The air shutter has been factory preset for proper
operation between sea level and 2000 feet elevation at standard conditions
(60°F ambient water and air temperatures). In colder temperatures or higher
altitudes, it may be necessary to adjust the air supply to the combustion
chamber. This adjustment will maximize burner efficiency and avoid inefficient
operation or excessive sooting of the heat exchanger coil. A smoke spot
test is recommended during any air shutter and band adjustment. If you do
not have the equipment to perform a smoke spot test, follow the procedures
listed below.
. The machine must be running and the burner ON.
2. Loosen the Locking Screw (#3 at left) on the shutter.
3. Check for smoke from the heat exchanger exhaust. If smoke is not
present, slowly close the Air Shutter (#1 at left) by moving the dial
counterclockwise to a lower number. Continue moving the dial until
smoke appears.
4. Record this setting.
5. Open Air Shutter (# at left) two increments. Example: If Air Shutter
was set at 2, move it to 4.
6. Slowly trigger the gun on and off. This will cause the burner to turn
on and off. Look for a smoke puff when the burner ignites.
7. Repeat steps 5 and 6 until a smoke puff is noticed. Record the Air
Shutter Setting.
8. The difference between the recorded settings in steps 4 and 7 is the
combustion window. Set the dial /2 way between these settings.
NOTE:
If you are unable to detect a setting on either step 3 or 7, more or less
air may be needed to achieve a proper combustion window. Loosen
the Bolt (#4 at left) and open the Air Band (#2 at left) in 1/4" increments.
Repeat steps 3-8 until proper combustion window is achieved.
TEST WATER & FUEL PRESSURE: These procedures should be performed
by an authorized service technician.
TEST WATER TEMPERATURE: This procedure should be performed by an
authorized service technician.
BURNER AIR ADJUSTMENT
Summary of Contents for HDS series
Page 10: ...10 Operator s Manual HDS FEATURES HDS FEATURES 032905 RZ ...
Page 40: ...40 Manuel de l utilisateur COMPOSANTS HDS HDS FEATURES 032905 RZ Facultatif ...
Page 70: ...70 Manual del Operador CARACTERÍSTICAS HDS FEATURES 032805 RZ oPCIÓNAL ...
Page 90: ...90 Manual del Operador NOTA ...
Page 91: ...Manual del Operador 91 NOTA ...
Page 92: ...92 Manual del Operador ...


