14
Work Pro WCW-Series Operator’s Manual
OPERATING INSTRUCTIONS
PRIMING THE PUMP:
1.
It is essential to prime the pump on initial start-up and each time the water
supply is disconnected from the unit after initial use.
2.
Lay the high pressure hose (16) out to remove any loops. Water flow will
constrict the hose, creating tight loops if the hose is not straight.
3.
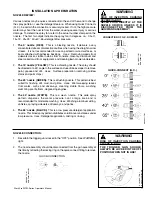
Be certain the nozzle assembly is NOT be connected to the gun
assembly at this time. See "Nozzle Connection" page 11.
4.
With the trigger gun locked in the "OFF" position, turn the water supply
completely on. Pointing the gun in a safe direction, unlock the trigger gun
and squeeze the trigger.
5.
Low pressure water will begin flowing from the hose/gun assembly. This
allows the unit to prime and purge any air from the system. The unit is
primed when water flow is uninterrupted by air.
6.
Once the unit is primed, release the trigger and lock the gun in the "OFF"
position. Securely connect the nozzle assembly. See "Nozzle Connection"
page 11.
CAUTION
RISK OF DAMAGE.
DO NOT ALLOW SPRAY
PATTERN TO REMAIN ON A
FIXED AREA FOR AN EXTENDED
PERIOD OF TIME. POSSIBLE
DAMAGE MAY OCCUR TO THE
AREA.
DANGER
RISK OF INJECTION CAUSING
SEVERE INJURY!
KEEP CLEAR OF NOZZLE! NEVER
PLACE HAND OR FINGERS IN
FRONT OF NOZZLE!
DO NOT DIRECT DISCHARGE
STREAM AT PEOPLE OR PETS!
BE CERTAIN THE NOZZLE IS
SECURELY CONNECTED TO THE
WAND TO PREVENT ACCIDENTAL
DISCHARGE!
START-UP:
1.
Refer to the "Safety Precautions" pgs. 4-7 before starting the unit.
2.
Locate the Safety Decals on your unit and heed their warnings. (1-4, 18.)
3.
With the gun locked in the "OFF" position, Point the trigger gun away from
yourself or anyone else. Ensure the water supply is completely turned on.
4.
Disengage the safety lock-off on the gun and squeeze the trigger. Low
pressure water will begin flowing from the nozzle.
5.
BE CERTAIN the trigger gun remains in an open position while starting the
engine.
Brace yourself as the gun will kickback from the high pressure
created by the pump once the engine has started.
6.
Steady the unit during engine start-up. (Refer to the engine manual
accompanying this pressure washer for the correct procedures needed to
start the engine.)
7.
Once the engine has started, perform the following procedures with the gun
open:
a.
Inspect for system oil leaks and fuel leaks.
If a fuel leak is found, TURN UNIT OFF IMMEDIATELY! See "Fire &
Ventilation Precautions", #2 and #4, pg. 4. Be sure that all damaged
parts are replaced and that the mechanical problems are corrected prior
to operation of the unit. If you require service, contact Customer Service.
b.
Inspect high pressure hoses for kinking, cuts and leaks. If a cut or leak
is found, DO NOT TOUCH HOSE AT LEAK!!! TURN UNIT OFF
IMMEDIATELY! Replace hose before restarting the unit. See
"Miscellaneous Safety Precautions" #6, page 6. Be sure that all damaged
parts are replaced and that the mechanical problems are corrected prior
to operation of the unit. If you require service, contact Customer Service.
8.
Trigger the gun several times. Be certain to LOCK the trigger gun in the
"OFF" position whenever changing the quick connect nozzles. NEVER look
directly into the nozzle! High pressure water creates a risk of severe injury!
9.
Do not allow unit to operate in bypass mode (with trigger closed) for more
than three minutes without triggering the gun. Failure to follow this simple
rule can cause premature failure of pump packing seals, resulting in costly
pump repair.
10. Because your pressure washer delivers a high pressure spray and a variety
of spray patterns, there are many cleaning jobs that can be done without the
use of detergents. If a cleaning agent is required, see "Cleaning With
Detergents" pg. 15 for the correct procedures.


