16
For 3-phase operators: If door moves in wrong direction, turn off incoming power and reverse any two of the three
incoming power supply leads to correct rotation. Press the on board open button again. If door is going in the correct open
direction, activate the open limit switch to ensure door stops. If door does not stop, turn off incoming power and
interchange any two incoming power lines once again and slide dipswitch #1 to reverse motor direction. If motor direction
is reversed, the open and close limit switches are automatically reversed. However, the advanced close limit switch needs to
be manually changed. To do this, disconnect the 2 wires from the advanced limit switch and re-connect to the auxiliary limit
switch provided.
Note
: Ensure that when the on-board open button is depressed and the door moves in the correct open direction that
activation of the open limit switch illuminates the “OPEN LIMIT’’ L.E.D and stops the door.
LIMIT SWITCH ADJUSTMENTS:
Once the motor rotation and limit cam direction have been verified, adjust the limit cam settings. Please note that when
each limit switch is activated the corresponding LED will light up. Refer to operator installation manual for complete limit
switch adjustment instructions.
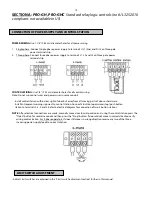
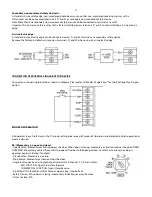
CONNECTION OF EXTERNAL O/C/S PBS:
Connect O/C/S PBS as shown in diagram.
Note: Jumper #1 must be removed after the external O/C/S PBS has been installed.
FAILSAFE FEATURE
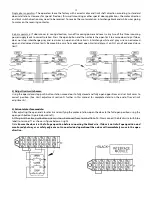
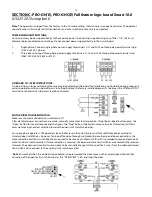
A safety device failsafe feature is built into the logic board. The logic board has provisions to connect one primary
monitored safety device as well as 1 or more secondary non-monitored safety device(s).
Primary monitored safety device:
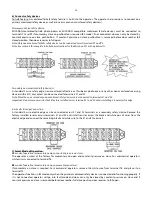
MICANAN monitored failsafe photo beams or MICANAN compatible monitored failsafe devices must be connected to
terminals P1 and P2 as primary monitored safety device. Primary monitored safety device must be connected if momentary
activation on close is required in B2, T and TS modes. If it is not connected in B2, T and Ts modes, door can only be closed by
constant pressure on close and if constant pressure is removed before door reaches full close position, door reverses to full
open.
Note: Only one monitored failsafe device can be connected to terminals P1 and P2.
Summary of Contents for PRO-GH
Page 1: ...INSTALLATION AND INSTRUCTION MANUAL MODELS PRO GH PRO GHC AUG 2010...
Page 32: ...32...
Page 33: ...33 33...
Page 34: ...34...
Page 35: ...35 35...
Page 36: ...36 36...
Page 37: ...37...
Page 38: ...38...
Page 39: ...39...
Page 40: ...40...
Page 41: ...41...
Page 42: ...42...
Page 43: ...43...
Page 44: ...44...

