background image

WARRANTY POLICY

PACIFIC LIMITED WARRANTY

The 

Pacific 

 ScrubMaster 30R has been manufactured, tested and inspected in accordance with specific engineering requirements.  This

machine is WARRANTED to be free from defects in workmanship and materials for periods as follows from the date of purchase.

Ten years parts, one year labor – Polyethylene Components
Five years parts, one year labor – Main Frame
Two years parts, one year labor– Brush Drive Motors
One year parts & labor – All other components unless excluded below

Travel time for warranty repair is authorized for a period of ninety (90) days following the date of sale to the end user, with a maximum
of three (3) hours per claim.

This warranty extends to the original user/purchaser and only when used, operated and maintained in accordance with 

Pacific

Operating and Maintenance instructions.

This warranty does not apply to certain wear parts and accessories of the machine such as electrical cords, carbon motor brushes, floor
brushes, belts, hoses, tools, squeegee blades, etc., nor does it apply to damage or failure caused by improper use, abuse or neglect.
Warranty credit or replacement of return parts including motors, pumps, etc., is subject to incoming inspection of those items.

To secure repair under this warranty, the following procedure should be taken:

1. 

 After the expiration of the ninety (90) day travel time warranty period, the customer is responsible for warranty travel payment or

the inoperative machine or warranted parts must be delivered to the authorized dealer with shipping and delivery charges prepaid.  If
unable to locate the Dealer, you may contact 

Pacific 

at the address listed herein for the location of the nearest 

Pacific 

repair center or

agent or for other instructions pertaining to your warranty difficulty.

2. 

 Upon compliance with the above warranty procedure, all warranted repairs will be completed at no additional charge or cost to the

user.

3.

  Only 

Pacific 

or its authorized dealers and agents may make no charge warranty repairs on this product.  All others do so at their own

risk.

This warranty limits 

Pacific 

liability to the repair of the product and/or warranted parts replacement and does not include incidental or

consequential damages arising from the use of a 

Pacific 

machine whether defective or not.

BATTERY WARRANTY

In addition to the terms above, any original equipment Pacific Battery which becomes unserviceable under normal use within a period
of ninety (90) days from date of sale to the original user will be repaired or replaced with one of equal specification at our option, F.O.B.
any authorized Pacific Sales or Service Branch, with no charge to user, except transportation costs.  After the expiration of the above
ninety (90) day period, any battery which fails under normal use will be adjusted to the original user with a new battery of equal
specification on a twelve (12) month pro rata basis from the date of purchase.  Adjustment will be determined using the then current
list price, plus transportation costs.  Warranty is rendered null and void if battery is not kept  filled to the proper level with
DISTILLED WATER.

This warranty is in lieu of all other expressed or implied warranties and is extended to the original purchaser/user.

10/01

885613A

2259 Sheridan

Muskegon, Michigan  49442

Ph: (800) 968-1332  Fax: (231) 773-1642

www.nextwaveofclean.com

Summary of Contents for ScrubMaster 30R

Page 1: ...9312 or 800 331 3339 MI OH IN only 2011 N High St Lansing Michigan 48906 Fax 517 484 9836 Email CustServ Michco com Web site www Michco Com Parts Web site www FloorMachineParts Com Order Parts on Line...

Page 2: ...eorbuildings For new books write to Pacific 2259 S Sheridan Muskegon MI 49442 6252 Carefullyinspectallcomponentstoensurethatthereis no concealed freight damage If such damage is dis covered filea CONC...

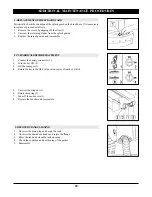
Page 3: ...CLEANING THE RECOVERY TANK AND FILTER 2 CLEANING THE SQUEEGEE 3 CLEANING THE SOLUTION TANK AND FILTER 4 DISASSEMBLY OF THE ROTATING BRUSHES 5 HOPPER CLEANING WEEKLYMAINTENANCE 1 REPLACEMENT OF THE REA...

Page 4: ...5 Do not turn the machine on a ramp Do not stop and leave the machine on a ramp or incline 16 When the machine is parked take out the key and set the parking brake 17 Emptythesolutiontankbeforelifting...

Page 5: ...queegeeleverposition Symbolindicatingthechargelevelsofthebatteries Symbol for thecylindrical brush motor Indicatesthecylindricalbrushmotorswitch Symbol for the counter rotating brushes Indicatesthebru...

Page 6: ...ward or reverse Symbol denoting forward or reverse drive Symboldenotinggeneralswitchwithkey Symbolindicatingtheswitchtochooseeitherautomaticormanualoperation SYMBOLS USED ON THE MACHINE Symbolfortheso...

Page 7: ...ft the solution tank 5 Place the batteries in their compartment MACHINE PREPARATION 1 UNPACKINGTHEMACHINE 1 Use a fork truck to move the machine when packaged 2 Take off the outer package 3 The machin...

Page 8: ...ries generate gases that can cause an explosion Keep sparks and flames away from batteries NO SMOKING WARNING To prevent an explosion charge the batteries only in an area with good ventilation WARNING...

Page 9: ...m motor will remain on in order to finish drying the floor before recharging 6 SQUEEGEEASSEMBLY Assemble the squeegee onto the machine as shown in the figure 1 Fit the holding pins into the squeegee s...

Page 10: ...ckwise loosen to lower it Note Adjust the right and left knobs the same amount the squeegee should be positioned parallel to the floor MACHINE PREPARATION 5 Place the brushes under the base Line up th...

Page 11: ...daily However if the brushes are not new and have deformed bristles it is better to reassemble them in the same position Because the different inclination of the bristles may cause an overload to the...

Page 12: ...foam liquid into the recovery tank before cleaning will also help preventfoaming NEVERUSEPUREACID 11 Open the cover and fill the solution tank with clean water at a temperature not more than 50 C 122...

Page 13: ...ly During the descent the actuator s signal light 8 and the brush motor will come on The light turns off when the brush base reaches the working position 9 Press the vacuum motor switch 9 10 Press the...

Page 14: ...tions of the machine Commonconditionsthatanoperatorshouldbeawareof The machine will not start if the operator is not properly seated When the solution tank is empty the signal light 1 on the instrumen...

Page 15: ...al starts the machine s movement and the speed is adjusted through the knob 2 Note Remember to lift the squeegee through the manipulator 3 when in manual mode duringreversemotion Note Switchtomanualmo...

Page 16: ...he machine is equipped with an alarm system that consists of a red blinking signal light The lights blinking sequence is very helpful in identifying causes of machine anomalies Each sequence correspon...

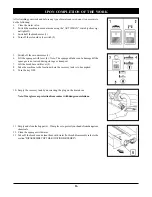
Page 17: ...he squeegee is not raised during storage or transport 7 Lift the brush base with lever 5 8 Take the machine to the location where the recovery tank is to be emptied 9 Turn the key OFF 10 Empty the rec...

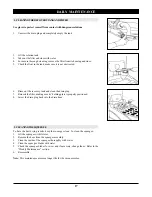
Page 18: ...ank and clean the drain plug 7 Reinsert the filter making sure its holding plate is properly positioned 8 Screw the drain plug back into the drain hose 2 CLEANINGTHESQUEEGEE To have the best drying re...

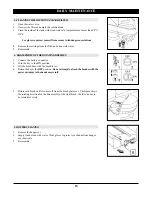
Page 19: ...TIONTANKANDFILTER 1 Open the water valve 2 Unscrew the filter and empty the solution tank 3 Clean the inside of the tank with clean water at a temperature not more than 50 C 122 F Use gloves to protec...

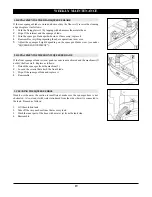
Page 20: ...plates 1 by tapping with a hammer then rotate them 2 Slip off the retainer and the squeegee blade 3 Turn the squeegee blade upside down or if necessary replace it 4 Reassemble everything repeating the...

Page 21: ...ge 3 Rinse the tank and clean the tank opening 4 Check the condition and positioning of the gasket 5 Reassemble 1 REPLACEMENTOFTHESPLASHGUARD Periodically check the condition of the splash guard on th...

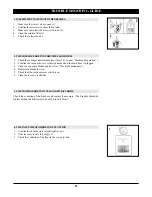
Page 22: ...um hose is securely attached and the drain hose is plugged 3 Clean the squeegee blades and hose see Weekly Manitenance 4 Replace the blades if worn 5 Check that the vacuum motor switch is on 6 Clean t...

Page 23: ...5 Confirm the batteries are charged 6 EXCESSIVEFOAMPRODUCTION Check that a low foam detergent has been used If required add a small quantity of antifoam liquid into the recovery tank Remember that mor...

Page 24: ...NOTES 23...
Page 25: ...able to locate the Dealer you may contact Pacific at the address listed herein for the location of the nearest Pacific repair center or agent or for other instructions pertaining to your warranty diff...

Reviews: