background image

Operating Instructions

MSC7401

Summary of Contents for MSC7401

Page 1: ...Operating Instructions MSC7401...

Page 2: ...MESSTECHNIK GmbH Co KG Koenigbacher Strasse 15 94496 Ortenburg Germany Tel 49 0 8542 168 0 Fax 49 0 8542 168 90 e mail info micro epsilon de www micro epsilon com Miniature sensor controller for indu...

Page 3: ...2 Design 9 2 3 Technical Data 9 3 Delivery 11 3 1 Unpacking Included in Delivery 11 3 2 Storage 11 4 Installation and Assembly 12 4 1 Precautions 12 4 2 Controller 12 4 3 Power Supply Sensor and Signa...

Page 4: ...xample D Adjustment via 2 point Adjustment 34 6 Service Repair 35 7 Liability for Material Defects 35 8 Decommissioning Disposal 35 Appendix A 1 Accessories 36 A 2 Factory Settings 37 A 3 Software 38...

Page 5: ...damage if not avoided Indicates a user action i Indicates a tip for users Measure Indicates hardware or a software button menu 1 2 Warnings Connect the power supply and the display output device accor...

Page 6: ...K GmbH Co KG K nigbacher Stra e 15 94496 Ortenburg Germany The measuring system is designed for use in industrial environments and meets the requirements 1 4 Intended Use The MSC7401 measuring system...

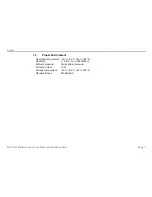
Page 7: ...for inductive sensors 1 5 Proper Environment Operating temperature 40 to 85 C 40 to 185 F Humidity 5 95 no condensation Ambient pressure Atmospheric pressure Protection class IP 67 Storage temperature...

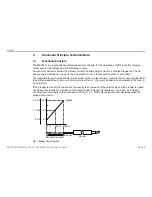
Page 8: ...ee Chap 5 The demodulator electronics transforms the signal of the two secondary coils into the set output signal With the setting possibilities for zero point and gain see Chap 5 the user can adapt t...

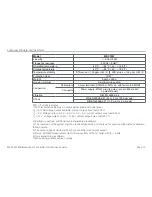
Page 9: ...chnical Data Model MSC7401 Supply voltage 5 V 1 14 V 30 V Current consumption 20 mA 40 mA with current output Supply protection Reverse polarity and overvoltage protection Sensors Full bridge sensor L...

Page 10: ...Shock DIN EN 60068 2 27 40 g 6 ms 1000 per axis DIN EN 60068 2 27 100 g 6 ms 3 per axis FSO Full Scale Output 1 With technical restrictions on output signal load and signal span UB 5 V No voltage outp...

Page 11: ...the packaging and ensure that the goods are forwarded in such a way that no damage can occur Check the delivery for completeness and shipping damage immediately after unpacking If there is damage or...

Page 12: ...he equipment is started i Pay attention to careful handling during installation and operation 4 2 Controller Fasten the controller of series MSC7401 by means of two screws M4 The position of the mount...

Page 13: ...2 47 76 2 99 Mounting holes for M4 screws Sensor connection Cable gland WS15 Clamping range 1 mm 5 mm Alternative option 010 M9 5 pole socket Series 712 Binder Power and signal connection Cable gland...

Page 14: ...sensors signal output are on the controller see Fig 2 Connections Power supply output side Cable gland WS19 clamping range 4 5 mm 10 mm Connection screw terminals AWG 16 up to AWG 24 up to AWG 28 wit...

Page 15: ...imary coil Primary coil Shield sensor cable Fig 5 Pin assignment for sensor on the terminal block X2 full bridge Terminal block X2 Coil Cable 1 DTA x CA x DTA x CR xC701 x Wire 1 DTA x LA x Solder pin...

Page 16: ...Z20 x Connector LDR x SA Sensor cable 1 C7210 x Secondary coil Pin 3 Secondary white 1 brown Secondary coil Pin 4 brown 3 blue Center tap Pin 2 green 4 black Primary coil Pin 6 Primary Primary coil Pi...

Page 17: ...for power supply and signal Terminal block X2 Sensor connection Terminal block X3 Digital interface RS485 Terminal block X1 Power supply and signal Pin Description Description Description 1 Housing Sh...

Page 18: ...d signal connector M12x1 5 pole A coded 4 3 2 Sensor If the plunger is moved into the sensor this results in an increase of the output voltage if the plunger is pulled out further this results in a de...

Page 19: ...et the controller and the sensor connected warm up for approx 2 minutes when the power supply is switched on before you perform any measurement or setting i Observe the operating instructions of the s...

Page 20: ...4 3 2 Ensure that the wiring of the sensor connections signal cable and power supply connections are correct before connecting the controller to the power supply and turning it on see Chap 4 Then swit...

Page 21: ...ay Channel The LED Channel indicates the current channel with and the channel can be changed red and green Channel 1 green channel 2 red Flashes in corresponding color if channel is not parameterized...

Page 22: ...gs It is divided into four function blocks see Fig 15 The 4 LEDs show the cur rent position in the menu and the corresponding setting value at any time see Chap 5 4 Alternatively the software SensorTo...

Page 23: ...atus D3 D4 green Sensor recognition successful After successful recognition the sensor is ready for use The output signal is preset according to the fac tory setting rough adjustment of the measuring...

Page 24: ...on the used sensor model After manual setting of the sensor parameters the adjustment of the system is recommended see Chap 5 3 4 Sensor model Measuring range Sensor type Frequency Amplitude DTA 1x 1...

Page 25: ...ints within the measuring range and the corresponding signal values Factory settings The controller can be reset to the parameters stored by default see Chap A 2 Zero point search This is a special ca...

Page 26: ...nsors 5 4 Menu Structure Legend menu structure 1 O LED orange O LED orange flashing G LED green G LED green flashing R LED red R LED red flashing LED off SMR Start of measuring range MR Midrange EMR E...

Page 27: ...zero point search see Fig 22 page 29 ENTER E1 level G Factory settings O Zero point search MENU 3 sec Automatic sensor recognition ENTER G Successful G Successful E1 level R R Failed R Failed Sensor p...

Page 28: ...page 26 D1 Channel D2 E1 D3 E2 D4 Value Next menu G R Sensor parameter ENTER R Sensor type G DTA LVDT R LDR ENTER G Frequency DTA LDR G 1 kHz 9 kHz O 2 kHz 13 kHz R 5 kHz 16 kHz R 10 kHz 21 kHz ENTER...

Page 29: ...t position O Flashes orange when the measu ring object is in the electrical center of the sensor ENTER G R LED color changes depending on the target position O Move the measuring object to the positio...

Page 30: ...asuring object to the position X0 until the output reaches U0 Lights orange when the measuring object is in the electrical center of the sensor ENTER G O LED color changes depending on the target posi...

Page 31: ...kip example A G R R R Output situation sensor is not automatically recognized Press the button twice G R Menu point Sensor parameter see Chap 5 3 3 ENTER Confirm by pressing the ENTER button G R R G S...

Page 32: ...see Chap 5 3 2 in delivery state the electronics works with automatic load recognition depending on the output load the LED D4 is red 4 20 mA or orange 2 10 V If the automatic settings suits you you c...

Page 33: ...e the arrow buttons to set the voltage in such a way that the measuring device displays 6 00 V U0 ENTER Confirm by pressing the ENTER button G G O Now move the measuring object to the zero point X0 MM...

Page 34: ...4 is green or switched off G G Go to the menu Adjustment see Chap 5 3 4 ENTER Confirm by pressing the ENTER button G G G G G R Select 2 point adjustment ENTER Confirm by pressing the ENTER button G G...

Page 35: ...replaced free of charge if the device is returned to MICRO EPSILON with shipping costs prepaid Any damage that is caused by improper handling the use of force or by repairs or modifications by third p...

Page 36: ...ut cable length 6 m 4 wire one side tinned Strands AD 5 6 mm PC5 5 Power and output cable con nector M12x1 5 pin A coding length 5 m 5 core open ends AD 5 6 mm IP 67 IF 7001 Single channel USB RS485 c...

Page 37: ...2 Factory Settings The controller is assigned with the following parameters by default Automatic recognition of customer signals Automatic sensor recognition Upon successful recognition Start of measu...

Page 38: ...er software A 3 1 Search Sensor Finder Connect the controller to a free USB port on your PC e g via IF7001 and connect the power supply In the drop down menu set the sensor groups induSENSOR Sensortyp...

Page 39: ...e channels found are now listed in the overview Choose the desired language by clicking on the respective flag icon Fig 26 Language German Fig 27 Language English Click the Configure Serial Interface...

Page 40: ...for inductive sensors The following window is displayed Fig 29 Window Change Serial Configuration SensorTool i Tip Set the baud rate to 256 000 Baud Start the data acquisition configuration by clickin...

Page 41: ...Page 41 Appendix Software MSC7401 Miniature sensor controller for inductive sensors The following window is displayed Fig 30 View Sensorfinder...

Page 42: ...pendix Software MSC7401 Miniature sensor controller for inductive sensors A 3 2 Measurement To check your measurements a simple depiction of your data acquisition is available see Fig 31 Fig 31 View M...

Page 43: ...e to initials settings e g after zooming Click the Jump to Head button to display the current signal course A 3 2 2 Data Acquisition Start Stop Start the data acquisition by clicking the Start button...

Page 44: ...can be set in milliseconds 1 Trigger Disabled Deactivated basic settings Continuous Manual trigger One shot sample based Sample can be set records the signal course accord ing to the set samples the...

Page 45: ...V output Click this button to start acquiring the measurement data Click this button to stop recording Click this button to save the currently selected measurement value Click this button to cancel th...

Page 46: ...l curves of the sensors used Color Change the color settings of the single signal courses Mastering When the Master tab is activated in the menu Data acquisition Signal process ing see Fig 35 you can...

Page 47: ...Page 47 Appendix Software MSC7401 Miniature sensor controller for inductive sensors A 3 3 Settings A 3 3 1 General Fig 39 View Settings General...

Page 48: ...atic sensor recognition Model setting User specific sensor setting Sensor Recognition After switching on the electronics automatically identifies the sensor After successful recognition the sensor mod...

Page 49: ...u see Fig 41 Fig 40 View Settings Output Fig 41 Section Settings Analog output Analog Output Output Range Automatic 0 0 V 10 0 V 2 0 V 10 0 V 0 0 V 5 0 V 0 5 V 4 5 V 4 0 mA 20 0 mA 0 0 mA 20 0 mA 0 0...

Page 50: ...oint A 3 3 3 1 Two Point Fig 42 View 1 Two Point Adjustment Please make sure before the adjustment that the basic settings were carried out sensor configuration output signal and that the target can b...

Page 51: ...Page 51 Appendix Software MSC7401 Miniature sensor controller for inductive sensors Fig 43 View 2 Two Point Adjustment Repeat this process for the second position X2...

Page 52: ...djustment i Optionally you can enter the associated millimeter values which can be found under Measurement and the designation Custom The chart is divided into 3 areas Green Taught in range limited by...

Page 53: ...before the adjustment that the basic settings were carried out sensor configuration output signal and that the target can be positioned accordingly Start the sensor adjustment via the start Start butt...

Page 54: ...1 Miniature sensor controller for inductive sensors Fig 46 View 2 Zero Point adjustment Now move the target inside the midrange to the point X2 Also enter the desired output value there and accept it...

Page 55: ...now symmetrically arranged around the zero point i Optionally you can enter the associated millimeter values which can be found under Data acquisi tion and the designation Custom The chart is divided...

Page 56: ...provides the current overview of the controller information sensor information diagnostic infor mation and the currently connected sensor By clicking the Disconnect button you return to the sensor se...

Page 57: ...n restore the factory settings Fig 50 Button Factory Reset Clicking Export Settings opens the explorer and enables you to save the setting values in a default csv file on the PC Fig 51 Button Export S...

Page 58: ...N MESSTECHNIK GmbH Co KG K nigbacher Str 15 94496 Ortenburg Germany Tel 49 0 8542 168 0 Fax 49 0 8542 168 90 info micro epsilon de www micro epsilon com X9751377 A021118HDR X9751377 A02 MICRO EPSILON...

Reviews: