background image

8   

|   POWER PACK SERVICE MANUAL                   


                    MICROMATIC.COM   |   866-327-4159

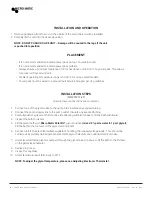
INSTALLATION AND OPERATION

1.  Remove packaging from the unit in the vicinity of the area where it will be installed.

2.  Carefully lift the unit into the desired position.

NOTE: DO NOT PUSH OR SLIDE UNIT – Damage will be caused to the legs if the unit 

is pushed into position.

PLACEMENT


•  It is not recommended to install a power pack on top of a walk in cooler.


•  It is not recommended to install a power pack outside.


•  Always ensure a minimum clearance of 18 inches above and in front of a power pack. This allows 


  for proper air flow around unit.


•  Ambient operating temperature range is 50-90° F for all air cooled models.


•  Power pack must be wired to a ground fault circuit interrupter per UL guidelines.

INSTALLATION STEPS

(MMPP4301-EP)

(Assure tower connections are complete.)

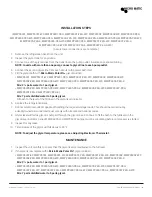
  1.  Connect one of the glycol tubes to the pump inlet. Insulate any exposed tubing.  
  2.  Connect the second glycol line to the pump outlet. Insulate any exposed tubing. 
  3.  Carefully push the glycol bath lid to one side, allowing sufficient space to fill the bath with liquid.
  4.  Inspect the bath for debris.
  5.   Fill the glycol bath with 

Micro Matic Polar Flo

®

 glycol solution 

(mixed 2 ½ parts water to 1 part glycol).


Fill the bath to the full level on the glycol level indicator.  

  6.   Connect unit to the electrical outlets capable of handling the required voltage loads.  This should be    

carried out by suitably trained personnel and comply with all state and national electrical codes.

  7.   Glycol level will fall as glycol is pumped through the glycol lines. Continue to fill the bath to the fill level 

on the glycol level indicator.  

  8.  Replace top cover.
  9.  Inspect for any leaks.
10.  Glycol temperature will fall slowly to 29° F.


NOTE: To adjust the glycol temperature, please see Adjusting Electronic Thermostat.

Summary of Contents for MMPP4301

Page 1: ... MMPP4302 WC MMPP4302 PKG MMPP4302 PKG WC MMPP4303 PKG MMPP4303 PKG WC MMPP4303 PKG 3 MMPP4305 PKG MMPP4305 PKG WC MMPP4305 PKG 3 MMPP4305 PKG WC3 MMPP4307 PKG MMPP4307 PKG WC MMPP4307 PKG 3 MMPP4307 PKG 3 WC MMPP4307 PKG 4 MMPP4307 PKG 4 WC POWER PACK SERVICE MANUAL v3 0 ...

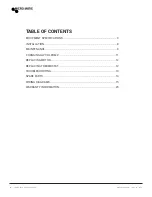
Page 2: ...IC COM 866 327 4159 EQUIPMENT SPECIFICATIONS 3 INSTALLATION 8 MAINTENANCE 9 CHANGING GLYCOL PUMP 11 REPLACING MOTOR 12 REPLACING THERMOSTAT 12 TROUBLESHOOTING 13 SPARE PARTS 14 WIRING DIAGRAMS 15 WARRANTY INFORMATION 23 TABLE OF CONTENTS ...

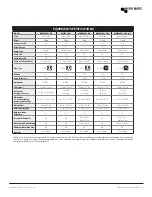
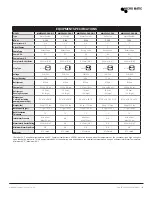
Page 3: ...18 low 140 high 18 low 140 high 18 low 140 high 18 low 140 high Dimensions L x W x H Including pump s and motor s 26 12 x 17 12 x 21 56 30 x 18 x 27 75 30 x 18 x 28 75 30 x 18 x 27 75 30 x 18 x 28 75 Weight lbs 41 kg 90 lbs 55 kg 120 lbs 55 kg 120 lbs 58 kg 128 lbs 58 kg 128 lbs Bath Capacity gal 4 5 gal 17 L 11 5 gal 43 5 L 11 5 gal 43 5 L 11 5 gal 43 5 L 11 5 gal 43 5 L Bath Insulation Thickness...

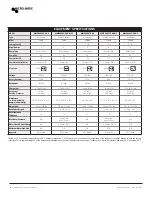
Page 4: ...high 18 low 140 high 18 low 140 high 18 low 140 high 18 low 140 high Dimensions L x W x H Including pump s and motor s 30 x 18 x 29 75 30 x 18 x 28 75 30 x 18 x 29 75 30 x 18 x 28 75 30 x 18 x 29 75 Weight lbs 71 kg 157 lbs 80 kg 175 lbs 71 kg 157 lbs 71 kg 157 lbs 80 kg 175 lbs Bath Capacity gal 11 5 gal 43 5 L 11 5 gal 43 5 L 11 5 gal 43 5 L 11 5 gal 43 5 L 11 5 gal 43 5 L Bath Insulation Thickn...

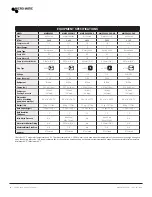
Page 5: ...ow 140 high 18 low 140 high 18 low 140 high 18 low 140 high Dimensions L x W x H Including pump s and motor s 30 x 18 x 28 75 30 x 18 x 29 75 30 x 18 x 28 75 37 12 x 18 75 x 31 15 37 12 x 18 75 x 31 5 Weight lbs 80 kg 175 lbs 91 kg 200 lbs 80 kg 175 lbs 98 kg 215 lbs 98 kg 215 lbs Bath Capacity gal 11 5 gal 43 5 L 11 5 gal 43 5 L 11 5 gal 43 5 L 11 5 gal 43 5 L 11 5 gal 43 5 L Bath Insulation Thic...

Page 6: ... low 140 high 18 low 140 high 55 low 260 high 55 low 260 high 55 low 260 high Dimensions L x W x H Including pump s and motor s 37 12 x 18 75 x 31 5 37 12 x 28 75 x 31 5 38 x 20 x 36 37 12 x 18 75 x 31 5 38 x 30 x 36 Weight lbs 131 kg 290 lbs 98 kg 215 lbs 134 kg 295 lbs 134 kg 295 lbs 134 kg 295 lbs Bath Capacity gal 11 5 gal 43 5 L 11 5 gal 43 5 L 11 5 gal 43 5 L 11 5 gal 43 5 L 11 5 gal 43 5 L ...

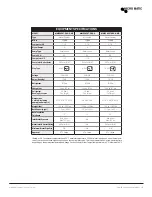
Page 7: ... low 260 high 55 low 260 high Dimensions L x W x H Including pump s and motor s 37 12 x 18 75 x 31 5 38 x 30 x 36 37 12 x 28 75 x 31 5 Weight lbs 134 kg 295 lbs 134 kg 295 lbs 134 kg 295 lbs Bath Capacity gal 11 5 gal 43 5 L 11 5 gal 43 5 L 11 5 gal 43 5 L Bath Insulation Thickness 1 5 1 5 1 5 Inlet Water Pressure Min 40 psi Max 120 psi NA Min 40 psi Max 120 psi Water Inlet Outlet Fitting 9 52mm 3...

Page 8: ...ions are complete 1 Connect one of the glycol tubes to the pump inlet Insulate any exposed tubing 2 Connect the second glycol line to the pump outlet Insulate any exposed tubing 3 Carefully push the glycol bath lid to one side allowing sufficient space to fill the bath with liquid 4 Inspect the bath for debris 5 Fill the glycol bath with Micro Matic Polar Flo glycol solution mixed 2 parts water to...

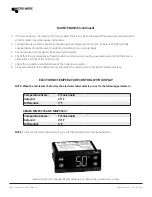
Page 9: ...07 PKG 4 Mix 7 parts distilled water to 5 parts glycol Fill bath to the level of the fill line on the glycol level indicator 6 Replace the refrigeration deck 7 Connect electrical outlets capable of handling the required voltage loads This should be carried out by suitably trained personnel and must comply with all state and national codes 8 Glycol level will fall as glycol is pumped through the gl...

Page 10: ...inued 3 If there is evidence of ice build up in the unit allow the ice to melt and replace all the water glycol solution with a fresh solution mixed per above instructions 4 The glycol water solution should be changed approximately every 18 months In regions of high humidity considerations should be given to replacing the solution on an annual basis 5 Check and clean the condenser fins every sixty...

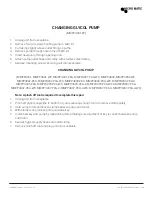
Page 11: ...4302 PKG MMPP4302 PKG WC MMPP4303 PKG MMPP4303 PKG WC MMPP4303 PKG 3 MMPP4305 PKG MMPP4305 PKG WC MMPP4305 PKG 3 MMPP4305 PKG WC3 MMPP4307 PKG MMPP4307 PKG WC MMPP4307 PKG 3 MMPP4307 PKG 3 WC MMPP4307 PKG 4 MMPP4307 PKG 4 WC Note A pinch off tool is required to complete this repair 1 Unplug unit from receptacle 2 Pinch off glycol supply line to bottom of pump allowing enough room to remove clamp s...

Page 12: ...rd to new motor by affixing ground wire to green ground screw and plugging 2 wires to motor connections Place cord in electrical wire channel in motor housing and reattach electrical connection cover plate 8 Plug cord into receptacle REPLACING THERMOSTAT IN ALL UNITS 1 Unplug unit from receptacle 2 Remove the screws holding the thermostat housing to the unit Slide the white plastic brackets backwa...

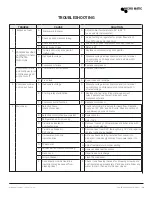
Page 13: ...ressor malfunction C Replace compressor 5 Warm beer A Defective Pump check motor also A Check return line in reservoir for liquid flow Replace pump on 125 250 and 500 units Check condition of key between pump and motor B Defective motor check pump also B Replace motor C Refrigeration unit not running C Refer to 2 D Trunk lines located in overheated area D Remove from any hot water pipes or kitchen...

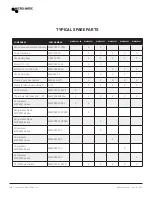
Page 14: ...MMPP4305 M X X X Vane Pump Key MM 3362 2 X X X X X Clamp Pump Connectors MM BC3 KIT X X X X X Nipple for Vane Pump Straight 617C X X X X X Vertical Pump MMPP4301 EPVP X Thermostat Danfoss ERC 112C MMPP080G3206 X X X X X X Compressor MPP4301 Series MMPP4301 EP C X X Refrigeration Deck MPP4301 Series MMPP4301 UPPER X Refrigeration Deck MPP4302 Series MMPP4302 UPPER X Compressor MPP4302 Series MMPP43...

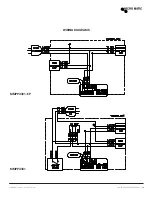
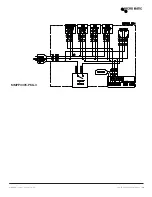
Page 15: ...MICROMATIC COM 866 327 4159 POWER PACK SERVICE MANUAL 15 WIRING DIAGRAMS MMPP4301 EP MMPP4301 ...

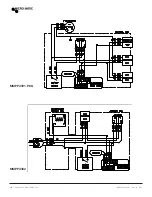
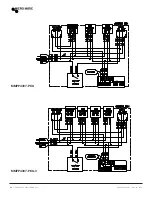
Page 16: ...16 POWER PACK SERVICE MANUAL MICROMATIC COM 866 327 4159 MMPP4301 PKG MMPP4302 ...

Page 17: ...MICROMATIC COM 866 327 4159 POWER PACK SERVICE MANUAL 17 MMPP4302 PKG MMPP4303 PKG ...

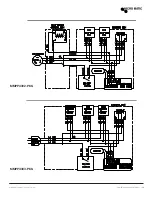
Page 18: ...18 POWER PACK SERVICE MANUAL MICROMATIC COM 866 327 4159 MMPP4303 PKG 3 MMPP4305 PKG ...

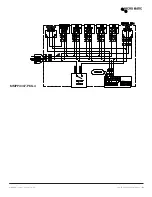
Page 19: ...MICROMATIC COM 866 327 4159 POWER PACK SERVICE MANUAL 19 MMPP4305 PKG 3 ...

Page 20: ...20 POWER PACK SERVICE MANUAL MICROMATIC COM 866 327 4159 MMPP4307 PKG MMPP4307 PKG 3 ...

Page 21: ...MICROMATIC COM 866 327 4159 POWER PACK SERVICE MANUAL 21 MMPP4307 PKG 4 ...

Page 22: ...22 POWER PACK SERVICE MANUAL MICROMATIC COM 866 327 4159 ...

Page 23: ...bject to misuse neglect alteration accident unauthorized service abuse or to any damage caused by transportation This warranty does not cover items subject to normal wear and tear gaskets seals o rings etc PURCHASER RESPONSIBILITY Except as expressly provided in this Agreement Purchaser assumes all other responsibility for any loss damage or injury to persons or property arising out of connected w...

Page 24: ...02035 MM M 0319 2019 Micro Matic USA Inc All Rights Reserved Micro Matic reserves the right to change specifications without notice ...

Reviews: