RFT9709 Transmitter Instruction Manual
7
Wirin
g
Sta
rt
up
T
roub
lesh
ootin
g
Bef
o
re
Y
ou Be
gin
Mou
n
ting
Installation
Step 2
Wiring
2.1
General guidelines
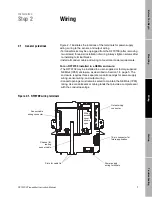
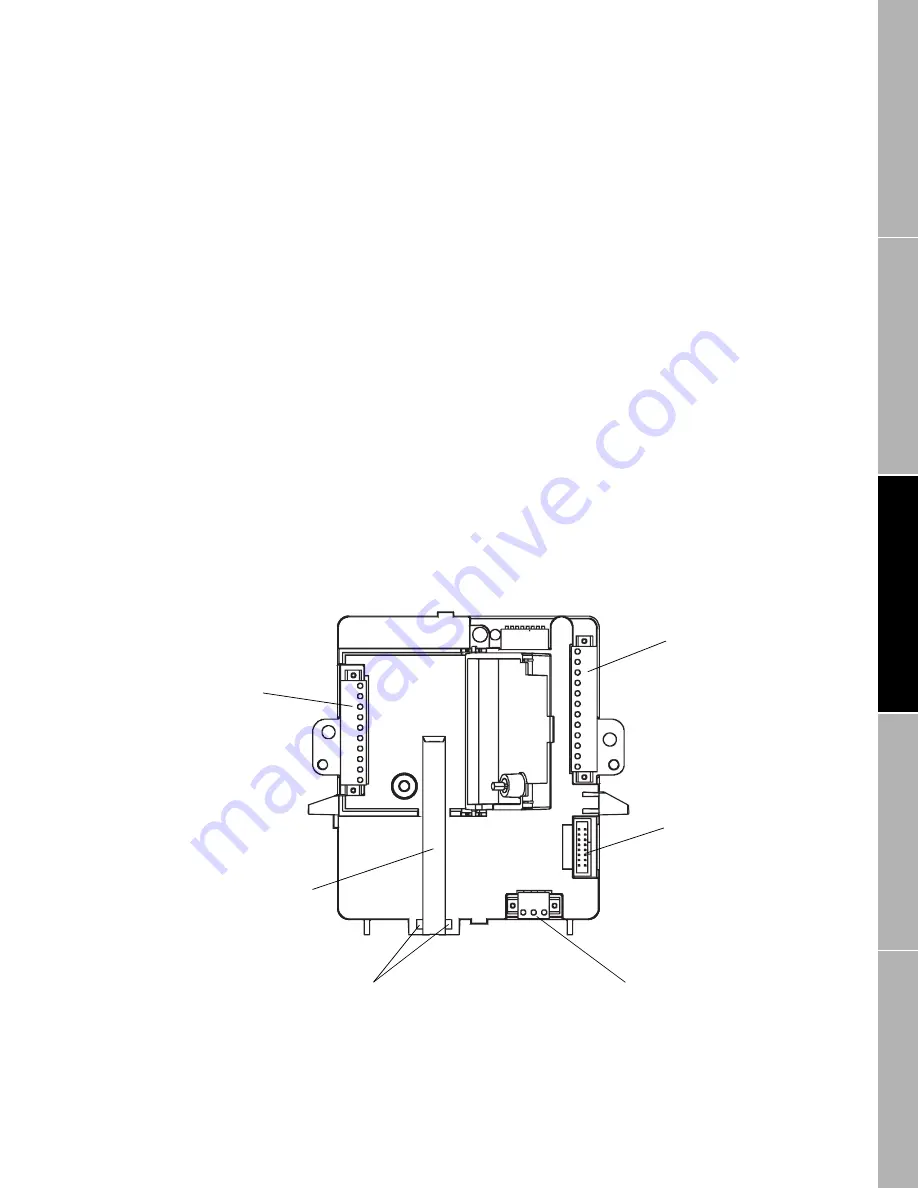
Figure 2-1 illustrates the locations of the terminals for power-supply
wiring, wiring to the sensor, and output wiring.
• Terminal blocks may be unplugged from the RFT9709 (after removing
two screws) for easier installation of wiring. Always tighten screws after
re-installing terminal blocks.
• Install all conduit, cable and wiring to meet local code requirements.
For an RFT9709 installed in a NEMA enclosure:
• The RFT9709 may be installed in a user-supplied or factory-supplied
NEMA-4 (IP65) enclosure, as described in Section 1.4, page 5. The
enclosure requires three separate conduit openings for power-supply
wiring, sensor wiring, and output wiring.
• Conduit openings must remain sealed to maintain the NEMA-4 (IP65)
rating. Use conduit seals or cable glands that provide a complete seal
with the conduit openings.
Figure 2-1. RFT9709 wiring terminals
Output wiring
connector
Channel for
routing
sensor cable
Power-supply
wiring terminals
Sensor cable
wiring connector
Slots for cable tie
Wiring
access
cover
shown
open
16-pin connector for
future application
09wire.fm Page 7 Monday, March 1, 1999 4:31 PM
Summary of Contents for Fisher-Rosemount RFT9709
Page 1: ...Model RFT9709 Transmitter Instruction Manual March 1999 ...
Page 2: ......
Page 4: ......
Page 8: ...iv RFT9709 Transmitter Instruction Manual ...
Page 34: ...26 RFT9709 Transmitter Instruction Manual ...
Page 52: ...44 RFT9709 Transmitter Instruction Manual ...
Page 60: ...52 RFT9709 Transmitter Instruction Manual ...
Page 62: ...54 RFT9709 Transmitter Instruction Manual ...
Page 72: ...64 RFT9709 Transmitter Instruction Manual ...
Page 73: ......


