Software Description
2014 Microchip Technology Inc.
DS50002300A-page 39
4.3.5
Demo Tab
The
Demo
tab (
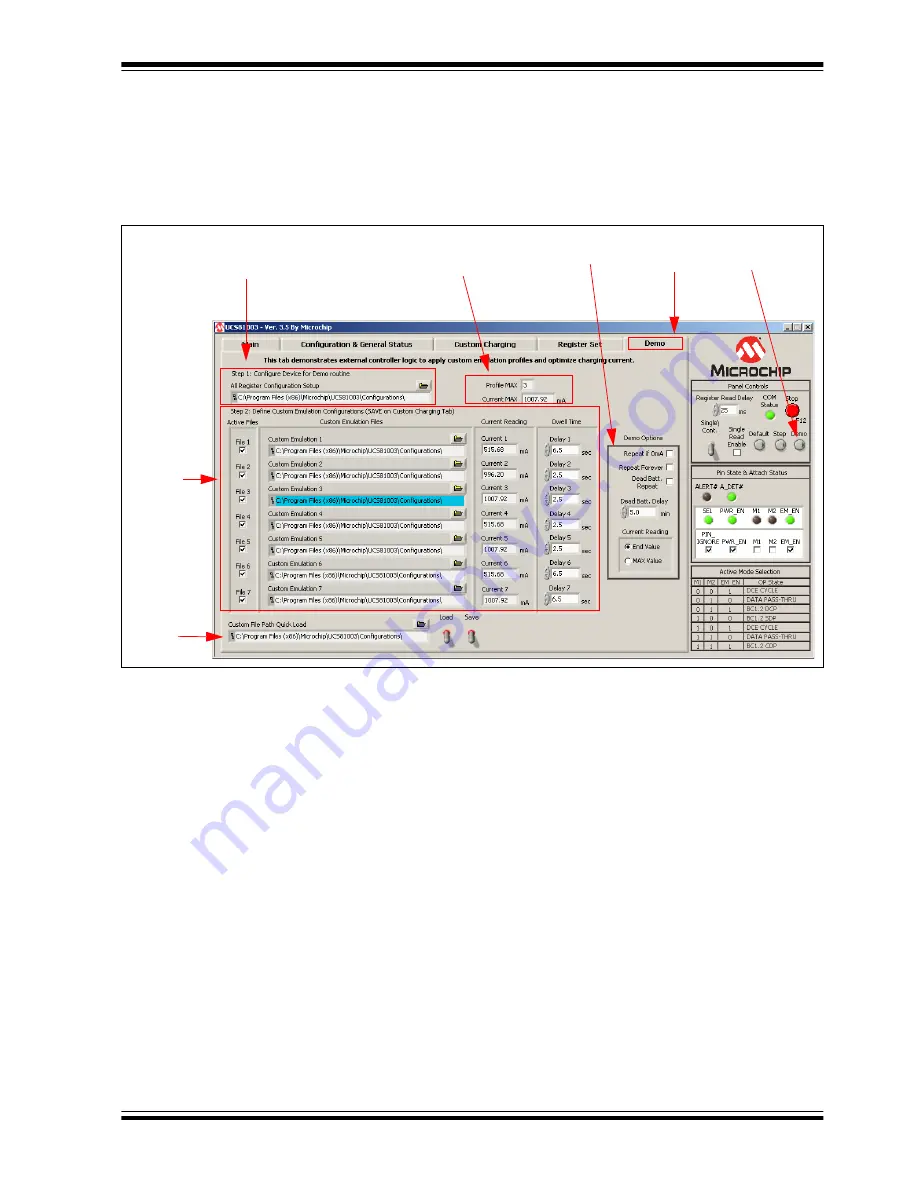
) demonstrates external controller logic to apply custom
emulation profiles and optimize charging current. This feature uses the LabView engine
to step through the selected files and store the current drawn by the device. Several
options are available to customize the operation of the demo and explore the potential
of the UCS81003.
FIGURE 4-16:
Demo Tab.
4.3.5.1
STEP 1: CONFIGURE DEVICE FOR DEMO ROUTINE
The first step in preparing to run the Demo feature is to configure the device to the
desired starting configuration. A file has been preloaded at installation and is ready to
be used, or a new configuration can be created. Each time the
Demo
button (in the
Panel Control
section) is toggled, the
Setup.txt
file will be loaded.
4.3.5.2
STEP 2: DEFINE CUSTOM EMULATION CONFIGURATIONS
At installation, a set of files are preloaded on the users system (
profile1.txt
–
profile7.txt
) with the default profiles of the UCS81003. These files can be
changed easily by using the
Custom Charging
tab.
4.3.5.2.1
Active Files
Check the corresponding check box to activate the desired profile in the demo routine.
4.3.5.2.2
Custom Emulation Files
This column contains the full path to the profile file to be loaded. This file should contain
registers 40h – 4Ch, 16h and 25h. This file can be created with the GUI on the
Custom
Charging
tab.
Demo Tab
Selected
Demo Options
Quick
Step 2
Load
Custom
Panel
Option
Demo
Button
Step 1
Configure Device
Emulation
Config
Options
Demo
Results


