background image

AquaPrep II 056

Fuses

Aug 2011                                                  

4-1 

4.  TROUBLESHOOTING

There are only two components subject to failure or degradation that are amenable to user 
diagnosis and correction:

• Fuses
• Hydrophobic capsule

Contact your local service representative or Micromeritics directly for all other difficulties 
with the AquaPrep.

Fuses

If the AquaPrep fails to respond when the unit is turned on, first unplug the power cord and 
check the fuse(s); replace if necessary. Refer to 

Selecting the Input Power, 

page

 2-2

, steps 1 

through 5 for instructions on replacing the fuse. Check the power receptacle for its voltage to 
prevent recurrence of the problem. Refer to Chapter 5 for ordering information.

Hydrophobic Capsule

Replace the hydrophobic capsule when excessive deterioration is detected. Refer to Chapter 5 
for ordering information. 

1. Turn off the AquaPrep.

2. Remove all tubing and clamps from the capsule. The tubing on the top of the capsule is 

secured by a twist-lock fitting; turn the fitting counterclockwise to remove. 

3. Pull the capsule from its retaining clips and discard.

4. Attach the tubes and clamps to their respective fittings on the new capsule. Squeeze the 

clamps until 2 to 3 teeth are engaged. It’s usually easier to attach the tubes before 
installing the capsule on the AquaPrep.

5. Snap the new capsule into its retaining clips on the side of the AquaPrep.

Summary of Contents for AquaPrep II 056

Page 1: ...AquaPrepTM II 056 Operator s Manual 056 42801 01 Aug 2011...

Page 2: ...Micromeritics and Saturn DigiSizer are trademarks of Micromeritics Instrument Corporation Teflon is a registered trademark of Norton Company Micromeritics Instrument Corporation 2010 2011 All rights...

Page 3: ...e following conditions 1 Certain products sold by MICROMERITICS are the products of reputable manufacturers sold under their respective brand names or trade names We therefore make no express or impli...

Page 4: ......

Page 5: ...2 Description 1 3 Specifications 1 4 2 INSTALLATION Unpacking and Inspecting the Equipment 2 1 Equipment Damage or Loss During Shipment 2 1 Equipment Return 2 1 Installing the AquaPrep 2 2 Selecting...

Page 6: ......

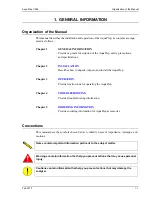
Page 7: ...quaPrep safety precautions and specifications Chapter 2 INSTALLATION Describes how to unpack inspect and install the AquaPrep Chapter 3 OPERATION Provides instructions for operating the AquaPrep Chapt...

Page 8: ...alysis Tap water varies greatly in its dissolved air content and the presence of debris This water must be deionized and well filtered before using with the AquaPrep Filtering the water through at lea...

Page 9: ...ector on the hydrophobic capsule and an outlet connector on the front panel The switch for turning it on and off is located on the rear panel just left of the power card entrance The air removed from...

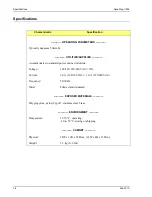
Page 10: ...to standard power mains worldwide Voltage 100 120 220 240 VAC 10 Current 2 0 A 100 120 VAC 1 0 A 220 240 VAC Frequency 50 60 Hz Water Filtered and deionized EXPOSED MATERIALS Polypropylene nylon Tygon...

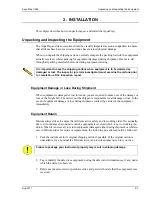
Page 11: ...carrier of the equipment immediately Equipment Return Micromeritics strives to ensure that all items arrive safely and in working order Occasionally due to circumstances beyond our control equipment...

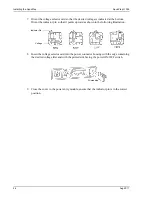
Page 12: ...C and with the line fuse removed The correct setting of the universal power entrance must be checked and the appropriate fuse s installed before the AquaPrep can be operated The AquaPrep is designed t...

Page 13: ...rrangement 200 240 VAC Insert the appropriate fuse s for the input power source 5 Position the fuse block so that the side containing the fuse s is facing the power module and insert it into the conne...

Page 14: ...hat it points upward as shown in the following illustration 8 Insert the voltage selector card into the power connector housing with the edge containing the desired voltage first and with the printed...

Page 15: ...of the capsule Squeeze the clamps until 2 to 3 teeth are engaged Connecting the Power Cord Insert one end of the power cord into the input power connector on the rear panel of the Aqua Prep and the o...

Page 16: ......

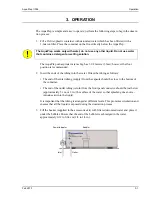
Page 17: ...the bottom of the container The end of the outlet tubing return from the front panel connector should be just below approximately 5 cm or 2 in the surface of the water so that splashing does not re i...

Page 18: ...of deaeration For example you may observe 20 bubbles per minute If the background measurement you will perform next shows adequate deaeration you can watch for approximately 20 bubbles per minute whe...

Page 19: ...e for its voltage to prevent recurrence of the problem Refer to Chapter 5 for ordering information Hydrophobic Capsule Replace the hydrophobic capsule when excessive deterioration is detected Refer to...

Page 20: ......

Page 21: ...ories can be ordered by telephone 770 662 3636 email customerservice micromeritics com internet www micromeritics com Part Number Item and Description 003 51130 01 Fuse 1 0 Amp 5 x 20 mm slow blow T1...

Page 22: ......

Reviews: