


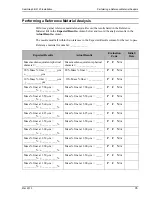


Verifying Operation
SediGraph III 5120 Installation
26
Mar 2010
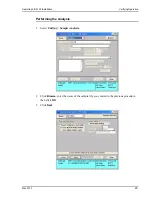
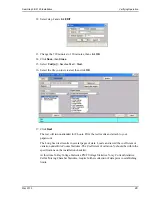
4. Make sure the
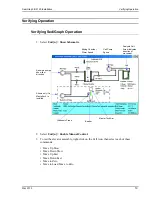
Prepare SediGraph to load sample
box is checked and
Leave liquid in
mixing chamber
is selected.
5. Pour approximately 50 mL of 0.05% sodium metaphosphate in water into a beaker.
6. Weigh 1.5 g of garnet into a sample cup. Disperse this mixture using one of the following
methods.
• If an ultrasonic probe is available:
a. Transfer the garnet into the beaker of sodium metaphosphate and water.
b. Insert the probe and operate according to the manufacturer’s instructions
(about 30 seconds).
c. Pour the dispersed sample into the mixing chamber.
• If an ultrasonic bath is available:
a. Transfer the garnet into the beaker of sodium metaphosphate and water.
b. Place the beaker into the bath and sonicate for 3 minutes
c. Pour the dispersed sample into the mixing chamber.
• If an ultrasonic probe or bath is unavailable (Note this on FSR).
a. Pour the measured sodium metaphosphate in water into the mixing chamber.
b. Add one drop of Photo-Flo 200.
DO NOT USE MORE THAN ONE DROP.
c. Pour the garnet into the mixing chamber and let stir for 5 minutes.
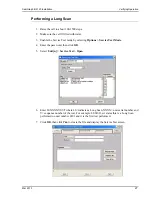
7. Click
Start
.
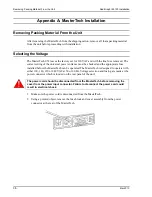
8. Fill the mixing chamber with sample mixture when instructed.
9. Click
Next
.
10. The instrument will now perform the “
Load
” procedure; next it will start a “
Full Scale
Scan
” and finally start the actual sample run.
11. Let the instrument run the sample automatically.
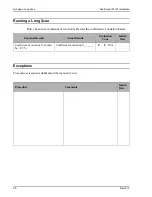
12. Record the results in the Installation Checklist and verify that data are within limits
specified in the checklist.
If the message "Bubble elimination in progress" appears, place one (1) drop of Photo-
Flo 200 solution into the mixing chamber to help eliminate bubbles. DO NOT USE
MORE THAN ONE DROP.


