10
6. Fit the feed nozzle which is likely to give this feed rate using the table below as a
guide:
(* Supplied for use with the atomiser cone housing B120 only - do not use with the
atomiser cone housing A90 as this will result in flooding of the cone.)
7. Measure the flow rate which this feed nozzle gives using the actual spray liquid to
be used.
The actual flow rate should be checked holding
the HERBIFLEX-4 in the spraying position
(see 'TO START SPRAYING'). Remove the
feed nozzle from the atomiser cone housing
and allow the liquid to flow into a suitable con-
tainer (such as the 50 ml measuring cup pro-
vided with the sprayer).
If the sprayer is new it may be noticed that with the white or brown feed nozzle fitted,
air trapped in the liquid feed tube reduces the flow rate. If this occurs, clear the air
by gently tapping the tube and, if necessary, flushing it through with a strong soap
solution to reduce the surface tension in it. Once a steady flow is established measure
the volume dispensed in one minute. If necessary fit a different feed nozzle and re-
measure the flow rate.
Read off from the calculator the actual walking speed which is needed to apply the
given volume application rate with the flow rate measured. It is preferable to walk
more slowly to achieve the required spray volume than to use higher flow rates.
e.g
.
Volume Application
Rate (l/ha)
Band
Width
(cm)
Flow Rate
(ml/min)
Nozzle
Walking Speed
(km/hr)
Glyphosate
10
45
30
White
4
Other herbicides
20
45
45
Brown
3
20
45
30
White
2
Increased Flow rate
Feed nozzle
White
Brown
Blue
Yellow*
Orange*
Red*
Flow rate
Thin liquids
30
45
60*
Do not use
Do not use
Do not use
Thick liquids
10-15
15-25
25-35
35-45
45-55*
55+*
(ml/min)
11
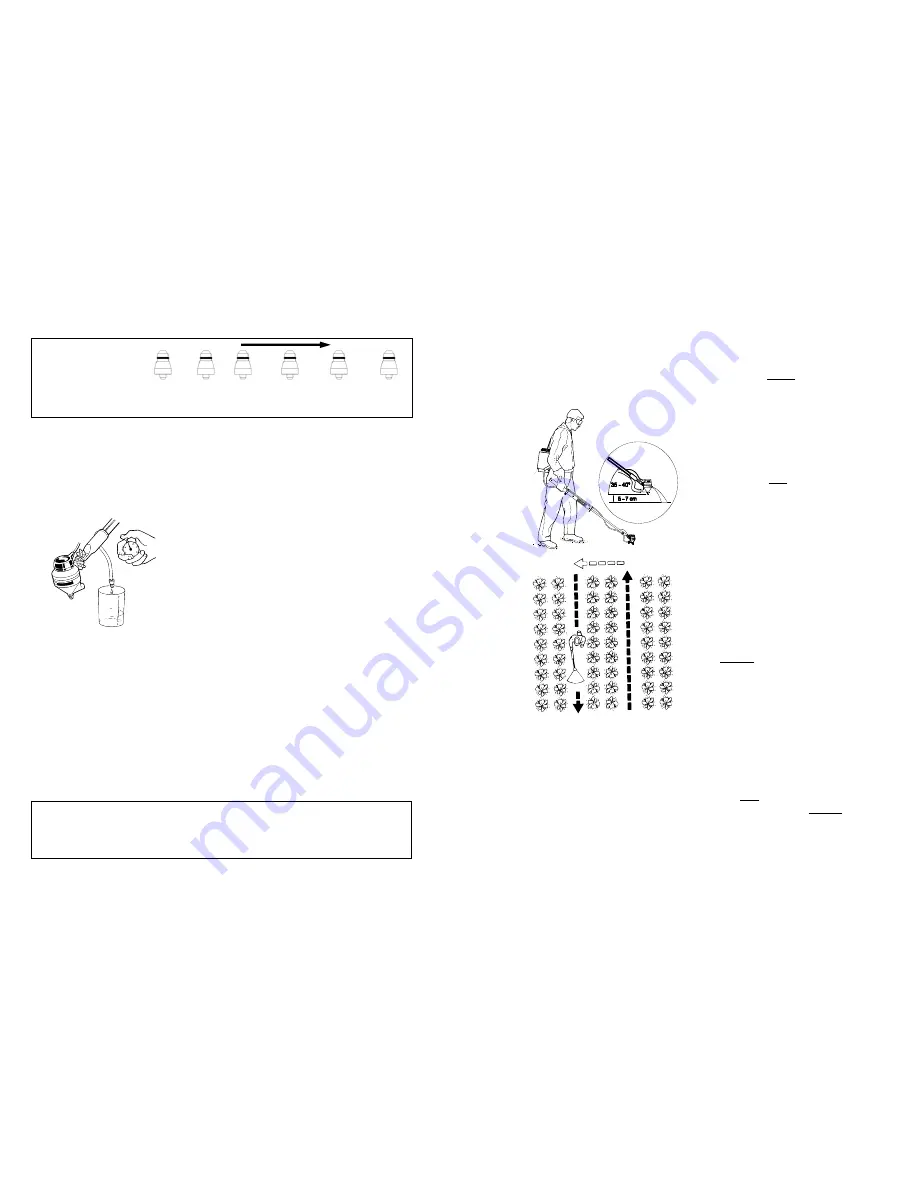
TO START SPRAYING
Before spraying for the first time check the operation of the sprayer using water and a
little detergent only. (see 'BEFORE SPRAYING FOR THE FIRST TIME').
Check the wind speed and direction (below 5 kph is safest). Take special care to
avoid drift by keeping the spray head as low as possible.
Never
spray into the wind
and avoid walking into the spray.
Hold the spray head 5-7 cm above
the ground or weed foliage at an an-
gle of 35
o
to 40
o
to the ground.
Switch on the sprayer and listen to
check that the atomiser disc starts
spinning; then open the flow valve.
There may be a slight delay before
spray is emitted while liquid flows
down the tube to the feed nozzle.
Start walking immediately the spray
liquid is emitted.
N.B. the machine
will not spray if the spray head is
above the level of liquid in the con-
tainer. It is best to hold the HERBI-
FLEX-4 slightly to one side so as to
avoid walking over the treated area.
Always
keep the spray head away
from the body to avoid direct con-
tamination by the spray.
TO STOP SPRAYING
Close the flow valve and wait for a few moments until the spray liquid in the bottom
of the atomiser cone is sprayed out and then switch off the sprayer. When the atom-
iser disc has stopped spinning lift the spray head so that it is above the level of liquid
in the tank and the sprayer is at an angle of 45
o
and then open the flow control valve
to drain any remaining liquid in the feed tube back into the tank.
Do not
raise the
spray head until the atomiser disc has stopped spinning. Then close the flow valve.
This isolates the liquid in the backpack and means it can be disconnected from the
sprayer.


