BIG-TOWER AMIGA-4000
ASSEMBLY INSTRUCTIONS
We congratulate you for purchasing this towercase that was specially designed for the
Amiga 4000. It converts the usual hard to expand Amiga 4000 into a professional
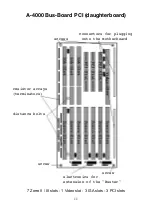
device offering lots of space for expansions. The new bus-board (=daughterboard)
features 7 fully usable Zorro II / Zorro III - Slots (16-/32-bit), as well as 5 PC-ISA and 2
video-slots in the ISA version or 3 ISA and 3 PCI slots and one video-slot in the PCI
version.
The case offers six 5.25 inch drive bays which are all accessible from outside, and four
3.5 inch drive bays inside. Two of them are accessible from outside. One of the 5.25
inch drive bays can be occupied by the original Commodore 3.5 inch drive inside a
mounting frame, as the height of the drive is 1.5 inch.
DISMANTLING THE A-4000
After the 2 screws at the back of the case are removed you take the lid off. If there is a
hard disk inside, the next thing is to unscrew the hard disk frame and take the hard disk
out. Please handle the hard disk very carefully as it is very sensitive for mechanical
shocks. When removing the disk, take note of the polarity of the data cable.
The beam holding the daughter board with the slots for expansion cards is fixed with 2
screws and is removed next, then you pull out the daughter board. Pull out the plugs of
the power supply from the mainboard and the drives as well as the data cables of the
drives (nothing polarity) and the LED plugs (Key, Power, Disk).
Carefully pull out the Turbo-CPU board from the motherboard (parallel, not twisted)
and keep the plastic pieces as they will be used again. Now you can remove the front
assembly by pushing out the 7 plastic hooks.
2


