Now remove the screws of the 3.5 inch drive cage that is underneath the
5.25 inch drive bays and take it out, so you'll have enough space for the
mounting of the motherboard.
For the mounting of the motherboard the hexagonal screws have been
installed in the case frame by the factory in exactly the right hole positions
of the mainboard.
Lay the protective plastic sheet that comes from the bottom of the
mohterboard onto the bottom of the case frame.
Then the motherboard is placed into the case and the screws turned
loosely through the holes of the board into the fastly mounted hexagonal
screws, so that the board is still moveable.
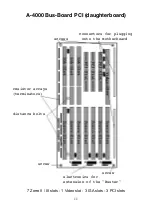
Also turn in the included two 1 inch long hexagonal distance bolts through
the holes of the board into the hexagonal bolts underneath the board, at
the positions shown in the drawing. They will give additional support to the
busboard.
The next thing to do is screwing back in the hexagonal bolts of the Sub-D
SERIAL port at the backplane of the case.
Please do not fasten the screws too tightly with the 5 mm key (or pliers) as
they are easily overturned whereby the threat is destroyed. They should
be just as tight as is needed so a fixed plug can be unscrewed and
removed without the hexagonals coming loose again. Bring the
motherboard into the optimum position and then fasten the M3 screws and
the 2 hexagonal distance bolts.
Now plug in the extension cables of the two joystick ports at the left side of
the motherboard. Which plug goes in which port can be determined by
cable length. Joystick 1 ist the MOUSE port, Joystick 2 is the GAME port.
4


