background image

ArtixScan DI 4020 Plus/ArtixScan DI 2020 Plus User's Manual     39

Care and Cleaning

To ensure optimal performance from the ArtixScan DI 4020 Plus/2020 Plus, it is

important to clean several critical parts of the scanner on a regular basis.

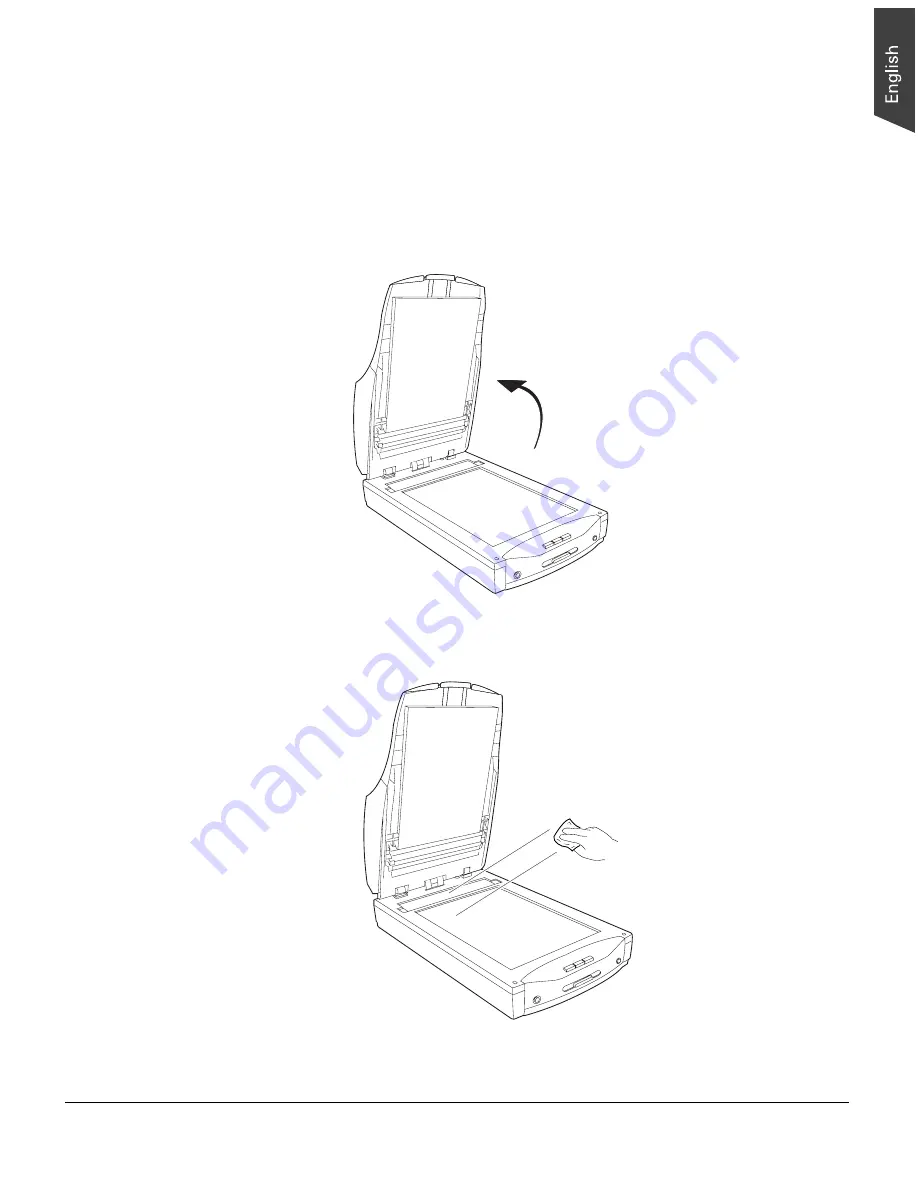
Cleaning the Scanner Glass Surface

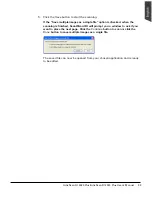
1. Lift the ADF.

2. Then use a soft, non-abrasive and lint-free cloth to gently wipe the rear and

front glass surface areas on the scanner flatbed.

Note

: Do not use any detergents, synthetic cleaning solutions, cleaning naphtha,

or other solvents to clean the glass surface directly.

Clean the rear and front

glass surface areas

Summary of Contents for ArtixScanDI 2020 Plus

Page 1: ...www microtek com ArtixScanDI 4020 Plus ArtixScanDI 2020 Plus User s Manual Document Imaging Scanner ...

Page 2: ... trademarks are the property of their respective holders Specifications software and hardware bundles are subject to change without notice Not responsible for typographical errors Disclaimer The contents of this manual have been checked carefully for accuracy and every effort has been made to ensure that there are no errors However Microtek makes no guarantee as to the accuracy of the contents of ...

Page 3: ... the equipment off and on the user is encouraged to try to correct the interference by one or more of the following measures Reorient or relocate the receiving antenna Increase the separation between the equipment and receiver Connect the equipment into an outlet on a circuit different from that to which the receiver is connected Consult the dealer or an experienced radio TV technician for help No...

Page 4: ... it from the wall outlet Moving and Storing the Scanner Always lock the scanner when shipping or moving the scanner Quick stops excessive force and uneven surfaces may cause the product to overturn when moving When locking or unlocking the scanner back do not turn the scanner upside down Do not place the scanner on any slippery slanted or unstable surface The product may slide or fall causing seri...

Page 5: ...king the Scanner 15 Step 4 Connecting the Scanner 15 To the Power Adapter 15 To the Hi Speed USB Cable 16 Positioning Documents 17 Into the ADF Automatic Document Feeder 17 On the Flatbed 19 Scanning Documents 20 Using ScanWizard DI 20 Scanning a Single sheet Document 20 Scanning a Stack of Documents 23 Scanning Documents with Mixed Contents 25 Scanning Documents with Barcodes 27 Scanning Document...

Page 6: ...s 39 Cleaning the Mylar Cartridge 39 Cleaning the Rollers 40 To clean the rollers under the ADF cover 41 To clean the rollers under the Document Feed Tray 42 Cleaning the ADF Glass Surface 43 Maintenance 44 Replacing the Separation Pad Assembly 44 Replacing the Feed Roller Assembly 45 Appendix 46 Fixing Paper Jams 46 Troubleshooting 47 Specifications 48 ...

Page 7: ...33 x 4 33 110 mm x 110 mm up to 8 5 x 25 215 9 mm x 635 mm Advanced feeding technology Equipped with an ultrasonic sensor the ArtixScan DI 4020 Plus 2020 Plus is able to detect the gap between overlapping pages and to prevent multiple pages from being fed together efficiently preventing the happens of mis feed or double feed when delivering papers through the ADF Three programmable function button...

Page 8: ...n the documents It saves you huge amounts of time and money to organize to index and to search files of documents in seconds enhancing the efficiency and productivity of file management Remove Blank Page With this feature blank pages are automatically detected and removed by the software when scanning a stack of documents This function is quite helpful especially when users are scanning double sid...

Page 9: ...e your ArtixScan DI 4020 Plus 2020 Plus your computer must satisfy the following system requirements DVD ROM drive for installing software Color display with 24 bit color output capability 512 MB RAM or above Pentium IV PC or higher with Hi Speed USB USB 2 0 port Microsoft Windows XP Vista and Windows 7 ...

Page 10: ...ends the Document Output Tray when loading amounts of documents 6 Programmable Function Allows users to perform the function that was previously Buttons defined or customize the buttons to perform their preferred functions via software settings These function buttons are F1 F2 and F3 7 Power Button Turns the scanner on or off 8 Vertical Ruler Used to measure the length of a scanned document 9 Fron...

Page 11: ... Plus User s Manual 11 Rear Side View No Names of Parts Functions of Parts 1 ADF Automatic Document Feeder 2 Hi Speed USB Port Connects the Hi Speed USB USB 2 0 cable to the computer 3 Power Connector Connects the scanner to the power adapter ...

Page 12: ... yellow stickers which are marked from Step 1 to Step 4 and are placed on your scanner contents Follow the steps in order for a quick and easy installation process Step 1 Unpacking Package Contents After unpacking your scanner package please check for the major components listed below Document scanner Hi Speed USB cable Power adapter Power cord Software CDs DVDs ...

Page 13: ...on My Computer the CD DVD ROM icon then cdsetup exe to start the installer program 4 To install the software on the Microtek Software CD DVD click each software program in the order that it appears on the screen to install and follow the on screen instructions 5 Click EXIT on the Microtek Software Installer screen when all the software has been installed 6 Restart your computer Drivers Software Up...

Page 14: ...an find the calibration data in either of these two locations After the software has been installed go to the drive where it is installed and look for a folder named Scanners Double click Scanners to open it look for a data named ADFCalData86_xxxx dat for ArtixScan DI 4020 Plus or ADFCalData87_xxxx dat for ArtixScan DI 2020 Plus and then copy it out from the folder Look for the same folder Scanner...

Page 15: ... scanner and locate the locking switch at the bottom left corner of the scanner Do not turn the scanner upside down when attempting to unlock as this may damage the scanner s mechanism 3 Push the locking switch to the position as indicated in the graphic with the icon on the lock showing as unlocked Step 4 Connecting the Scanner To the Power Adapter 1 Remove the yellow Step 4 sticker from your sca...

Page 16: ... of the Hi Speed USB cable to your computer 5 Connect the other end of the Hi Speed USB cable to the scanner s USB port 6 Press the Power button at the front panel of your scanner to turn on the scanner the LED orange lights at the button panel The system will detect your scanner automatically Power button ...

Page 17: ...port if the length of the originals exceeds 10 inches 2 Load the stack of originals onto the Document Feed Tray with the side to be scanned facing up Push the stack of papers into the tray until the edge of the stack touches the front edge of the Document Feed Tray Document Output Tray Feed Tray Extender Document Feed Tray 3 Align stack of originals with the center of the Document Feed Tray by sli...

Page 18: ...ed to scan the lengt h of the docu ment short er than 11 cm ATTENTION Output Tray Extender 11 cm 11 cm The scanned documents on the Document Feed Tray cannot be less than 11 cm The ADF can handle paper within the following specifications Width 4 33 to 8 5 110 to 215 9 mm Length 4 33 to 25 110 to 635 mm Weight 10 to 30 lbs 38 to 110 g m2 Feeder capacity Up to 100 sheets of 24 lbs 90 g m2 If the doc...

Page 19: ... lid and place the document to be scanned face down on the scanner glass surface 2 Place the top end of the document towards the back of the scanner then lower the scanner lid on the scanner glass surface When scanning the Rear Glass Surface should be kept clear and free of obstruction at all times With the document face down on the scanning glass align the document against the top edge of Front G...

Page 20: ...canning error may occur Before using the ScanWizard DI make sure that your anti virus software program has been turned off Otherwise the scanning speed may be affected The following sections will show you step by step how to use ScanWizard DI Scanning a Single sheet Document 1 Place the single sheet document to be scanned on either the scanner glass surface or on the ADF s Document Feed Tray 2 Lau...

Page 21: ...preview image appears in the preview window 5 If necessary click the Scan Frame tool button to adjust the size of the scan frame enclosed within the red dotted lines and labeled with the tag Main Drag on the edge or corner of the scan frame to resize the scan frame 6 Select your image type in the Attribute drop down menu Select Line Art to scan line art images images in one color or in black and w...

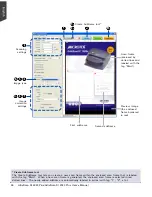
Page 22: ...us ArtixScan DI 2020 Plus User s Manual Image correction settings Image type Scanning settings Scan frame enclosed by dotted lines and labeled with the tag Main Preview window Preview image the enclosed frame bordered in red ...

Page 23: ... Auto deskew option is selected the scanner automatically detects the size of the original image crops the full scan frame to fit the image and removes unwanted black borders after the scan as well as corrects the distorted image for proper alignment f If necessary select a level of paper thickness for the ultrasonic double feed detection in the Double Feed drop down menu 4 If necessary specify th...

Page 24: ...DI 2020 Plus User s Manual For preview purposes only Image correction settings Image type Scanning settings Scan frame enclosed by dotted lines and labeled with the tag Main Preview window Preview image the enclosed frame bordered in red ...

Page 25: ...st the size of the scan frame enclosed within the dotted lines and labeled with the tag Main Drag on the edge or corner to resize the scan frame 6 Select Photo in the Attribute drop down menu as your image type for the main scan frame 7 If necessary adjust image quality by using the image correction tools 8 Specify the first subframe a Click the Create Subframe tool button Move the mouse pointer t...

Page 26: ... tag Main When a new scan frame is generated the enclosed scan frame is selected in red dotted lines The newly added subframe is automatically labeled in series with tag 1 2 etc Create Subframe tool Preview image the enclosed frame bordered in red Image correction settings Image type Scanning settings Scan frame enclosed by dotted lines and labeled with the tag Main Second subframe First subframe ...

Page 27: ...ttribute drop down menu 7 If necessary adjust image quality by using the image correction tools 8 Check the Barcode Separator option to activate the Barcode Frame tool button 9 Click the Barcode Frame tool button to adjust the size of the barcode frame enclosed within the red dotted lines and labeled with the tag BarCode Drag on the edge or corner to determine the final size of the actual scan for...

Page 28: ...de Separator Select Frame tool Image correction settings Scan frame enclosed by dotted lines and labeled with the tag Main Barcode Frame tool Barcode frame enclosed by dotted lines and labeled with the tag BarCode Barcode number is used as a file directory name Barcode number is used as a file name ...

Page 29: ...he procedures steps 3 through 6 for Scanning a Stack of Documents to specify your scanning requirements in the ScanWizard DI control panel 4 Click the Quick Scan button to start scanning Immediately your scanner starts scanning automatically When the scanning is finished ScanWizard DI will prompt you a window to ask if you want to place the next page Click the Continue button to scan more pages or...

Page 30: ...can button and select Save to File to open the Custom Scan Save to File dialog box In the Custom Scan Scan to File dialog box specify the following settings a Key in your preferred file name in the File prefix edit box or use the default Image as a root file name b Select your required export file format Save the file as TIF PDF or DCX which enables the Save multiple images as a single file option...

Page 31: ...is saved and used as a file directory If unchecked the value of the scanned barcode is saved and used as a file s name When Save Barcode as Directory is checked you have to assign at least one of the File Prefix or Serial No to be your output filename They cannot be null at the same time If Save Barcode as Directory is unchecked and if you do not assign either one of the File Prefix or Serial No t...

Page 32: ... Line Art as your image type to obtain best OCR results When Black White is your chosen mode in the Scan Type options Line Art should be the selected image type 4 Click the Custom Scan button and select OCR to open the Custom Scan OCR dialog box In the Custom Scan OCR dialog box specify the following settings a Key in your preferred file name in the File prefix edit box or use the default Document...

Page 33: ...es as a single file option is checked when the scanning is finished ScanWizard DI will prompt you a window to ask if you want to place the next page Click the Continue button to scan or click the Done button to save multiple images as a single file The saved file can now be opened from your chosen application and is ready to be edited ...

Page 34: ...lt Image as a root file name b Select Portable Document Format as your file saving format from the Save as type drop down menu c Check the Save multiple images as a single file option to store all the scanned images as a single file if desired d Check the Send image to application after saving option then choose your Adobe application software from the options 5 Click the Save button The originals...

Page 35: ...ialog box specify the following settings The File Option button is active when the RGB Color or Grayscale is set as your image output type and the PDF is chosen With this function you can control the image quality compression as your desired a Key in your preferred file name in the File name edit box or use the default Image as a root file name b Select your required export file format c Check the...

Page 36: ... steps 3 through 6 for Scanning a Stack of Documents to specify your scanning requirements 4 Click the Custom Scan button and select Copy to open the Custom Scan Copy dialog box In the Custom Scan Copy dialog box specify the following settings a Select a default printer or any alternative printer from the options b Specify the number of copies to be made c Select a scale ratio for increasing or re...

Page 37: ...ne through the Save Settings to Function Button command as explained below 1 Launch ScanWizard DI either as a stand alone by clicking the program icon or by using the File Import or Scan command from an application program 2 Follow the procedures steps 3 through 7 for the Scanning a Single sheet Document section to specify your scanning requirements in the ScanWizard DI panel 3 When you finish spe...

Page 38: ...ital file Saves time from retyping documents into your word processor 5 Specify the function settings according to your requirements then click the OK button The parameters currently specified for your selected function button are saved To define another custom function button if desired follow steps 2 through 5 of this section Note When you have finished the settings for the desired function butt...

Page 39: ...l parts of the scanner on a regular basis Cleaning the Scanner Glass Surface 1 Lift the ADF 2 Then use a soft non abrasive and lint free cloth to gently wipe the rear and front glass surface areas on the scanner flatbed Note Do not use any detergents synthetic cleaning solutions cleaning naphtha or other solvents to clean the glass surface directly Clean the rear and front glass surface areas ...
Page 40: ...ed at the bottom of the ADF Cleaning the Rollers Prolonged used of the ADF may result in accumulation of ink and other residue on the feeder s rollers affecting their efficiency Clean the rollers periodically to maintain performance Note Rollers are found in two areas of the ArtixScan DI 4020 Plus 2020 Plus Directly under the ADF cover and under the Document Feed Tray ADF Cover Document Feed Tray ...

Page 41: ... s Manual 41 To clean the rollers under the ADF cover 1 Push the button at the top of the ADF to release and lift up the ADF cover 2 Clean the rollers with a lint free cloth or a swab moistened with alcohol or ECO cleaner as shown in the graphic below ...

Page 42: ...o clean the rollers under the Document FeedTray 1 Push the button at the top of the ADF then lift the Document Feed Tray along with the ADF cover 2 Clean the rollers with a lint free cloth or a swab moistened with alcohol or ECO cleaner as shown in the graphic below ...

Page 43: ... s Manual 43 Cleaning the ADF Glass Surface 1 Push the button at the top of the ADF then lift the Document Feed Tray along with the ADF cover 2 Using a soft and non abrasive lint free cloth clean the inner glass surface of the ADF gently and carefully ...

Page 44: ...hen move the cover of the ADF up to see the separation pad assembly as indicated in the graphic below 2 With the cover fully opened use your fingers to nip off the separation pad assembly and pull it out from its compartment 3 Insert as shown in a and push down as shown in b the new separation pad assembly into its compartment making sure that the separation pad assembly snaps into place 4 Close t...

Page 45: ...the cover with a screwdriver and pull out the feed roller assembly carefully Feed Roller Assembly 3 Insert and push down the new feed roller assembly into its compartment making sure the feed roller assembly snaps into place Tighten the screw back on the cover 4 Make sure the feed roller assembly is attached to the feed cover properly then close the feed cover Note The recommended replacement poin...

Page 46: ...y under the ADF cover or under the Document Feed Tray ADF Cover Document Feed Tray If a paper jam has occurred in the rollers under the ADF cover pull out the paper by using a forward moving direction If a paper jam has occurred in the rollers directly under the Document Feed Tray lift the Document Feed Tray then pull out the paper by using a forward or backward motion until the paper has been pul...

Page 47: ... sure your scanner is unlocked see Step 3 in the Initial Setup section Make sure your scanner is connected to your computer and plugged in to a power source see Step 4 in the Initial Setup section Uninstall and reinstall the ScanWizard DI software 4 After clicking Scan a blank screen appears Make sure your scanner is unlocked see Step 3 in the Initial Setup section Uninstall and reinstall the Scan...

Page 48: ... ppm at 200 dpi A4 line art grayscale color Duplex 60 ipm at 200 dpi A4 line art grayscale color Scanning Area Flatbed 8 5 x 11 7 215 9 mm x 297 2 mm ADF 8 5 x 25 215 9 mm x 635 mm Feeder Capacity 100 sheets of copy bond paper Unfolded Paper Weight 10 to 30 lbs 38 to 110 g m2 ADF Paper Size Min 4 33 x 4 33 110 mm x 110 mm Max 8 5 x 25 215 9 mm x 635 mm Duty cycle 2000 pages per day Rubber Pad Life...

Reviews: