background image

8     NDT-2000 User's Manual

Digitizing Industrial X-ray Films in Other Sizes ........................................... 34

Positioning Industrial X-ray Films ....................................................... 34
Scanning Industrial X-ray Films ......................................................... 36

Digitizing Industrial X-ray Films Automatically ........................................... 37

Care and Cleaning ................................................................................. 38

Cleaning the Glass and Components on the Front Cover....................... 38
Cleaning the Glass Surface on the Digitizer ......................................... 41
Cleaning the Rollers ......................................................................... 42

Maintenance ......................................................................................... 43

Appendix ............................................................................................. 44

Fixing Film Jams ............................................................................. 44
Troubleshooting .............................................................................. 45
Optional Auto Film Feeder (AFF) ....................................................... 47

Installing and Connecting the Auto Film Feeder (AFF) .................... 48
Positioning the X-ray Films  ........................................................ 50
Using Output Tray ..................................................................... 53
Scanning X-ray Films by Using the Auto Film Feeder (AFF) ............. 54

Optional Multi-channel Film Feeder (MFF) ........................................... 56

Installing the Multi-channel Film Feeder (MFF) ............................... 57
Using the Multi-channel Film Feeder (MFF) ................................... 58
Positioning the X-ray Films ......................................................... 63
Using the Film-rolling Rack ......................................................... 65
Using the Output Tray ............................................................... 66
Scanning X-ray Films by Using the Multi-channel Film Feeder (MFF)  67

Specifications

 ................................................................................. 69

Summary of Contents for NDT-2000

Page 1: ...www microtek com NDT RT Industrial Film Digitizer User s Manual ...

Page 2: ...ty of their respective holders Specifications software bundles and accessories are subject to change without notice Not responsible for typographical errors Disclaimer The contents of this manual have been checked carefully for accuracy and every effort has been made to ensure that there are no errors However Microtek makes no guarantee as to the accuracy of the contents of this document and reser...

Page 3: ...if not installed and used in accordance with the instructions may cause harmful interference to radio communications However there is no guarantee that interference will not occur in a particular installation If this equipment does cause harmful interference to radio or television reception which can be determined by tuning the equipment off and on the user is encouraged to try to correct the inte...

Page 4: ...4 NDT 2000 User s Manual ...

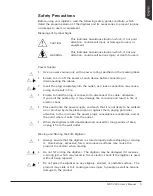
Page 5: ...you pull the cable only it may damage the core wire and result in fire or electric shock Place and route the power supply cord such that it is not likely to be walked on or pinched by items placed upon or against them paying particular attention to the cord near the power plugs convenience receptacles and at the point where it exits from the outlet When the digitizer is left unattended and unused ...

Page 6: ...power switch immediately Do not attend to remove your hairs from the front cover when the digitizer is still turned on Maintenance and Service When the digitizer is going to be cleaned ensure to turn off the power of each device and unplug the power cable from the AC outlet When you need a repair service unplug the digitizer from the power outlet and consult qualified service personnel When replac...

Page 7: ...our Film Digitizer 20 Installing the Feed Tray 20 Installing the Output Tray 21 Output Basket 22 Installing Your Film Digitizer 23 Installing the Software 23 Connecting the Film Digitizer 24 To the Power Cord 24 To the Hi Speed USB Cable 24 Using Light Shield to Digitize Industrial X ray Films 26 Attaching Light Shield into Guide Arms 26 Positioning Industrial X ray Films 27 Scanning Industrial X ...

Page 8: ...nce 43 Appendix 44 Fixing Film Jams 44 Troubleshooting 45 Optional Auto Film Feeder AFF 47 Installing and Connecting the Auto Film Feeder AFF 48 Positioning the X ray Films 50 Using Output Tray 53 Scanning X ray Films by Using the Auto Film Feeder AFF 54 Optional Multi channel Film Feeder MFF 56 Installing the Multi channel Film Feeder MFF 57 Using the Multi channel Film Feeder MFF 58 Positioning ...

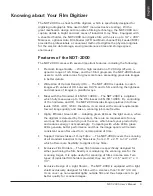
Page 9: ...gitizer which fully measures up to the DS classes in EN ISO 14096 By controlling of the hardware and OD the NDT 2000 divides image qualities into three levels 3 5D 4 0D 4 5D therefore it can meet with various requirements toward image quality and make a scanning job more flexible Highly Efficient Green LED Adopting green LEDs as the light source when the digitizer is detected by the system there a...

Page 10: ...mm 100 mm 120 mm 140 mm 3 3 inch and 4 5 inch in width film at one time Microtek ScanWizard Industry software SanWizard Industry is dedicated scanning software developed by Microtek for capturing images of industry X ray film It is easy to install and use Optional Microtek MiiNDT software MiiNDT is software exclusively designed for the image management in the RT industry It can combine inspecting ...

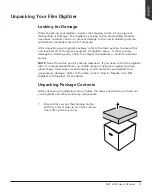
Page 11: ...are any damaged or missing parts notify the shipper immediately or contact customer service NOTE Save the carton and all packing materials If you need to ship the digitizer later it is recommended that you should repack it using the original wire ties plastic bags foam supports and cartons which protects your digitizer from unnecessary damage Refer to the later section How to Repack Your Film Digi...

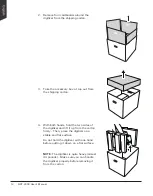
Page 12: ...4 With both hands hold the two sides of the digitizer and lift it up from the carton firmly Then place the digitizer on a stable and flat surface Do not hold the digitizer with one hand before putting it down on a flat surface NOTE The digitizer is quite heavy almost 44 pounds Make sure you can handle the digitizer properly before removing it from the carton ...

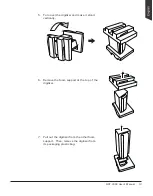
Page 13: ...l 13 5 Turn over the digitizer and make it stand vertically 6 Remove the foam support at the top of the digitizer 7 Pull out the digitizer from the other foam support Then remove the digitizer from its packaging plastic bag ...

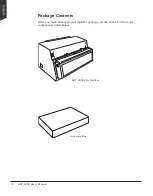
Page 14: ...14 NDT 2000 User s Manual Package Contents After you have unpacked your digitizer package please check for the major components listed below NDT 2000 Film Digitizer Accessory Box ...

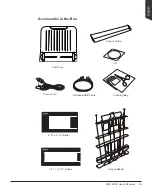
Page 15: ...NDT 2000 User s Manual 15 Power Cord Hi Speed USB Cable CD Feed Tray Output Guide Output Basket Accessories in the Box 8 5 x 4 5 Holder 12 x 3 1 3 Holder Cleaning Bag ...

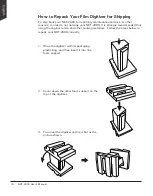
Page 16: ...your NDT 2000 it is strongly recommended that using the original carton and other packing materials Follow the steps below to repack your NDT 2000 correctly 1 Wrap the digitizer with its packaging plastic bag and then insert it into one foam support 2 Cover down the other foam support on the top of the digitizer 3 Turn over the digitizer and lie it flat as the picture shown ...

Page 17: ... digitizer with the foam supports attached and then put the digitizer back into the shipping carton 5 Put four cardboards back into the shipping carton 6 Put the accessory box with accessories in the shipping carton and close the top cover Then seal the carton with tape ...

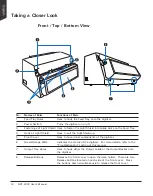
Page 18: ...Shield Uses to pull the Light Shield up 5 Front Cover Uses to cover inner components of the digitizer 6 Green Orange LEDs Indicates the status of the digitizer For more details refer to the Troubleshooting section of this manual 7 Output Tray Holes Uses to hook either the Output Guide or the Output Basket onto the digitizer 8 Release Buttons Releases the front cover to open the lamp holder There a...

Page 19: ...000 User s Manual 19 No Names of Parts Functions of Parts 1 Hi Speed USB Port Connects the Hi Speed USB USB 2 0 cable to the computer 2 Power Connector Connects the digitizer to the power cord Rear Side View ...

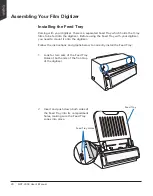
Page 20: ...Before using the Feed Tray with your digitizer you need to mount it onto the digitizer Follow the instructions and graphs below to correctly install the Feed Tray Feed Tray Feed Tray Holes 1 Look for two sets of the Feed Tray Holes at both ends of the front top of the digitizer 2 Insert and push down both sides of the Feed Tray into its compartment holes making sure the Feed Tray snaps into place ...

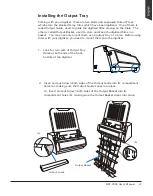
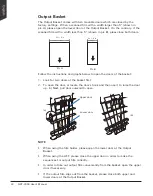
Page 21: ...itized films in a basket You may use only one of them as an output tray at a time Before using them with your digitizer you need to mount them onto the digitizer 1 Look for two sets of Output Tray Holes at both ends of the front bottom of the digitizer 2 Insert and push down both sides of the Output Guide into its compartment holes a making sure the Output Guide snaps into place Or Insert and push...

Page 22: ...low to open the doors of the basket 1 Look for two doors at the basket first 2 To open the door a locate the door s hook and then use it to raise the door up b Next pull door outward to open Pic B W 5 in Pic A W 5 in NOTE When using the film holder please open the lower door at the Output Basket When using the AFF please close the upper door in order to make the sequences for output film correctly...

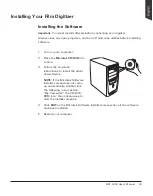
Page 23: ... on your computer 2 Place the Microtek CD DVD into a drive 3 Follow the on screen instructions to install the driver and software NOTE If the Microtek Software Installer screen does not come up automatically double click the following in succession My Computer the CD DVD ROM icon then cdsetup exe to start the installer program 4 Click EXIT on the Microtek Software Installer screen when all the sof...

Page 24: ...e left side of the digitizer 2 Plug one end of the power cord into a wall outlet or other power source To the Hi Speed USB Cable 3 Connect one end of the Hi Speed USB cable to your computer 4 Connect the other end of the Hi Speed cable to the digitizer s USB port locating at the left side of the digitizer ...

Page 25: ...of the digitizer Pull it up to raise the Light Shield Power switch LEDs 6 Turn the power switch at the front left panel of the digitizer to On once the digitizer is detected by your system the LED lights on the front panel will brighten and the digitizer is ready to scan Hook of the Light Shield ...

Page 26: ...ght Shield down otherwise pull the Light Shield up and do not use it NOTE When pulling up or pushing down the Light Shield make sure it is set at its proper position otherwise the system may detect that you are using a Multi channel Film Feeder falsely and then come out a warning message Attaching Light Shield into Guide Arms Before using the Light Shield you have to fasten it into Guide Arms on t...

Page 27: ...ay with the aim of the Light Shield 1 Attach the Light Shield into Guide Arms before using it Refer to the previous sections Attaching the Light Shield into Guide Arms for the detail 2 Load and insert the film into the Feed Tray with the side to be scanned facing down and with the top of the film directing downwardly Push the film into the tray until the edge of it touches the bottom edge of the F...

Page 28: ...ll prompt a window to remind you Bring up the Light Shield and click the Calibration button Then the digitizer will start to calibrate When the calibration is done click the OK button to bring in main windows of ScanWizard Industry program To skip the reminding window pull up the Light Shield before turning on the digitizer 3 Click the Overview button to perform a preliminary scan of the image whi...

Page 29: ...lm image into a negative film image by multiplying 10 000 When saved as a TIFF format it can be displayed as a positive film image again This mode is suitable for the film with high density but in needs of superior image quality However the scanning speed will be slowed down Speed Mode This is the default setting which can improve the contrast ration of a normal image 9 Click the Scan button in th...

Page 30: ...d lines NOTE When scanning with the Light Shield if the scan frame covers the area of the Light Shield the selected area of the Light Shield will be cropped out automatically and will not appear in the saved image file If the scanned image is too big the auto crop function will be cancelled ...

Page 31: ...older which can hold up to one piece of the 8 5 x 4 5 industrial X ray film at a time 1 Install the Feed Tray onto your digitizer before using it Refer to the previous section Installing the Feed Tray for the detail 2 Load the film face down inside the holder Slide the film along the slot of the holder until the film is fully loaded 3 Load and insert the 8 5 x 4 5 Film Holder with loaded film into...

Page 32: ...Tray for the detail 2 Load the film face down inside the holder Slide the film along the slot of the holder until the film is fully loaded 3 Load and insert the 12 x 3 1 3 Film Holder with loaded film into the Feed Tray with the side to be scanned facing down and with the top of the film directing downwardly Push the holder into the tray until the edge of it touches the bottom edge of the Feed Tra...

Page 33: ...Scanning Industrial X ray Films in the Using Light Shield to Digitize Industrial X ray Film chapter to launch the ScanWizard Industry software to specify your scanning requirements and to start scanning In step 6 instead select the correct holder size to frame the scan area from the Scan Frame drop down menu When done you will see a flashing frame marquee around the selected area Settings window P...

Page 34: ...y can hold only one piece of X ray film at a time This section shows you how to position a single sheet of X ray film into the Feed Tray 1 Install the Feed Tray onto your digitizer before using it Refer to the section Installing the Feed Tray of this manual for the detail 2 Load and insert the film into the Feed Tray with the side to be scanned facing down and with the top of the film directing do...

Page 35: ...e Feed Tray can handle X ray films of the following sizes Width 2 5 to 14 6 35 to 35 56 cm Length 2 5 to 200 6 35 to 508 cm Sheet Feed Single sheet per time If the film are torn curled or wrinkled do not put them into the Feed Tray to scan because they may cause film jams Remove clips or staples before placing the film into the Feed Tray DO NOT use the digitizer to scan your X ray film with clips ...

Page 36: ...lm into the digitizer s Feed Tray 2 Follow the procedures steps 2 through 8 for Scanning Industrial X ray Films in the Using Light Shield to Digitize Industrial X ray Film chapter to launch the ScanWizard Industry software to specify your scanning requirements and to start scanning Scan Frame tool Settings window Preview window Scan frame enclosed by red dotted lines ...

Page 37: ...your scanning requirements 2 Next select the Auto Scan function instead of the Scan button to start scanning a Click the Scan Process Tool button and then choose Auto Scan from the appearing drop down menu b When enabled once the film on the digitizer s feed tray is detected by the digitizer the digitizer will start scanning automatically based on your preferred scan settings If you want to save y...

Page 38: ...regular basis Cleaning the Glass and Components on the Front Cover 1 Push down two Release buttons at both sides of the front cover of the digitizer and open the front cover When opening the front cover support the both sides of the front cover with your hands avoiding suddenly falling down of the front cover 2 Make sure that the Light Shield has been pulled up ...

Page 39: ...ure the glass has been pull to reach the end of the track next use another hand to grab the right end of the glass and then lift it up perpendicularly from its compartment part NOTE When you try to remove the glass out from its compartment part if the glass has not been pulled out to the end of the track and has not been lifted up perpendicularly by both hands the glass may be damaged and broken 4...

Page 40: ...face or diffuser directly To remove stains use supplied cleaning cloth moistened with optical lens cleaner e g Purosol Lens Cleaner Wipe off dirt and stains from the surface of the glass horizontally while cleaning Do not wipe them vertically in order to avoid dropping off dirt or stains into the interior of the scanner While cleaning wipe the glass only toward the same direction Do not wipe back ...

Page 41: ...ail descriptions refer to the printed document come with the cleaning bag inside the package Forceps Straight and Serrate Lint free cloth Several pieces Remove the glass cover Clean the indented glass 1 Open the front cover of the digitizer 2 Locate the glass cover and remove it from its compartment part 3 Loose the the ratchet snap lock of the forceps 4 Put the lint free cloth on the serration of...

Page 42: ...ver support the both sides of the front cover with your hands avoiding suddenly falling down of the front cover 2 When the front cover is opened you can find several groups 4 sets of rollers located at the inside of the digitizer Clean the rollers with a lint free cloth or a swab moistened with alcohol or ECO cleaner as shown in the graphic below NOTE Remember to clean all rollers inside of the di...

Page 43: ... worn out and a problem such as insufficient light supply may occur In this cases contact your local dealers or wholesales for the maintenance services NOTE Your digitizer need a professional to perform the required service or maintenance Do not attend to fix or perform the maintenance by yourself or it may cause dangers to you or the digitizer ...

Page 44: ...n the both sides of the front cover 2 After opening the front cover let the jammed film fall into the output basket and then remove it from the output basket NOTE To remove the jammed film from the digitizer you have to open the front cover first Otherwise your film may be damaged if they are forcedly removed ...

Page 45: ...document 3 When trying to scan an error message appears on your screen that reads Can t Find Digitizers Make sure your digitizer is connected to your computer and plugged in to a power source see Connecting the Digitizer in the Assembling Your Film Digitizer section Uninstall and reinstall the ScanWizard Industry software 4 After clicking Scan a blank screen appears Uninstall and reinstall the Sca...

Page 46: ... that you have selected the correct Scan Type Multi Channel Crop or General Make sure the glass surface on the front cover has been set into its proper position Make sure the Light Shield has been set into its proper position Make sure you have selected a correct scan process tool and device connected runs properly ...

Page 47: ... time It increases convenience and efficiency in multiple sheet scanning of X ray film After unpacking the AFF package check for the item shown below Specifications of AFF Film Capacity Up to 15 sheets of films Dimension 458 L x 90 W x 438 H mm Weight 4 45 kg Scanning Area Min 2 5 x 10 Max 14 x 17 The coming section describes how to install the AFF on the NDT 2000 through the NDT 2000 s accessory ...

Page 48: ...that the Feed Tray has been removed out from the digitizer and the digitizer s power is off Follow the steps below to install the AFF 1 Look for two sets of the Feed Tray Holes at both ends of the front top of the digitizer 2 Insert and push down both sides of the AFF into its compartment holes making sure the AFF snaps into place Lift up the Feed Tray and remove it from the digitizer before insta...

Page 49: ...NDT 2000 User s Manual 49 3 Plug the connector of the AFF into the digitizer s 9 pin accessory port securely and properly ...

Page 50: ...ilms at a time This section shows you how to position X ray films into the tray of the AFF correctly 1 Install the AFF onto your digitizer before using it Refer to the previous sections Installing and Connecting the Auto Film Feeder AFF for the detail 2 Lift up the Top Bar AFF Top Bar Rear Rollers ...

Page 51: ...ing downwardly When loading the films into the tray make sure all films have been loaded on the bottom rail of the tray Incorrect positioning of films may cause film jams or damage the digitizer Please take note that the bottom of the films should be placed against the front side of the bottom rail as shown in the graphic and rest the back against the AFF housing ...

Page 52: ...Manual 4 Lower down the Top Bar onto the films so the films are sandwiched between the Top Bar and the AFF s tray 5 If the width of the film is large than 10 24 26 cm pull the Light Shied up otherwise pull it down Top Bar ...

Page 53: ...erwise improper outputs of piles of films may cause jams of films and bring damage to your digitizer Refer to the previous section Installing the Output Tray for details about how to install the Output Tray onto your NDT 2000 NOTE To ensure that the after scan film can stay in the basket neatly make sure that the lower door of basket is opened Output Basket with lower door opened ...

Page 54: ...ame marquee around the selected area 8 Select your desired image quality 3 5D 4 0D or 4 5D from the Density drop down menu for the current scan job based on the needs image quality requirements of the inspection 9 If necessary select your desired scan mode Standard Mode or Speed Mode from the Scan Mode drop down menu to scan film based on the requirements 10 Click the Scan button in the Preview wi...

Page 55: ...NDT 2000 User s Manual 55 Settings window Preview window ...

Page 56: ...npacking the MFF package check for the items shown below Specifications of MFF Film Capacity 3 sheets of 60 mm 70 mm 80 mm 90 mm 100 mm 3 3 inch and 4 5 inch in width films at one time or 2 sheets of 120 mm and 140 mm in width films at one time Dimension 700 L x 420 W x 255 H mm Weight 4 45 kg The coming section describes how to install the MFF on the NDT 2000 and how to scan X ray films by using ...

Page 57: ...efore before mounting the MFF onto your digitizer make sure that the Feed Tray or the AFF has been removed out from the digitizer and the digitizer s power is off For how to install the MFF and its related components please refer to the printout coming with the MFF package Please store the printout carefully for the use in the future Film rolling Rack Multi channel Film Tray Back Support Base Tray...

Page 58: ...tion Bars Pinch both sides of a Film separation Bar and then take it out from its component part Take turns to remove all Film separation Bars attached with the Multi channel Film Tray There should be four pieces of Film separation Bars in total Film feeding channels Bottom Guardrail Film separation Bar 1 Remove top and bottom Guardrails Locate two Quick lock Nuts at two sides of the top Guardrail...

Page 59: ...face grab both sides of the top Rectangular Prism push it toward the left of the axis and then turn it over clockwise or counterclockwise When done push the top Rectangular Prism toward the right of the axis to ensure the top Rectangular Prism has been fixed and cannot be turned over Repeat the step above to adjust the bottom Rectangular Prism ensuring both Rectangular Prisms possess the same surf...

Page 60: ...ilm separation Bar inside notches at both top and bottom Rectangular Prisms as shown in the graph below Fill all notches with Film separation Bars next to the selected measurement scale 4 When done put the top Guardrail and the bottom Guardrail back into their component parts Finally screw Quick lock Nuts clockwise to secure both Guardrails The long notch next to the measurement scale Top Guardrai...

Page 61: ...u try to remove the glass out from its compartment part if the glass has not been pulled out to the end of the track and has not been lifted up perpendicularly by both hands the glass may be damaged and broken a Push down two Release buttons at both sides of the front cover of the digitizer and open the front cover When opening the front cover support the both sides of the front cover with your ha...

Page 62: ...ward the perforation of the glass To change another mask locate a shallow pit between the glass and the printed number of the mask Through the shallow pit use a sharp device to insert under the mask and then tilt it up carefully 70mm 70mm 70mm NOTE When changing the Glass Mask do not forget to adjust the measurement scale on Rectangular Prisms of the Multi channel Film Tray into a corresponding an...

Page 63: ...l 63 d When done insert the glass with the Glass Mask into the compartment part of the front cover and then push it back along the tracks until it snaps into place Finally push back the front cover until it snaps into place ...

Page 64: ...e side to be scanned facing down and with the top of the film directing downwardly When loading the films into the tray make sure all films have been pushed into the tray until the edge of them touch the bottom edge of the MFF 3 Pull up the Light Shield NOTE If you would like to scan less than 3 sheets of X ray films at a time make sure that you have to put one sheet of X ray films at the middle c...

Page 65: ...scrolled facing up and with the top of the film directing downwardly When loading the films into the tray make sure the film has been pulled out into the tray until the edge of them touch the bottom edge of the MFF 3 Pull up the Light Shield NOTE If you would like to scan less than 3 rolls of X ray films at a time make sure that you have to put one roll of X ray films at the middle channel For exa...

Page 66: ...T 2000 too otherwise improper outputs of piles of films may cause jams of films and bring damage to your digitizer Refer to the previous section Installing the Output Tray for the details about how to mount the Output Tray onto your NDT 2000 NOTE To ensure that the after scan film can stay in the basket neatly make sure that the lower door of basket is closed Output Basket with lower door closed ...

Page 67: ... will see a flashing frame marquee around the selected area Please note that when using the MFF you are allowed to adjust only the height of the scan frame 8 Select your desired image quality 3 5D 4 0D or 4 5D from the Density drop menu for the current scan job based on the needs image quality requirements of the inspection 9 If necessary select your desired scan mode Standard Mode or Speed Mode f...

Page 68: ...68 NDT 2000 User s Manual Settings window Preview window ...

Page 69: ... 300 dpi 14 x 17 grayscale Film Size Min 2 5 x 2 5 63 5 mm x 63 5 mm Max 14 x 200 355 6 mm x 5080 mm Film Holder 8 5 x 4 5 12 x 3 1 3 Lamp Life 100 000 times at 300 dpi scan cycle Product Life Cycle 100 000 scans or 5 years Interface Hi Speed USB USB 2 0 Dimensions L x W x H 12 9 x 18 7 x 8 8 329 x 474 x 224 mm 329 x 474 x 544 mm w input tray 586 x 474 x 934 mm w input output tray Weight 44 5 lbs ...

Reviews: