background image

     3

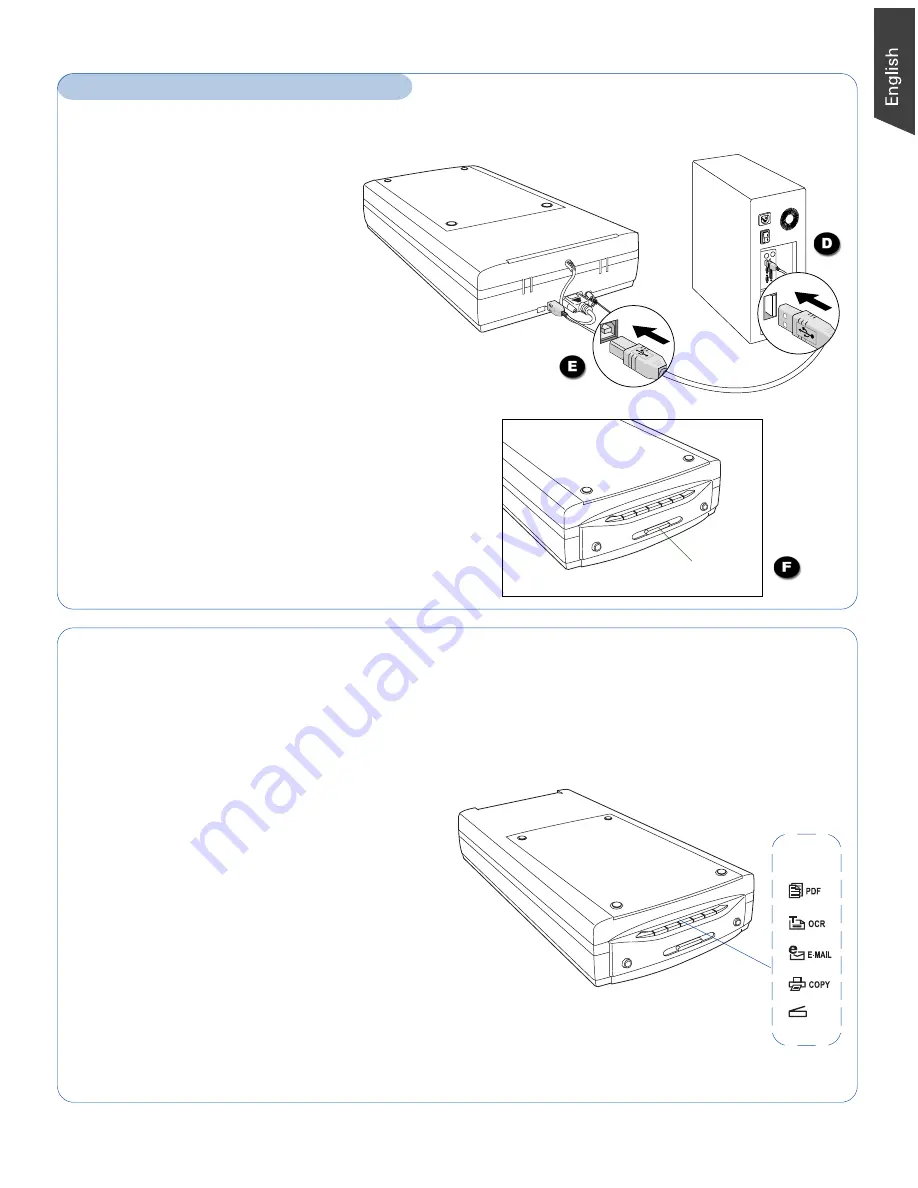
To the Hi-Speed USB cable

D.

Connect one end of the Hi-Speed

USB cable to your computer.

E.

Connect the other end of the Hi-

Speed cable to the scanner’s USB

port.

Step 4: Connect Scanner (cont.)

Power button

Scanner Buttons

The

 ScanMaker i800 Plus

 is equipped with six scanner buttons, providing quick access to the most

frequently used functions. These buttons are 

Scan

Copy

E-mail

OCR

,

 PDF

, and 

Custom

.

Scan: 

Captures images that can be saved as

files or sent to an image-editing application.

Copy: 

Scans the image and sends it to your

printer.

E-mail: 

Scans the image and delivers it

directly to your e-mail editor.

OCR: 

Scans a text document, converts, and

saves it in text file format.

PDF: 

Scans the image and saves it in the

Adobe Acrobat PDF format.

Custom: 

Customizes this button to perform

your preferred function, such as Power

Saving, Scan, Fax, or Launch Application.

F.

Press the power button at the front panel of

your scanner, and wait for the LEDs to stop

blinking and stay on steady.

The 

scanner

 will be detected by your system

automatically.

SCAN

Custom

Summary of Contents for ScanMaker i800 Plus

Page 1: ...nPotter into a drive and double click the ScanPotter installer icon to install ScanPotter C Install the remaining software components then restart your computer at the end of all software installation...

Page 2: ...locking switch to the position as indicated by the graphic on the right with the icon on the lock showing as unlocked Locked Unlocked NOTE To lock the scanner for shipping and other reasons refer to...

Page 3: ...can be saved as files or sent to an image editing application Copy Scans the image and sends it to your printer E mail Scans the image and delivers it directly to your e mail editor OCR Scans a text d...

Page 4: ...bration strip of the holder facing towards the back of the scanner EZ Lock 35mm Filmstrip Holder EZ Lock 35mm Slide Holder EZ Lock 4 x 5 Film Holder EZ Lock 6 x 22 cm Film Holder Do not block calibrat...

Page 5: ...the image and finally perform the image scan with factory settings When done the scanned image can be saved in a file and delivered to the specified location Select preferences if necessary Before you...

Page 6: ...for transparencies and slides depending on the film type you are using 5 In the Scan Job Queue window check the Multiple Auto crop for EZ Lock Film Holder option 6 Click the Overview button to auto c...

Page 7: ...ype as your image output type Select Color to scan the image in color Select Grayscale to scan the image in grayscale Select Black White to scan the image in black and white b Select a desired resolut...

Page 8: ...fects Filter column and additional image correction tools Additional Adjustment column for your scanned image Click the Scan Settings button to switch back to the default control panel of ScanPotter S...

Page 9: ...ee Step 4 Uninstall and reinstall the ScanWizard EZ or ScanPotter software 4 After clicking Scan a blank screen appears Make sure your scanner is unlocked see Step 3 Uninstall and reinstall the ScanWi...

Page 10: ...ment Drivers Software Upgrades After you finish the installation of software if you found that the installed drivers and software cannot run your product or your computer system properly later please...

Reviews: