©2018 Mid West Products, Inc.
-2-
Form No. M1-1729
1. Remove parts from carton and lay on a flat
surface.
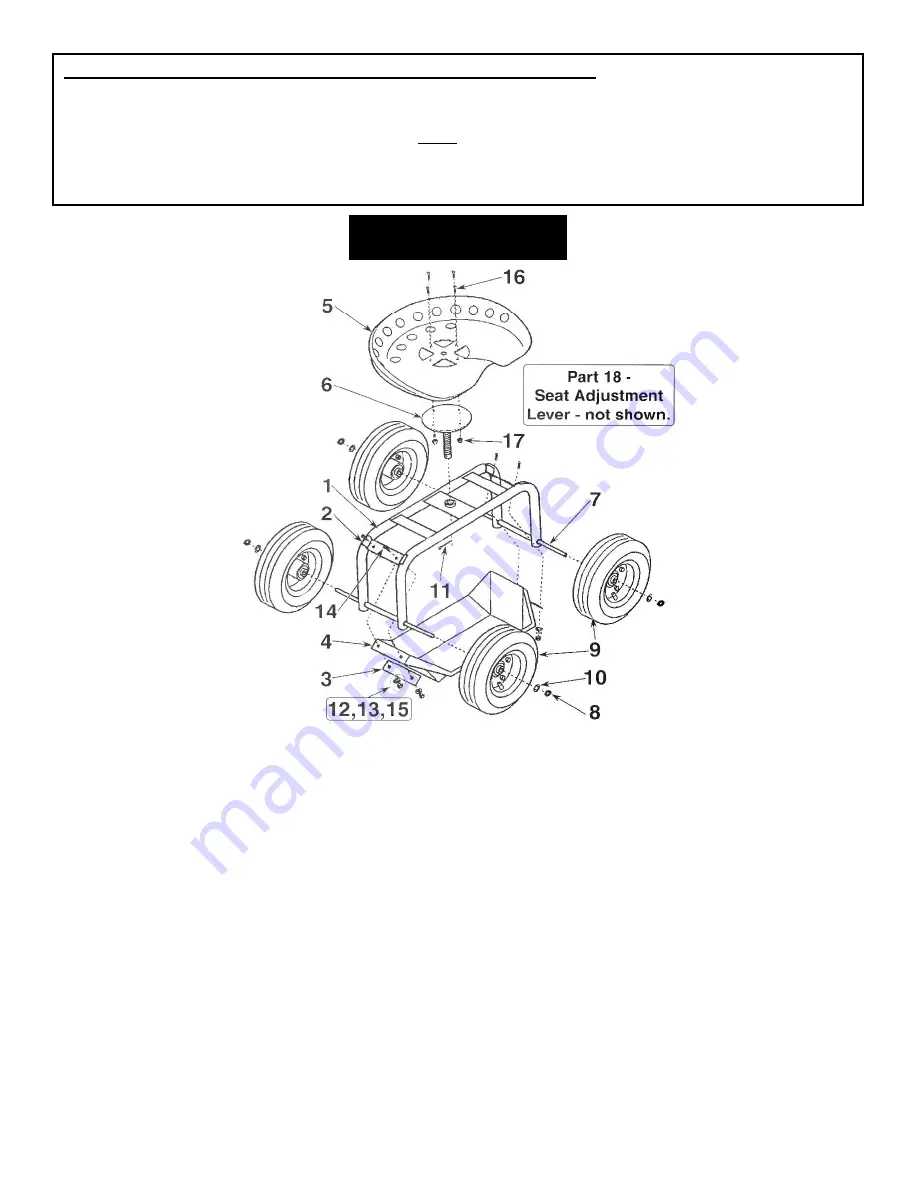
2. Matching up all the predrilled holes, attach the
Tray Bracket (2) to the Frame (1), the Plastic Tray
(4) and the Reinforcing Plate (3) using the Screws
(14), Small Washers (12), Lock Washers (13), and
Small Nuts (15). Tighten hardware. See
Assembly Drawing above.
3. Slide both Axles (7) into the Frame (1). Slide the
Wheel (9) (be sure the valve stem is facing out),
and the Large Washer (10) onto the Axle. Thread
a Nylon Axle Nut (8) onto the end of Axle and
tighten, leaving enough space to permit the Wheel
to turn freely. Repeat for the rest of the Wheels.
4. Be sure the Adjustment Lever (18) is screwed
onto Seat Post (6). The Seat (5) is attached to
the Seat Post (6) with four Tapered Bolts (16)
and Washer/Nylon Lock Nuts (17). Twist Seat
(5) and Seat Post (6) assembly into the Frame
(1) clockwise. The threaded Post needs to be
seen from below the Frame. Inset the Cotter Pin
(11) through hole in the Post. Spread open the
Cotter Pin (11).
5. Loosen Adjustment Lever (18) to set the desired
height. Adjust Seat height by rotating the Seat in
the Frame. Rotate Adjustment Lever (18) to
secure seat post in position. The Adjustment
Lever (18) will prevent the Seat from lowering
beyond the desired height. Before each use,
check the Seat (5) to make sure that the Seat is
securely in place with all hardware tightened
down.
ASSEMBLY
Please read all Instructions before assembly and using the product!
1. Keep work area clean and uncluttered to avoid injuries.
2. Keep children away from this product. This is not a toy.
3. Use eye and ear protection. Always wear approved impact safety goggles when assembling this product.
4.
Do not overreach. Keep proper footing and balance at all times when assembling this product.


