■
■
The Vent Connector shall be as short as possible.
The entire length shall be readily accessible for
inspection, cleaning and replacement.
■
■
The length of horizontal uninsulated Vent Connector
between chimney and a single gas utilization equipment
shall not exceed 75% of the height of the chimney above
the connector, or 100% if the Vent Connector is
insulated.
■
■
The Vent Connector shall be installed so as to avoid
turns or other construction features which create
excessive resistance to flow of vent gas. It shall be
installed without any dips or sags and shall slope upward
at least 1/4" per foot.
■
■
A manually operated damper shall not be placed in the
Vent Connector or chimney of any gas utilization
equipment.
■
■
The Vent Connector shall be firmly attached to draft
hood outlets and flue collars. Joints between sections of
connector piping shall be fastened by sheet-metal
screws or other approved means. The Vent Connector
shall be supported for the design and weight of the
material employed to maintain clearance and prevent
physical damage and separation of joints.
■
■
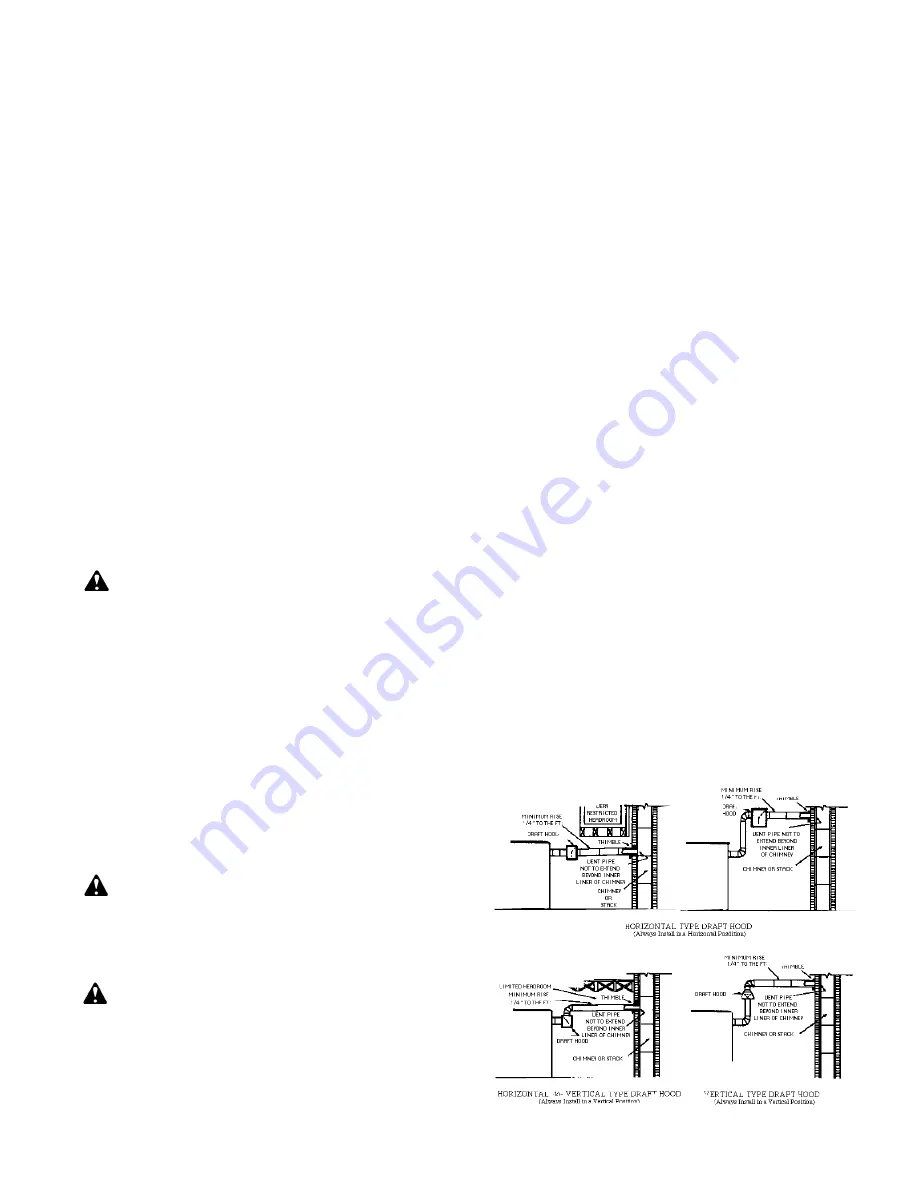
A draft hood or a barometric draft regulator shall be
installed in the same room or enclosure as the
equipment in such a manner as to prevent any difference
in the pressure between the hood or regulator and the
combustion air supply (see Figures 3 and 4). In no case
shall the relief opening of the draft hood or barometric
draft regulator be located at a point lower than the top of
the highest flue passage in the equipment.
■
■
Gas utilization equipment requiring controlled draft
may be equipped with a listed double acting barometric
draft regulator, if a approved by local codes.
■
■
A device which will automatically shut off gas to the
burner in the event of sustained backdraft is required. It
must be of the listed manual reset type and installed and
adjusted by a qualified service technician in accordance
with the manufacturer's instructions.
■
■
Refer to the gas utilization equipment manufacturer for
recommended vent connection requirements.
FIGURE 3
Recommended Locations for Draft Hoods
III COMBUSTION CHAMBER
A combustion chamber liner is normally required to
protect non-heat transfer surfaces and to provide a
radiant bed for rapid heat transfer to the primary surfaces
of the heat exchanger. In most cases the existing
combustion chamber liner formerly used for oil burner
can be used, if in good condition.
■
■
In the case of wet base boilers, where the entire firing
chamber is comprised of heat exchange surfaces and no
chamber liner was provided for oil firing, a liner is usually
not required for the ECONOMITE. However, a liner or
target wall may be necessary if the firing chamber is
unusually short, in order to avoid flame contact on the
heat exchanger walls or flueways.
■
■
If a built up chamber liner is required, use 2,300°F
minimum insulating material.
■
■
The burner tube must be sealed air tight into the
combustion chamber opening with refractory material as
shown by Figures 1 and 2.
NOTE: In no case should the burner tube be allowed to
extend into the chamber proper; it must be set flush to 1"
short of the inside surface because high combustion
chamber temperatures will cause premature pilot,
electrode, burner tube and sleeve deterioration.
■
■
Special heat resistant alloy extension tubes and
instructions are available for those applications where
the burner tube is too short to reach the combustion
chamber (such as old-fashioned gravity warm air furnace
installations.)
WARNING: BURNER CABINET MUST BE
MOUNTED IN ORIENTATION SHOWN IN FIGURES 1
AND 2. ANY OTHER MOUNTINGS MAY CAUSE A
DANGEROUS CONDITION, AND WILL VOID BURNER
WARRANTY AND AGENCY APPROVALS. NON-
STANDARD ARRANGEMENTS MAY BE AVAILABLE
FOR SOME MODELS-CONSULT FACTORY FOR
DETAILS REQUIRED.
■
■
Before permanently setting the burner in place, check
that the burner ports and pilot are free of foreign
materials, and also that the electrodes have not been
damaged or displaced. See Figure 7.
IV CHIMNEY, VENT CONNECTOR,
AND DRAFT CONTROL
WARNING: The chimney shall be inspected for
unsafe conditions such as deteriorated masonry and
excessive soot or other blockage or potential
blockage. Installation must conform with local codes
or in the absence of local codes with ANSI Z21.8b-
1993 and NFPA, ANSI Z223.1-1992.
WARNING: THE VENT CONNECTOR SHALL NOT
BE CONNECTED TO A CHIMNEY ALREADY
VENTING SOLID FUEL BURNING EQUIPMENT, AN
INCINERATOR OR AN OPEN FIREPLACE.
■
■
The Vent Connector shall be made of non-
combustible, corrosion resistant material capable of with-
standing the vent gas temperature produced by the gas
utilization equipment and of sufficient thickness to with-
stand physical damage.
-3-


