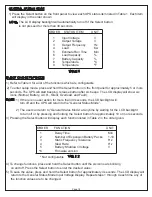
1) Press the Select button on the front panel to view each UPS status item listed in Table 1. Each item
will display in the order shown.
ORDER STATUS ITEM UNIT
1
Input Voltage
V
2
Output Voltage
V
3
Output Frequency Hz
4
Load
Kw
5
Estimate Run Time Min
6
Load Capacity
%
7
Battery Capacity
%
8
Temperature
ºC
9
Temperature
ºF
NOTE: The LCD display backlight will automatically turn off if the Select button
is not pressed for more than 30 seconds.
TABLE 1
GENERAL STATUS MODE
TABLE 2
FUNCTIONS SETUP MODE
2) To enter setup mode, press and hold the Select button on the front panel for approximately 5 or more
seconds. The UPS will start beeping, release button after six beeps. The LCD display will show six
icons (Normal, Battery, A.V.R., Silent, Overload, and Fault).
3) Pressing the Select button will display each function listed in Table 2 in the order given.
4) To change functions, press and hold the Select button until the six icons are blinking
on and off. Press the Select button to enter the desired value.
5) To save the value, press and hold the Select button for approximately 4 seconds. The LCD display will
return to the General Status Mode Input Voltage Display. Repeat steps 1 through 4 each time any of
the function values are to be changed.
NOTE: 1) If there is no user action for more than 30 seconds, the LCD backlight will
turn off and the UPS will return to the “General Status Mode”.
2) The user can return to “General Status Mode” at anytime by waiting for the LCD backlight
to turn off or by pressing and holding the Select button for approximately 10 or more seconds.
ORDER FUNCTION UNIT
1 Delay Time
Min
2 Number of Expansion Battery Packs 1-10
3 Static Frequency Tolerance Hz
4 Slew Rate
Hz
5 Battery Shutdown Voltage
V
6
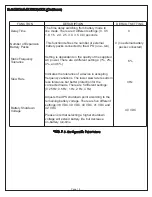
1) Refer to Table 3 for a list of the functions which are configurable.
Firmware version
* Not configurable
Page 18
*


