background image

Service manual 


1. Precaution 
1.1 Safety 

Precaution 


To prevent injury to the user or other people and property damage, the following instructions must be followed. 


Incorrect operation due to ignoring instruction will cause harm or damage.   


Before service unit, be sure to read this service manual at first. 


1.2 Warning 


Installation 


Do not use a defective or underrated circuit breaker. 

Use this appliance on a dedicated circuit. 

There is risk of fire or electric shock. 


For electrical work, contact the dealer, seller, a 

qualified electrician, or an Authorized service center. 

Do not disassemble or repair the product, there is risk of 
fire or electric shock. 


Always ground the product. 

There is risk of fire or electric shock. 


Install the panel and the cover of control box 

securely. 

There is risk of fire of electric shock. 


Always install a dedicated circuit and breaker. 

Improper wiring or installation may cause fore or electric 
shock. 


Use the correctly rated breaker of fuse. 

There is risk of fire or electric shock. 


Do not modify or extend the power cable. 

There is risk of fire or electric shock. 


Do not install, remove, or reinstall the unit by 

yourself (customer). 

There is risk of fire, electric shock, explosion, or injury. 


Be caution when unpacking and installing the 

product. 

Sharp edges could cause injury, be especially careful of 
the case edges and the fins on the condenser and 
evaporator. 


For installation, always contact the dealer or an 

Authorized service center. 

There is risk of fire, electric shock, explosion, or injury. 


Do not install the product on a defective installation 

stand. 

It may cause injury, accident, or damage to the product. 


Be sure the installation area does not deteriorate 

with age. 

If the base collapses, the air conditioner could fall with it, 
causing property damage, product failure, and personal 
injury. 


Do not let the air conditioner run for a long time 

when the humidity is very high and a door or a 

windows is left open. 

Moisture may condense and wet or damage furniture. 


Take care to ensure that power cable could not be 

pulled out or damaged during operation. 

There is risk of fire or electric shock. 


Do not place anything on the power cable. 

There is risk of fire or electric shock. 


Do not plug or unplug the power supply plug during 

operation. 

There is risk of fire or electric shock. 


Do not touch (operation) the product with wet hands. 

There is risk of fire or electric shock. 


Do not place a heater or other appliance near the 

power cable. 

There is risk of fire and electric shock. 


Do not allow water to run into electric parts. 

It may cause fire, failure of the product, or electric shock. 


Do not store or use flammable gas or combustible 

near the product. 

There is risk of fire or failure of product. 


Do not use the product in a tightly closed space for a 

long time. 

Oxygen deficiency could occur. 


When flammable gas leaks, turn off the gas and 

open a window for ventilation before turn the 

product on. 

Do not use the telephone or turn switches on or off. 
There is risk of explosion or fire. 


If strange sounds, or small or smoke comes from 

product. Turn the breaker off or disconnect the 

power supply cable. 

There is risk of electric shock or fire. 


Stop operation and close the window in storm or 

hurricane. If possible, remove the product from the 

window before the hurricane arrives. 

There is risk of property damage, failure of product, or 
electric shock. 


Do not open the inlet grill of the product during 

operation. (Do not touch the electrostatic filter, if the 

unit is so equipped.) 

There is risk of physical injury, electric shock, or product 
failure. 


When the product is soaked (flooded or submerged), 

contact an Authorized service center. 

There is risk of fire or electric shock. 


Be caution that water could not enter the product. 

There is risk of fire, electric shock, or product damage. 


Ventilate the product from time to time when 

operating it together with a stove, etc. 

There is risk of fire or electric shock. 


Turn the main power off when cleaning or 

maintaining the product.   

Summary of Contents for MSV1-09HRDN1

Page 1: ...Cover MSV1 09HRDN1 MSV1 12HRDN1...

Page 2: ...ngth and the elevation 14 8 4 Air purging of the piping and indoor unit 15 8 5 Pumping down Re installation 16 8 6 Re air purging Re installation 17 8 7 Balance refrigerant of the 2 way 3 way valves 1...

Page 3: ...it Error Display 31 13 2 Diagnostic chart 36 13 3 Resetting phenomenon often occurs during operation 38 13 4 Operation lamp flashes and Timer lamp off 38 13 5 Operation lamp flashes and Timer lamp on...

Page 4: ......

Page 5: ...very high and a door or a windows is left open Moisture may condense and wet or damage furniture Take care to ensure that power cable could not be pulled out or damaged during operation There is risk...

Page 6: ...a precision refrigerant system There is risk of damage or loss of property Do not block the inlet or outlet of air flow It may cause product failure Use a soft cloth to clean Do not use harsh deterge...

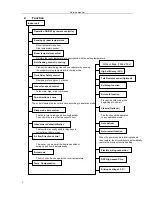
Page 7: ...n is turn to low speed cooling heating The unit will be turn off at the seventh hour Sleep mode auto control The function is usually used in rainy days in springtime or damp areas Independent dehumidi...

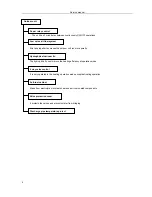
Page 8: ...ly The hydrophilic fin can improve the heating efficiency at operation mode Hydrophilic aluminum fin It is only operated in the heating operation mode except defrosting operation Anti rust cabinet Val...

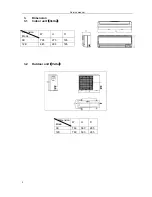
Page 9: ...Service manual 3 Dimension 3 1 Indoor unit Vertu Dimension W H D 5 Mode 9K 795 270 165 12K 845 286 165 3 2 Outdoor unit Vertu Dimension W H D Mode 9K 760 590 285 12K 760 590 285...

Page 10: ...min 1150 1000 850 1250 1050 900 m3 h 570 480 350 700 520 420 dB A 40 34 29 42 35 29 Model YDK24 6F YDK24 6F Brand Welling Welling Input W 56 56 Capacitor uF 2 5 2 5 Speed r min 800 800 m3 h 1700 1900...

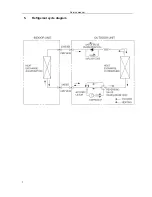
Page 11: ...Service manual 5 Refrigerant cycle diagram 7...

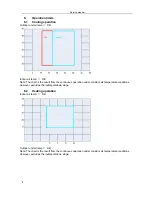
Page 12: ...rom the continuous operation under constant air temperature conditions However excludes the initial pull down stage 6 2 Heating operation Indoor air temp DB Outdoor unit air temp DB Note The chart is...

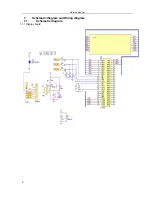
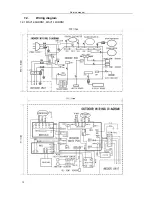
Page 13: ...Service manual 7 Schematic diagram and Wiring diagram 7 1 Schematic diagram 7 1 1 Display board 9...

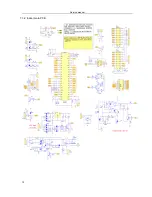
Page 14: ...Service manual 7 1 2 Indoor main PCB 10...

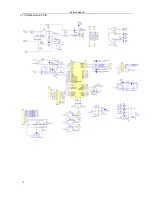
Page 15: ...Service manual 7 1 3 Outdoor main PCB 11...

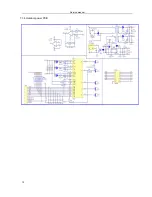
Page 16: ...Service manual 7 1 4 Outdoor power PCB 12...

Page 17: ...Service manual 7 2 Wiring diagram 7 2 1 MSV1 09HRDN1 MSV1 12HRDN1 13...

Page 18: ...Unit 7K 9K 12K mm2 1 0 1 0 1 5 8 3 Pipe length and the elevation 14 Pipe size Capacity Btu h GAS LIQUID Standard length Max Max Additional Elevation Elevation refrigerant m B m B m g m 3 8 9 52 1 4 6...

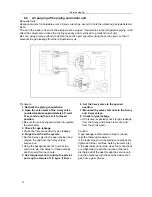
Page 19: ...nd 3 way valves 8 Check for gas leakage At this time especially check for gas leakage from the 2 way and 3 way stem nuts and from the service port Be sure to use a hexagonal wrench to operate the valv...

Page 20: ...rge hose with the push pin to the gas service port 4 Air purging of the charge hose Open the low pressure valve on the charge set slightly to purge air from the charge hose 5 Set the 2 way valve to th...

Page 21: ...minutes repeat 3 times After purging the air use a torque wrench to tighten the flare nut to on the 2 way valve 4 Check the gas leakage Check the flare connections for gas leakage 5 Discharge the refr...

Page 22: ...service port 3 Open the valves Low side on the charge set and discharge the refrigerant until the gauge indicates 0 05 to 0 1 Mpa If there is no air in the refrigeration cycle the pressure when the ai...

Page 23: ...s moved toward 0 1 Mpa 76 cmHg vacuum of 4 mmHg or less 3 Close the valve Low side on the charge set turn off the vacuum pump and confirm that the gauge needle does not move approximately 5 minutes af...

Page 24: ...pecified amount of refrigerant if can be charged with a little at a time approximately 150g each time0 while operating the air conditioner in the cooling cycle however one time is not sufficient wait...

Page 25: ...C Pressure kg cm2 34 0 33 5 32 0 31 0 28 0 27 0 18 C Pressure kg cm2 35 0 34 5 34 0 32 5 29 0 27 5 20 C Pressure kg cm2 36 5 36 0 35 5 33 5 30 0 28 5 22 C Pressure kg cm2 37 0 36 5 36 0 35 0 31 5 29...

Page 26: ...56 1 51 1 39 1 37 1 30 Capacity kW 3 45 4 10 4 05 3 70 3 48 3 11 2 99 1 70 18 C Input kW 0 96 1 55 1 58 1 60 1 52 1 40 1 38 1 32 Capacity kW 3 44 4 05 2 87 3 69 3 47 3 00 2 86 1 69 20 C Input kW 0 96...

Page 27: ...9 2 01 1 99 1 80 1 76 Capacity kW 4 801 6 09 5 58 5 02 4 39 4 10 3 59 3 27 18 C Input kW 1 6 2 18 2 39 2 20 2 16 2 09 1 83 1 81 Capacity kW 4 684 5 89 4 03 4 90 4 21 3 89 3 37 3 11 20 C Input kW 1 658...

Page 28: ...osting automatically or when the warm air control feature is activated in heating mode 11 1 6 TURBO indication lamp Lights up when select TURBO function on cooling operation or on heating operation 11...

Page 29: ...o signals in 4 minutes the unit stops and LED displays failure information and can t return to normal operation automatically 11 3 Fan only mode Fan speed is high mid low Auto 11 4 Cooling mode 11 4 1...

Page 30: ...ing mode or turned off 4 way valve doesn t delay in dehumidifying mode 11 6 2 Generally the outdoor fan is turned off with the on off action of compressor in heating mode except for the defrosting mod...

Page 31: ...ger remains consecutively lower than 3 c for more than 80 minutes and the temperature remains consecutively 2 c for more than 3 minutes 11 7 1 2 When outdoor temp is less than 0 Defrosting starts when...

Page 32: ...l switch 11 10 1 Mode changes when push this button Cooing mode Auto mode Unit off Cooing mode 11 10 2 At Cooing mode after 30 minutes cooling operation whose fan speed is set as low the A C operates...

Page 33: ...ates in accordance with selected running mode by auto mode 11 12 5 After 7 hours unit cancels this modes automatically 11 13 Auto restart function In case of a sudden power failure this function autom...

Page 34: ...8 38 F3 45 48 45 48 F4 52 57 52 57 F5 57 66 57 66 F6 64 76 64 76 F7 74 84 74 84 F8 86 90 86 90 F9 92 94 92 94 F10 96 98 96 98 I1COOL 6 0 6 5 6 0 6 5 I2COOL 7 0 8 3 7 0 8 3 I3COOL 8 5 9 5 8 5 9 5 I1HEA...

Page 35: ...ure sensor open or short circuit of P0 Module protection P1 Over voltage or too low voltage protection P2 Compressor top protection against temperature P3 Outdoor low temp protection P4 Inverter compr...

Page 36: ...s defective Yes Yes Does the led on outdoor control board bright No YES Replace the module board The power supply of PCB is supplied by the module board Replace the outdoor power supply board Yes Is t...

Page 37: ...r connection good Is voltage being applied to the fan motor rang 90v 160v between mid pin and N on CN1 No Indoor fan motor is defective Repair the connector No Yes Indoor PCB is defective Is connectio...

Page 38: ...the wires to compressor right Check the inverter module If some component cracked or damaged Is it breakdown between P N P U P V N W N U N V At inverter module Check compressor Inverter module is defe...

Page 39: ...circulation volume normal Gas charging Is abnormality the same after gas charging Check refrigerant system such as clogging of ill t Is protector normal Check the outdoor main PCB Replace protector N...

Page 40: ...lighted and the air conditioner can t be operated Reconnecting Yes Replace outdoor main PCB If the problem can not be solved replace inverter module Replace inverter compressor No If the problem comes...

Page 41: ...eck if AC 220V exists at the primary coil of transformer Yes YES No Check if AC 14 5V exists at the secondary coil of transformer Indoor PCB is defective Take off the secondary plug of transformer and...

Page 42: ...er changing indoor PCB check if the failure realease Yes After changing indoor fan motor check if the failure realease Yes YES Yes Power supply circuit has problems Indoor PCB is defective 13 4 Operat...

Page 43: ...changing the main control board check if the failure realease Power supply fault No Outdoor unit fault such as the compressor 13 7 Operation lamp on and Timer lamp flashes EEROM error indoor PCB is de...

Page 44: ...10 52 3 1918 1 37 1988 26 9 5507 53 3 0707 0 35 2024 27 9 1245 54 2 959 1 33 3269 28 8 7198 55 2 8442 2 31 5635 29 8 3357 56 2 7382 3 29 9058 30 7 9708 57 2 6368 4 28 3459 31 7 6241 58 2 5397 5 26 877...

Reviews: