background image

Cleaning the powder detergent
container

c

Cleaning the dosing cog

If left standing for a long time,
powder detergent can clump
together in the dosing cog.
Check the cog regularly and clean it
once a month.

^

Remove the lid.

^

Pour any remaining powder
detergent into another container to
keep it for future use.

^

Turn the container over.

^

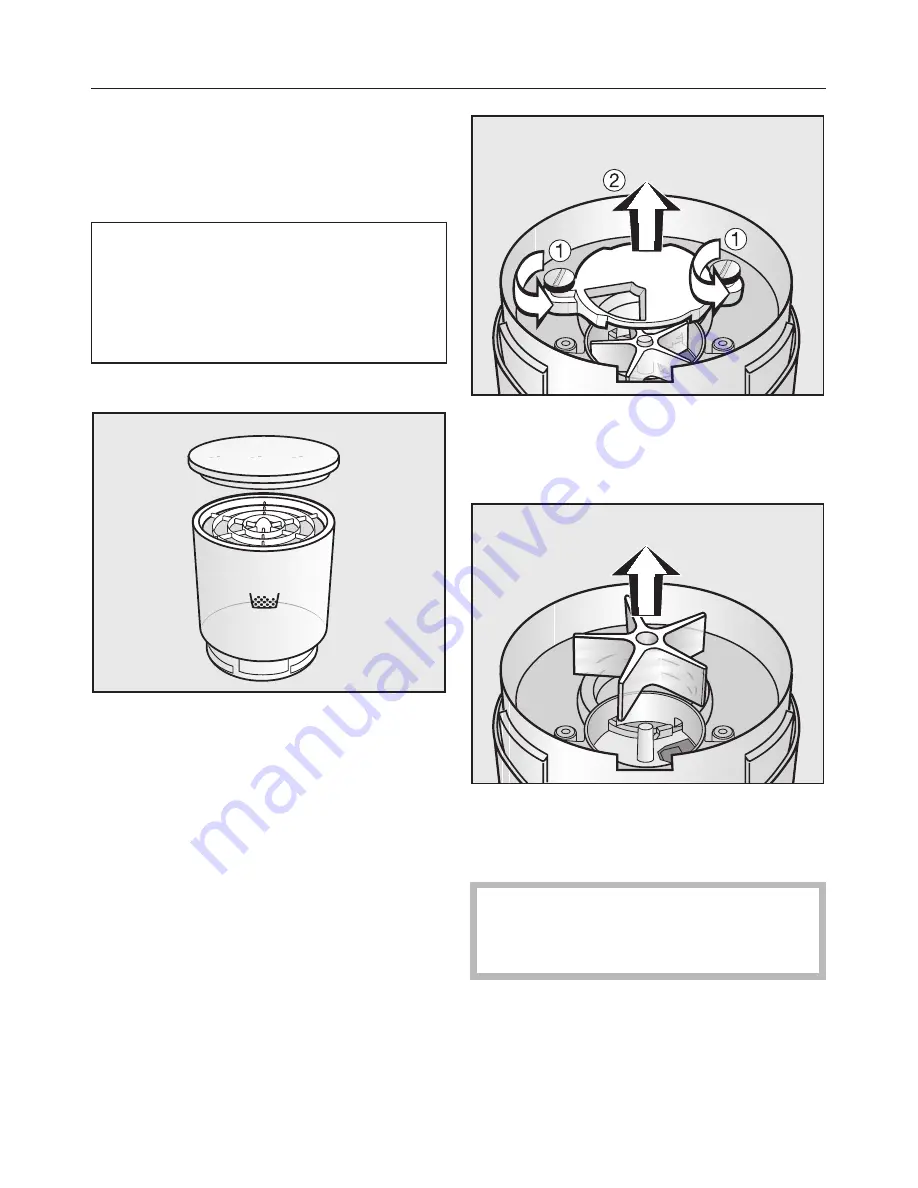
Use a screwdriver to undo the two
screws in the lid of the detergent
compartment and lift off the lid.

^

Remove the cog and clean it with hot
water.

^

Dry it with a soft cloth.

The cog must be dry to prevent the
powder detergent clumping
together.

^

Replace the cog by carrying out the
above procedure in the reverse
order.

^

Tighten the screws.

Cleaning and care

14

Summary of Contents for AWD 10

Page 1: ...ons Automatic detergent dispensing unit AWD 10 To avoid the risk of accidents or damage to the appliance it is essential to read these instructions before it is installed and used for the first time M Nr 07 940 510 en GB ...

Page 2: ... Connecting the hoses to the dispensing unit 9 Attaching the plug connector 10 Before using for the first time 11 Adding detergent 11 Preparing the washing machine 11 Cleaning and care 12 Cleaning the liquid detergent container d 12 Cleaning the powder detergent container c 14 Cleaning the dosing cog 14 Cleaning the container and agitator 15 Problem solving guide 17 No detergent or only a little d...

Page 3: ...appliance Electrical and electronic appliances often contain materials which if handled or disposed of incorrectly could be potentially hazardous to human health and to the environment They are however essential for the correct functioning of your appliance Please do not therefore dispose of it with your household waste Please dispose of it at your local community waste collection recycling centre...

Page 4: ...se or operation This detergent dispensing unit is not intended for use by people with reduced physical sensory or mental capabilities or lack of experience or knowledge unless they are supervised whilst using it or have been shown how to use it correctly by a person responsible for their safety Safety with children Keep children away from the detergent dispensing unit at all times It is not a toy ...

Page 5: ...met the washing machine is correctly plumbed in and connected to the electricity supply Do not make any alterations to the detergent dispensing unit unless authorised to do so by Miele Correct use Do not install the detergent dispensing unit in a room where there is a risk of frost occurring Frozen hoses can tear or burst If detergent comes into contact with the eyes rinse them thoroughly with luk...

Page 6: ...tergent dissolved in water bConnection cable with plug connector socket for the plug connector is located at the rear of the washing machine cWater inlet connection Components supplied The following are supplied Dispensing unit base Container for powder detergent Container for liquid detergent Two hoses for intake and drainage Positioning guide Bag containing screws 6 screws for securing the hoses...

Page 7: ...nd other electrical appliances The unit must be easily accessible for refilling It can be located in a variety of positions aOn the lid of the washing machine bBeside the washing machine e g on a shelf cFixed to the wall with a wall bracket optional accessory dIn a unit next to the washing machine Installation and connection 7 ON ON ON ...

Page 8: ...oning guide has an adhesive surface Observe the dimensions given in the illustration below before you attach the guide to ensure that the dispensing unit cannot protrude over the washing machine lid Remove the backing strip from the guide and stick the guide on the washing machine lid To screw the guide in place After sticking the positioning guide in place use the screws supplied to secure it Onl...

Page 9: ...end of the hoses to ensure you insert the correct hose to the washing machine Tip to make fitting easier Moisten the hose seals with water or suds solution beforehand Press each hose using some force into its appropriate opening and secure with the screws supplied Connecting the hoses to the dispensing unit Note the diameter at the end of the hoses to ensure you insert the correct hose to the disp...

Page 10: ... dispensing unit with the screws supplied Attaching the plug connector The connection socket for the plug connector is located at the rear of the washing machine Lift up the retainer and pull the cap off the connection socket Plug in the connector and close the retainer to secure it in place If the plug connector is removed it must be replaced with the cap Make sure the cap is secured by the retai...

Page 11: ...has a valve in the bottom which opens automatically when it is placed on its base c Powder detergent Open the lid of the container Add powder detergent to the container up to the maximum level mark Close the lid so that the powder detergent does not become lumpy and to prevent any foreign objects getting into the container Place the containers on the base Push the liquid detergent container d down...

Page 12: ... because of the chemicals they contain Remove the container from its base for cleaning Clean the base with a damp cloth Cleaning the liquid detergent container d Clean the container every six months or each time you change brand of liquid detergent Remove both lids Turn the valve in the base of the container and remove it Cleaning and care 12 ...

Page 13: ...ntainer with hot water to remove any detergent residues Clean the container with a mild non abrasive cleaning agent or soap and water using a well wrung out cloth Dry with a soft cloth Replace the valve in the container and secure it Cleaning and care 13 ...

Page 14: ...wder detergent into another container to keep it for future use Turn the container over Use a screwdriver to undo the two screws in the lid of the detergent compartment and lift off the lid Remove the cog and clean it with hot water Dry it with a soft cloth The cog must be dry to prevent the powder detergent clumping together Replace the cog by carrying out the above procedure in the reverse order...

Page 15: ...d on the previous page Before unscrewing the coupling make sure that the agitator is visible in the detergent compartment Otherwise it will not be possible to remove the agitator later on If necessary use the coupling to turn the agitator a bit further Use a screwdriver to unscrew the screw from the coupling and then remove the coupling from the agitator Turn the container over Remove the agitator...

Page 16: ...the agitator in hot water to soften hardened residues Clean the dosing cog and lid with hot water Dry the container agitator dosing cog and lid with a soft cloth The container agitator dosing cog and lid must be dry to prevent the powder detergent clumping together Reassemble the container by carrying out the above procedure in reverse order Tighten the screws Cleaning and care 16 ...

Page 17: ... automatic dispensing for the next wash programme No powder detergent has been dispensed The dosing cog has become clogged with detergent Clean the container as described in Cleaning and care The container is clogged or the dosing cog has not been fitted The container is too full Make sure you only fill the container up to the maximum level mark No liquid detergent has been dispensed Check whether...

Page 18: ...e required result Liquid detergents usually contain no bleaching agents They do not remove fruit coffee and tea stains Select the powder detergent container instead of the liquid detergent container or Add stain removers to the laundry in the drum Grey greasy particles cling to washed laundry Insufficient amounts of detergent were used to break down the particles of grease in heavily soiled laundr...

Page 19: ...he laundry is dry Wash dark textiles using a detergent which contains no zeolites Liquid detergents usually contain no zeolites Use the Dark garments for dark coloured laundry General problems There are dark specks in the liquid detergent Mould has developed in the detergent Pour the liquid detergent out of the container and then clean the container thoroughly Make sure you replace the lid of the ...

Page 20: ...Alteration rights reserved 0911 AWD 10 M Nr 07 940 510 01 ...

Reviews: