
fold here
fold here
fold here
fold here
fold here
fold here
fold here
fold here
fold here
fold here
fold here
fold here
This is how the steam ironing system is set
up.
When using the steam ironing system
for the first time the water hardness level
must be set.
Make sure the correct water hardness
level is set. An incorrect setting will inva-
lidate all warranty claims. Please read the
separate Operating Instructions supplied
with the appliance.
SWIT
CHING ON / IRONING
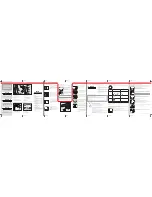
ASSEMBL
Y
DESCRIPTION
Before using for the first time
Description
Assembly
Switching on / filling the water container
Ironing / Switching off
Dismantling
M.-No. 10 462 481 / 02
FashionMaster
4817
en-US,CA
ĺ
Use the arrow buttons
or
on the con-
trol panel to set the water hardness le-
vel for your household (see chart in "Befo-
re using for the first time" in the Operating
instructions).
Level 7
Level 10
ĺ
Confirm your selection by pressing the
OK
button.
The steam ironing system is now set for the
specified water hardness.
ĺ
Confirm the display message
"Set water
hardness level"
by pressing the
OK
button.
Set water
hardness...
a
Rotary dial for height adjustment and
folding the appliance away
b
Iron resting surface
c
Steam connection
d
Steam hose holders
e
Control panel
f
Steam hose holder
g
Iron with steam hose
h
On/Off button
i
Display
Displays messages and instructions
for the user.
j
Arrow button
Lights up if additional options are pro-
vided or the display text exceeds the
specified length of a line. Scrolls down
the selection list to the next option or
decreases a value.
k
Arrow button
Lights up if additional options are pro-
vided or the display text exceeds the
specified length of a line. Scrolls up
the selection list to the next option or
increases a value.
l
OK button
Confirms the selection or the informa-
tion in the display.
m
Settings button
Opens the settings menu. In the set-
tings menu, the language and the le-
vel of the water hardness can be ad-
justed, or the descaling process can
be started.
a
Ironing board
i
X-Frame for the ironing board
b
Iron with steam hose
j
Iron resting surface
c
Steam hose holder
k
Power cord
d
Handle
l
Storage compartment (lower)
e
Water container
For the power cord, Steamer*,
f
Tower
anti-stick soleplate and clip for the
g
Residual water container
power cord.
h
Storage compartment (upper)
m
Wheels
For the iron and Steam hose holder.
n
Release mechanism
For setting up the steam ironing system.
* Standard equipment for steam ironing system B 3847.
Available as optional accessory for steam ironing systems B 3312 and B 3826.
1. Set up steam Ironing system
ĺ
Use one hand to pull the release
mechanism upwards.
This releases the locking mecha-
nism of the ironing board and the
X-frame folds down.
ĺ
Hold onto the release mecha-
nism and guide the ironing
board into a position of approx.
45°.
The ironing board remains in this
position by itself.
ĺ
Use both hands to pull the iro-
ning board upwards into a hori-
zontal position until this audibly
clicks into place on both sides
of the tower.
click!
click!
2. Height adjustment
The steam ironing system can be adjusted to suit your
personal preference.
ĺ
Use one of the rotary dials
located on the side of the to-
wer handle. Turn the dial in
the
direction and hold the
dial in position.
ĺ
At the same time, pull the
handle on the tower upwards
with the other hand up or press
the handle down.
Do not push down on the ironing board while adjus-
ting the height.
ĺ
When you have reached your desired working height,
release the rotary dial.
The rotary dial will spring back into the center position.
The ironing board remains in this position by itself.
3. Connection
ĺ
Open the (lower) storage com-
partment by swinging the lid
downwards.
ĺ
Remove the power cord from the
compartment.
ĺ
Insert the power plug into a sui-
table grounded outlet.
ĺ
Guide the power cord through
the groove in the cover.
ĺ
Close the storage compartment.
ĺ
Open the lid of the (upper) stora-
ge compartment on the tower.
ĺ
Take out the iron and the steam
hose holder and close the stora-
ge compartment.
ĺ
Plug the steam hose holder into
one of the sockets provided.
ĺ
Plug the steam hose into the
steam connection on the tower to
connect the iron.
ĺ
Guide the steam hose on the
rubber ring into the steam hose
holder.
ĺ
Always place the iron on the res-
ting surface before you start iro-
ning and when you take a break
from ironing.
Switching on the steam ironing system
ĺ
Press the
button on the control panel
on the tower.
The
button is illuminated and the Welco-
me screen appears for several seconds in
the display.
The message "
Pre-heating phase"
then appe-
ars on the display. The steam ironing system
starts to heat up.
As soon as the steam ironing system is ready
and steam is available, the message "
Ready"
will be displayed.
Filling the water container
If the water container is empty or not installed in the tower, the message "
Fill the water
container"
is displayed.
ĺ
Hold the water container by its handle.
ĺ
Pull the handle downwards.
The water container is released from the retainer.
ĺ
Pull the water container upwards and out.
ĺ
Open the twist lock at the rear of the water container by turning
the lock to the left (counterclockwise).
ĺ
Remove the twist lock.
ĺ
Refill the water container with fresh tap water.
ĺ
Close the twist lock by turning it to the right (clockwise) as far as it
will go.
ĺ
Put the water container back into the tower.
The water container can be removed and refilled at any time (even
during the ironing process).
Never attempt to use distilled water to fill the water container. This can cause the
steam ironing system to malfunction.
Do not use water from a water softener system.
Do not use condensate (e.g. from other appliances such as air conditioning units,
dryers).
Never use rainwater.
Do not use additives, (e.g. perfumes, ironing water, starch, carbon dioxide).
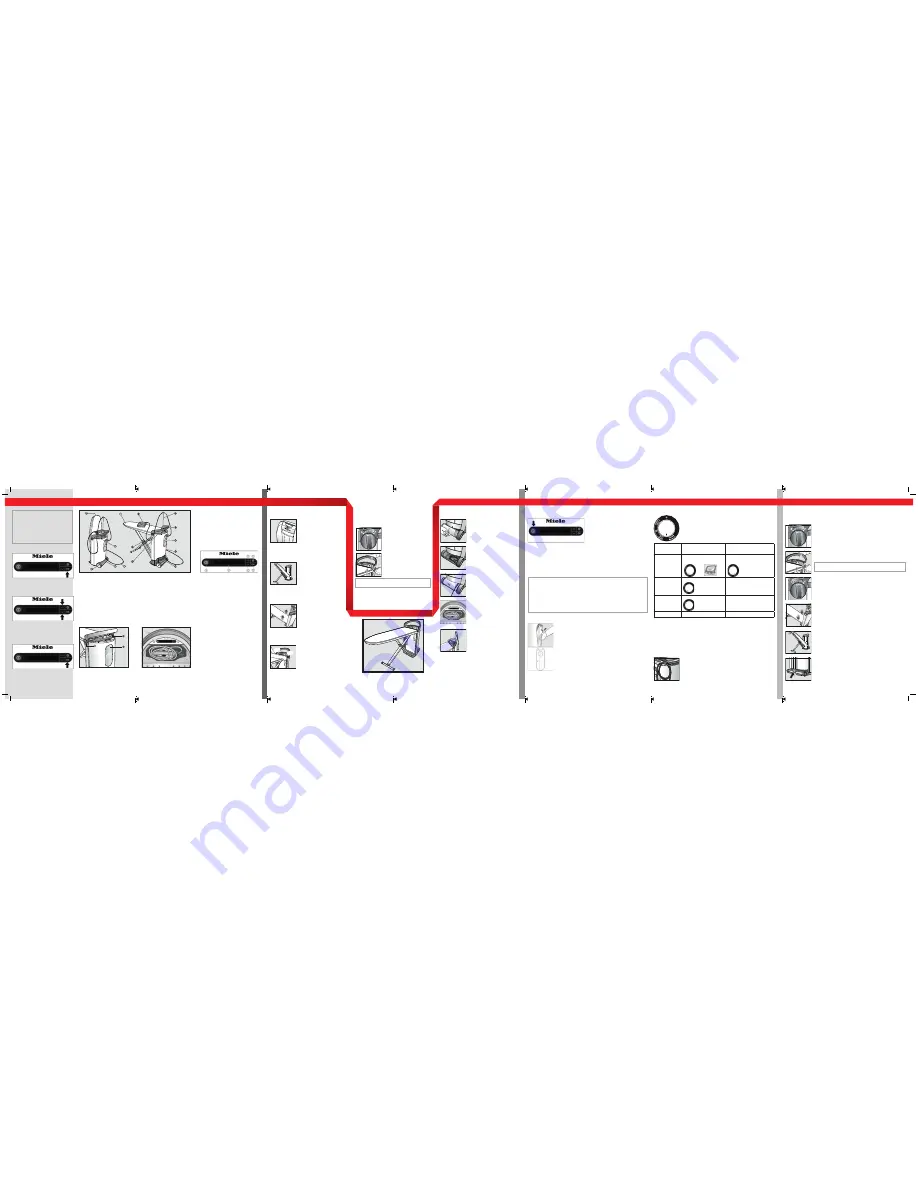
Selecting the ironing temperature
ĺ
Set the temperature selector to the required temperature setting.
Switching off the steam ironing system
ĺ
To switch off the steam ironing system, press the
button on the control panel.
The illuminated
button goes out.
When putting the steam ironing system away:
ĺ
Remove the plug from the socket.
ĺ
Store the power cord in the (lower) compartment or hang it up on
the cord clip.
The temperature settings are indicated on the scale of the selector.
When selecting the temperature levels
Silk/Wool
and
Linen/Cotton
you can use steam
when ironing.
Care label
(on the garment)
Ironing with steam for best results
(Material / Temperature setting)
Ironing without steam
(Material / Temperature setting)
Low temperature
With non-stick soleplate
Minimum iron, synthetics, appliqués,
prints, flocking, etc.
Minimum iron, synthetics
Medium temperature
Wool, silk
High temperature
Linen, cotton
Do not iron
+
Dismantling the steam ironing system
To dismantle the steam ironing system, the ironing board must first be placed at its lo-
west working height.
ĺ
Turn one of the rotary dials on the side of the tower handle as far
as it will go in the
direction.
ĺ
Hold the rotary dial in the
position.
The height of the ironing board can now be adjusted.
ĺ
Keep holding the rotary dial in the
position and, simultaneous-
ly, use the handle of the tower to push the ironing board down as
far as possible.
Never push on the ironing board to push it down.
ĺ
Release the rotary dial.
The rotary dial will spring back into the center position.
ĺ
Turn one of the two rotary dials to the
position as far as it will
go.
The ironing board is now unlocked.
ĺ
Release the rotary dial.
The rotary dial will spring back into the center position.
ĺ
Guide the ironing board downwards or allow it to slide down by
itself.
The ironing board remains in this position by itself.
ĺ
Push the ironing board up by the tapered end until it is upright and
locks into position on the tower.
ĺ
Push the protruding end of the X-frame onto the ironing board un-
til the frame locks into place.
ĺ
Ensure the ironing board has lo-
cked into place on both sides of
the tower.
The height adjustment only works
if both sides of the appliance have
locked into place.
Setting the water hardness level


