background image

Summary of Contents for CM 5310, CM 5410, CM 5510, CM 5710

Page 1: ...instructions Coffee machine Always read the operating instructions before setting up installing and commissioning the appliance This prevents both personal injury and damage to the appliance en CA M Nr 11 842 680 ...

Page 2: ...tial for the proper functioning and safe use of the equipment These could be hazardous to your health and to the environment if disposed of with general waste or if handled incorrectly Therefore please do not dispose of your old appliance with general waste Consult with local authorities dealers or Miele in order to dispose of and recycle electrical and electronic appliances Miele assumes no respo...

Page 3: ...reparing drinks 27 Making coffee with and without milk 27 Milk preparation 27 Using milk from milk cartons or other suitable containers 28 Making a coffee drink 28 Cancelling a drink 28 2 portions sensor button 29 Coffee pot 29 Making coffee drinks from ground coffee 30 Adding ground coffee 30 Dispensing hot water CM 5410 CM 5510 CM 5710 31 Grinder setting 32 Quantity of coffee brewing temperature...

Page 4: ...intervals 40 Cleaning by hand or in the dishwasher 41 Unsuitable cleaning agents 42 Grounds container drip tray and drip tray cover 43 Cleaning the water container 44 Removing and cleaning the water container filter 44 Central spout 45 Milk pipework 46 Bean container and ground coffee chute 47 Cleaning the housing 47 Opening the Maintenance menu 48 Rinsing the appliance 48 Rinsing the milk pipewor...

Page 5: ...Contents 5 Service and warranty 67 Contact in the event of a fault 67 Warranty 67 Saving energy 68 Electrical connection 69 Installation information 70 Appliance dimensions 71 Technical data 72 ...

Page 6: ...n safety use and maintenance of the appliance This prevents both personal injury and damage to the coffee machine In accordance with standard IEC 60335 1 Miele expressly and strongly advises you to read and follow the instructions in the chapter on installing and connecting the coffee machine as well as the safety notes and warnings Miele cannot be held liable for injury or damage caused by non co...

Page 7: ... of drinks such as espresso cappuccino latte macchiato tea etc All other types of use are not permitted This coffee machine can only be used by people with reduced physical sensory or mental capabilities or lack of experience and knowledge if they are supervised whilst using it They may only use the coffee machine without supervision if they have been shown how to use it in a safe manner They must...

Page 8: ... they have been shown how to use it in a safe manner Children aged 8 and older must be aware of the potential dangers caused by incorrect operation Children should be supervised in the vicinity of the coffee machine Never allow children to play with the appliance Young children must not be allowed to clean the coffee machine at all Cleaning may only be carried out by children 8 years of age or old...

Page 9: ...on should be checked by a qualified electrician Reliable and safe operation of the coffee machine can only be guaranteed if it is connected to the domestic electrical supply Do not connect the coffee machine to the domestic electrical supply using a multi socket adapter or an extension cord These do not guarantee the required safety of the appliance risk of fire The coffee machine may not be used ...

Page 10: ...ooled down completely Protect the coffee machine from water and splash water Do not immerse the coffee machine in water Repairs including on the power supply cable are only to be carried out by Miele authorized technicians Repairs by unqualified persons can cause considerable danger to users While the coffee machine is under warranty repairs should only be undertaken by a service technician author...

Page 11: ...anical components of the coffee machine will endanger your safety and may lead to appliance malfunctions Disconnect the coffee system from the domestic electrical supply if it is not going to be used for some time e g while on vacation Only use original Miele accessories If other parts are used warranty performance and or product liability claims will be invalidated 11 ...

Page 12: ...e water container Hot or warm water or other liquids can damage the coffee machine Change the water every day to prevent a build up of bacteria Do not use sparkling water Only put roasted coffee beans in the bean container Do not place coffee beans which have been treated with additives or ground coffee inside the bean containers Do not fill the bean container with any type of liquid Do not use gr...

Page 13: ... Most additives contain sugar which would stick to the milk pipework If using dairy milk make sure that it has been pasteurized Do not place flaming alcohol mixtures underneath the central spout The flames could ignite plastic components and cause them to melt Do not use open flames such as a candle on or near the coffee machine The coffee machine could catch fire with the risk of the fire spreadi...

Page 14: ...e Ensure that all components in which milk is transported are cleaned carefully on a regular basis Milk naturally contains bacteria that rapidly multiply if the milk pipework is not cleaned properly Do not use a steam cleaner to clean the appliance The steam could reach live electrical components and cause a short circuit Descale the coffee machine regularly depending on the water hardness Descale...

Page 15: ...or coffee machines with stainless steel surfaces Do not use sticky notes adhesive tape or other types of adhesive on the stainless steel surfaces Stainless steel surfaces are susceptible to scratching Even magnets can cause scratches 15 ...

Page 16: ...Cappuccinatore and hot water spout c On Off button d Control panel e Water container f Bean container and ground coffee chute g Grinder setting behind the appliance door h Brew unit behind the appliance door i Park position for milk pipework j Drip tray with lid and grounds container ...

Page 17: ...ns For scrolling through lists selecting entries or changing values f OK sensor button For confirming display messages and saving settings g Back sensor button For returning to the previous menu and cancelling unwanted actions h LED Flashes when the appliance is switched on and the display is in energy saving mode i Sensor button Additional drinks Profiles CM 5410 CM 5510 CM 5710 Maintenance Param...

Page 18: ...n model Cleaning brush For cleaning the milk pipework Optional accessories Miele also offers a range of optional accessories as well as cleaning and conditioning products for your coffee machine Milk pipework cleaner For cleaning the milk system Cleaning tablets For degreasing the brew unit Descaling tablets For descaling the water lines CJ Jug 1 0 l Insulated flask for coffee or tea pot function ...

Page 19: ... drinks menu sensor button Selecting a menu and navigating within a menu To select a menu touch the sensor button Settings Time Timer Language You will then be able to start an action or change settings in the menu A scroll bar at the right of the display shows that additional options or text are available To select an option touch the arrow buttons and until the option you want is highlighted Tou...

Page 20: ...ax marker and then refit it in the machine Take the lid off the coffee bean container fill it with roasted coffee beans and replace the lid Useful tip The milk pipework can be stored behind the appliance door when not in use Switching on for the first time Touch the On Off button Miele Willkommen appears briefly in the display Use the arrow buttons to highlight the required language Touch OK You m...

Page 21: ... ensure that any coffee residues from the factory testing process are removed from the brewing system please throw away the first 2 cups of coffee when using the coffee machine for the first time A larger quantity of coffee beans is ground for the first coffee drinks This means that powder from the coffee grounds may adhere to the lid of the drip tray ...

Page 22: ...he coffee machine will then appear in the display at the correct time Your local water authority will be able to tell you the hardness of the water in your area The water hardness level is set to 3 at the factory The appliance has 4 programmable hardness levels dH mmol l ppm mg l CaCO3 Setting 0 8 4 0 1 5 0 150 Soft 1 8 4 14 1 5 2 5 150 250 Medium 2 14 21 2 5 3 8 250 375 Hard 3 21 3 8 375 Very har...

Page 23: ...e coffee machine Only use cold fresh tap water to fill the water container Open the lid on the left hand side of the coffee machine Pull the water container up and out of the appliance Fill the water container with fresh cold tap water up to the max mark Replace the water container and close the lid Make sure that the water container handle is on the right so that the lid can close properly If the...

Page 24: ...r similar In addition green unroasted coffee beans or mixtures of coffee beans which contain green coffee beans can damage the grinder Green coffee beans are very hard and still contain residual moisture These can damage the coffee machine grinder as soon as grinding begins Only put roasted coffee beans in the bean container Useful tip You can use a nut or seed grinder to grind green coffee beans ...

Page 25: ...r buttons to wake the coffee machine up again to make a drink Switching the coffee machine off Touch the On Off button If coffee has been dispensed the coffee machine will rinse the pipework automatically before switching off If you have made a drink using milk Place milk pipe in drip tray will appear in the display Insert the end of the milk pipework into the aperture in the drip tray then touch ...

Page 26: ...to the height of the cups or glasses used This ensures that coffees or espressos do not cool down too quickly and that the crema lasts longer Pull the central spout down to the same level as the rim of the cup Or push the central spout up until the desired cups fits underneath it ...

Page 27: ...o make the coffee Long coffee is a coffee with considerably more water Cappuccino consists of approx 2 thirds milk froth and 1 third espresso Latte macchiato consists of 1 third each of hot milk milk froth and espresso Caffè latte consists of espresso and hot milk Hot milk and milk froth can also be made Milk preparation Milk or milk alternatives e g soy milk containing added sugar can clog up the...

Page 28: ...ke a lot of coffees with milk The milk flask is dishwasher safe and easy to store in the fridge after preparing Good milk froth can only be made with cold milk 10 C The Miele milk flask is available to order from the Miele online shop from Miele Service or from your Miele dealer Making a coffee drink Place a cup under the central spout Select a drink touch the sensor button for the drink you want ...

Page 29: ...ons Coffee pot You can make several cups of coffee one after the other automatically with the Coffee pot function max 0 75 litre to fill a coffee pot for example Up to 6 cups can be made in this way You can use the Coffee pot function twice in a row After this the coffee machine needs to cool down for one hour in order to prevent it from being damaged Make sure that the bean container and the wate...

Page 30: ...n using ready ground coffee Place a maximum of 12 g in the ground coffee chute If too much ground coffee is added the brew unit will not be able to process the coffee Adding ground coffee The coffee machine will use all the ground coffee which has been added to the chute to make the next coffee Touch the sensor button Select Additional drinks Ground coffee and confirm with OK Add ground coffee and...

Page 31: ...ote that the water dispensed is not hot enough for making black tea Place a suitable container centrally underneath the central spout Touch the sensor button Select Additional drinks Hot water and confirm with OK Hot water will run into the container under the central spout ...

Page 32: ...t a finer grinder setting The coffee has been too finely ground if The espresso or coffee flows into the cup very slowly The crema is dark brown Set a coarser grinder setting Only adjust the grinder one setting at a time Start making a new drink to grind beans again Adjust the grinder setting one setting at a time again Open the appliance door Push the slide control a maximum of one setting to the...

Page 33: ... too quickly The crema is very pale and uneven The espresso or coffee lacks body Increase the quantity of coffee so that more ground coffee is brewed The quantity of coffee is too high if The espresso or coffee flows into the cup very slowly The crema is dark brown The espresso or coffee tastes bitter Decrease the quantity of coffee so that less ground coffee is brewed Useful tip If the coffee is ...

Page 34: ...ortion size in the Parameters menu CM 5410 CM 5510 CM 5710 The changed portion size is always saved in the current profile The name of the current profile is shown in the top left of the display Cancelling portion size programming Touch the drinks button again or the sensor button for drinks from Additional drinks Changing the portion size while making a drink You can change and save the portion s...

Page 35: ...r long coffee caffè latte hot milk and milk froth via the Parameters menu Place a suitable container underneath the central spout Touch the sensor button and select Parameters Select the drink you want Select Portion size and confirm with OK Now proceed as for changing the portion size while making a drink ...

Page 36: ...e the parameters of a drink within a profile these settings only apply to the active profile The settings for drinks contained within other profiles remain unaffected Select the profile you want The name of the selected profile is shown in the top left of the display You can now change the drinks individually Making drinks stored in a profile Place a suitable container underneath the central spout...

Page 37: ...hould change Change profile You can choose between the following options Manually The selected profile will remain active until you select another one After each use The machine will revert to the Miele profile whenever a drink is dispensed When turned on The Miele profile will be displayed whenever the coffee machine is switched on regardless of which profile was selected before the machine was l...

Page 38: ...mode The system does not heat up until someone starts making a drink Eco mode is activated by default Info display information You can display the number of drinks dispensed so far and how many more can be dispensed until the maintenance programs have to be run System lock You can lock the coffee machine to prevent it from being used by unauthorized persons such as children Temporarily deactivatin...

Page 39: ...function enables the coffee machine to be demonstrated in shops or showrooms Although the sensor buttons and display seem to be working the thermo block is not being heated The appliance does not dispense any drinks run maintenance programs or save any settings You can activate demo mode without commissioning the appliance for the first time The water container is empty or not inserted Switch the ...

Page 40: ...clean maintain Daily at the end of the day Water container Grounds container Drip tray and drip tray cover Once a week more often if heavily soiled Central spout with integrated Cappuccinatore Brew unit Area underneath the brew unit and the drip tray Housing particularly important immediately after descaling the appliance Milk pipework Once a month Bean container and ground coffee chute Water cont...

Page 41: ...res Components may be ruined e g may become warped if washed in a dishwasher at temperatures higher than 55 C For dishwasher safe components always select dishwasher programs with a maximum temperature of 55 C Contact with natural dyes such as those found in carrots tomatoes and ketchup may discolour the plastic parts in the dishwasher This discolouration does not affect the stability of the parts...

Page 42: ...lk pipework Unsuitable cleaning agents Contact with unsuitable cleaning agents can alter or discolour the external surfaces All surfaces are susceptible to scratching Scratches on glass can in some circumstances lead to breakage Remove any residual cleaning agent immediately Make sure you remove any spillages or splashes of descaling agent immediately To avoid damaging the surfaces do not use clea...

Page 43: ...r used for rinsing will continue to run out of the coffee spouts for a while Pull the drip tray carefully out of the coffee machine Take the lid off Empty the drip tray and grounds container Remove the drip tray cover and the lower panel Clean all parts thoroughly Clean the lower panel by hand only using warm water and dish detergent All other parts are dishwasher safe Clean the inside of the appl...

Page 44: ...detergent After cleaning dry the water container Carefully clean and dry the surface the water container sits on in the coffee machine particularly the recesses Reinsert the water container Removing and cleaning the water container filter Clean the water container filter once a month The water container filter is located under the water container Remove the water container Unscrew the cap Remove t...

Page 45: ...etergent All other parts are dishwasher safe Carefully pull the stainless steel cover off Pull the dispensing unit down to remove it Release the upper section with the holder for the milk pipework from the dispensing spouts Clean all parts thoroughly Clean the surfaces of the central spout and the dispensing spouts with a damp cloth ...

Page 46: ...inside the coffee machine can cause these bacteria to multiply e g milk residues can go off and pose a risk to health Clean all components in which milk is transported thoroughly on a regular basis The coffee machine s milk pipework must be cleaned at least every 5 days There are two options for cleaning the milk pipework You can remove and dismantle the central spout with its integrated Cappuccin...

Page 47: ...illed If necessary clean the ground coffee chute Open the ground coffee chute and remove any ground coffee residue Useful tip Use a vacuum cleaner to remove any coffee residues from the bean container and the ground coffee chute Cleaning the housing If soiling is allowed to stay for a long time or there is contact with unsuitable cleaning agents surfaces can alter or discolour Remove any soiling i...

Page 48: ...will appear at the latest when you switch the machine off You can also rinse the milk pipework manually Touch the sensor button Select Maintenance Rinse milk pipework and confirm with OK When prompted place the milk pipework into the right hand opening in the drip tray cover Confirm with OK The milk pipework will now be rinsed Cleaning the milk pipework using the maintenance program For optimum cl...

Page 49: ...0 ml of lukewarm water Stir the solution with a spoon until the powder has fully dissolved Carrying out the cleaning process Place the container next to the coffee machine and hang the milk pipework in the solution Make sure the milk pipework is placed sufficiently far into the cleaning solution Confirm with OK Follow the further instructions given in the display The cleaning process is finished a...

Page 50: ...ing you to degrease the brew unit will appear in the display Confirm the message with OK The message will appear at regular intervals Once the maximum possible number of portions has been reached the coffee machine will lock Degreasing the brew unit No drinks can be made and Degrease the brew unit and clean inside of the machine appears in the display The cleaning process cannot be cancelled It mu...

Page 51: ...o prevent ground coffee from sticking to it the next time a coffee is made Risk to health due to inadequate cleaning Damp coffee residues in the interior of the machine can go mouldy and pose a risk to health Remove coffee residues regularly and clean the interior of the machine Clean the interior of the coffee machine Make sure that the areas highlighted in the illustration are cleaned especially...

Page 52: ...e descaled will depend on the water hardness level in your area Limescale must be removed regularly The appliance will guide you through the descaling process Various messages will appear in the display e g you will be prompted to empty the drip tray or fill the water container Descaling must be carried out The process takes approx 15 minutes The coffee machine will give you plenty of warning when...

Page 53: ... the product Moreover the descaling result required cannot be guaranteed if the descaling solution was not of the appropriate concentration The descaling tablets are available to order from the Miele online shop from Miele Service or from your Miele dealer You will need 1 descaling tablet to descale the machine Add 1 descaling tablet to the water container Fill the water container to the mark with...

Page 54: ...Cleaning and care 54 The descaling process is complete when the drinks menu appears ...

Page 55: ...or button twice Empty the system will appear on the display Select Yes and confirm with OK Follow the instructions in the display Danger of burning and scalding on the dispensing spouts Hot steam can cause scalding Keep well away from the area underneath the spouts when hot liquids or steam are being dispensed Do not touch hot components The evaporation process is finished when Program finished ap...

Page 56: ...ructions on the display If the fault message appears in the display again contact Miele Service Problem Possible cause and solution F1 F2 F80 F82 There is an internal fault Switch the coffee machine off with the On Off button Wait for approximately one hour before switching the appliance back on again F41 F42 F74 F77 F235 F236 There is an internal fault Switch the coffee machine off with the On Of...

Page 57: ...nserting the plug back in the socket Remove the brew unit and rinse under running water Push the coffee ejector of the brew unit into the correct position Do not insert the brew unit Close the appliance door and switch the coffee machine on with the On Off button This will initialize the brew unit drive and put it back into the start position When Insert the brew unit appears in the display put th...

Page 58: ...ee are added to the coffee chute The ground coffee will be emptied into the grounds container and the fault message will appear in the display Switch the coffee machine off with the On Off button Remove and clean the brew unit by hand see Degreasing the brew unit and cleaning the interior Remove the ground coffee inside the coffee machine e g with a vacuum cleaner Place a maximum of 12 g of coffee...

Page 59: ...socket Contact a qualified electrician or Miele Service The coffee machine turns off suddenly The factory set switch off time 20 minutes or the switch off time you have programmed has been reached If required you can select a new switch off time see Settings Timer The plug is not inserted in the socket correctly Insert the plug into the socket The sensor buttons do not respond The coffee machine c...

Page 60: ...r container appears in the display even though the water container is full and in the machine The water container is not in the correct position Remove the water container and push it back in again The water container was not correctly filled up and inserted during descaling Fill the water container to the descaling mark and restart the descaling program Fill and replace the water container appear...

Page 61: ...n though the drip tray has been emptied This is not a fault The drip tray was not properly removed and or replaced too quickly Insert the drip tray and the waste container appears in the display even though both are installed The drip tray is not correctly installed and is therefore not detected Empty the drip tray and grounds container Reassemble all parts and push the drip tray back as far as it...

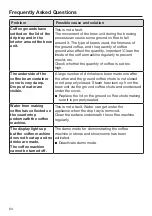
Page 62: ...y at operating temperature rinsing will not take place when the appliance is switched on Coffee dispensing is repeatedly interrupted and the message Fill the bean container appears in the display This is not a fault The brew unit has not detected the ground coffee Certain types of coffee produce a small amount of coffee when they are ground Usually this is because the grinder is set too fine and t...

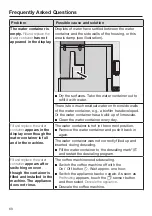
Page 63: ...milk should be frothed only hot milk comes out of the central spout The milk temperature is too high Good milk froth can only be achieved with cold milk below 10 C Check the temperature of the milk The central spout with integrated Cappuccinatore is not correctly installed and is taking in air Or the spouts are blocked Check whether the central spout has been assembled correctly Make sure that all...

Page 64: ...Drops of water are visible A large number of drinks have been made one after the other and the ground coffee chute is not closed or not properly closed Steam has risen up from the brew unit via the ground coffee chute and condensed under the cover Replace the lid on the ground coffee chute making sure it is properly sealed Water from making coffee has collected on the countertop underneath the cof...

Page 65: ...s not performing properly Coffee drinks trickle dribble slowly out of the central spout The coffee machine needs descaling Descale the coffee machine Coffee is not flowing out of the central spout Or coffee is only being dispensed via one spout The central spout has a blockage Rinse the coffee pipework see Cleaning and care Rinsing the appliance If there is still no coffee coming out or coffee is ...

Page 66: ... coarsely ground Set the grinder to a finer setting see Grinder setting The coffee is dispensed too slowly into the cup The coffee is too finely ground Set the grinder to a coarser setting see Grinder setting The brew unit is blocked Degrease the brew unit see Cleaning and care Degreasing the brew unit and cleaning the interior The crema on the coffee or espresso is not as it should be The grinder...

Page 67: ...r Miele dealer or Miele Service Contact information for Miele Service can be found at the end of this document Please quote the model identifier and serial number of your appliance SN when contacting Miele Service This information can be found on the data plate Warranty For further information please refer to your warranty booklet ...

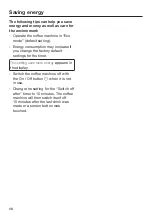
Page 68: ... may increase if you change the factory default settings for the timer This setting uses more energy appears in the display Switch the coffee machine off with the On Off button when it is not in use Change the setting for the Switch off after timer to 15 minutes The coffee machine will then switch itself off 15 minutes after the last drink was made or a sensor button was touched ...

Page 69: ...iance must be connected to an electrical system designed in accordance with national regulations The fuse rating must be at least 10 A The socket should be next to the appliance and easily accessible where possible Do not connect the coffee machine to the domestic electrical supply using a multi socket adapter or an extension cord These do not guarantee the required safety of the appliance risk of...

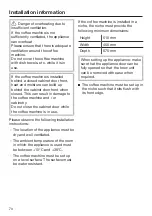
Page 70: ...close the cabinet door while the coffee machine is in use Please observe the following installation instructions The location of the appliance must be dry and well ventilated The ambient temperature of the room in which the appliance is used must be between 10 C and 38 C The coffee machine must be set up on a level surface The surface must be water resistant If the coffee machine is installed in a...

Page 71: ...Appliance dimensions INSTALLATION a 9 1 2 241 mm b 14 3 16 360 mm c 18 1 8 460 mm 71 ...

Page 72: ...ensions W x H x D 241 x 360 x 460 mm Net weight 9 48 kg Power supply cable length 120 cm Water container capacity 1 3 l Bean container capacity 200 g Waste container capacity Max 6 portions of coffee grounds Central spout Height adjustable from 80 135 mm Grinder Conical steel grinder Grinder setting Adjustable in 5 settings Ground coffee amount Max 12 g 72 ...

Page 73: ......

Page 74: ......

Page 75: ...e Vaughan ON L4K 4V8 www miele ca Customer Care Centre Phone 800 565 6435 customercare miele ca Miele Cie KG Carl Miele Straße 29 33332 Gütersloh Germany Manufacturer Canada Please have the model and serial number of your appliance available when contacting Customer Service ...

Page 76: ...M Nr 11 842 680 00 en CA CM 5310 CM 5410 CM 5510 CM 5710 ...

Reviews: