background image

Warning and Safety instructions

11

 

The ice-cube maker must only be connected to a cold water

supply.

 

Risk of injury. Ensure that you do not come into contact with

moving parts on dispensing mechanism of the ice cube maker or the
heating element on the ice cube maker.

Correct use

 

The appliance is designed for use within a certain climate range

(ambient temperatures), and should not be used outside this range.
The climate range for your appliance is stated on the data plate
inside the appliance. Installing it in a room with too low an ambient
temperature, e.g. a garage, will lead to the appliance switching off
for longer periods so that it cannot maintain the required
temperature.

 

Do not cover or block the air vents as this could impair the

efficiency of the appliance, increase the electricity consumption and
could cause damage to the components.

 

If storing food which contains a lot of fat or oil in the appliance or

the door, make sure that it does not come into contact with plastic
components as this could cause stress cracks or break the plastic.

 

Risk of fire and explosion. Do not store explosive materials in the

refrigeration appliance or any products containing propellants (e.g.
spray cans). Electrical components can cause flammable mixes of
gases to ignite.

 

Danger of explosion. Do not operate any electrical equipment (e.g.

an electric ice-cream maker) inside the refrigeration appliance.
Danger of sparking and explosion.

 

Danger of injury and damage to the appliance. Do not store cans

or bottles containing carbonated drinks or liquids which could freeze
in the freezer zone. Otherwise they could burst.

Summary of Contents for F 2411 Vi

Page 1: ...nd installation instructions Freezer To avoid the risk of accidents or damage to the appliance it is essential to read these instructions before it is installed and used for the first time en AE SA M Nr 11 633 570 ...

Page 2: ...lding in niche 27 Checking the installation niche 28 Before installation 29 Preparing the building in niche 30 Pushing the refrigeration appliance into the building in niche 33 Aligning the refrigeration appliance 34 Securing the refrigeration appliance in the building in niche 37 Preparing to install the furniture fronts 39 Securing and aligning the furniture front 42 Securing the covers 46 Secur...

Page 3: ...g off the Door assistant 71 Setting up Miele home 71 Switching off the Demo mode 75 Resetting the settings to their default settings 76 Switching Sabbath mode on or off 78 Switching on switching off or resetting the Water filter display 79 The correct temperature 81 Setting the temperature 81 Temperature range 82 Using Super freeze 83 Temperature and door alarm 84 Adjusting the interior fittings 8...

Page 4: ...care 97 Cleaning agents 97 Before cleaning the refrigeration appliance 98 Interior cabinet and accessories 98 Cleaning the door seal 99 Cleaning the ventilation gaps 99 Cleaning the water filter IntensiveClear mesh filter 99 After cleaning 101 Water filter 102 Problem solving guide 103 Noises 113 Service 114 Contact in case of malfunction 114 Warranty 114 Copyrights and Licences 115 ...

Page 5: ...60335 1 Miele expressly and strongly advises that you read and follow the instructions in the chapter on installing the appliance as well as the safety instructions and warnings Miele cannot be held liable for injury or damage caused by non compliance with these instructions Keep these instructions in a safe place and pass them on to any future owner Risk of injury and damage due to the refrigerat...

Page 6: ...e for storing and keeping cool medicines blood plasma laboratory preparations or similar substances or products that are subject to the the Medical Device Directive Incorrect use of the refrigeration appliance for such purposes may cause deterioration of the items stored The refrigeration appliance is also not suitable for use in areas where there is a risk of explosion Miele cannot be held liable...

Page 7: ...dren must not be allowed to clean or maintain the appliance unsupervised Please supervise children in the vicinity of the appliance and do not let them play with it Risk of death Please bear in mind that by removing the dividing panel in the large freezer basket children may be tempted to climb inside The appliance door hinges can cause injury Keep children away at all times Danger of suffocation ...

Page 8: ...es not affect the performance of the refrigeration appliance When transporting and installing the refrigeration appliance ensure that no parts of the cooling circuit are damaged Splashes of coolant can damage the eyes In the event of damage Avoid naked flames or anything which creates a spark Disconnect the refrigeration appliance from the mains electricity supply Ventilate the room where the refr...

Page 9: ...e easily accessible so that the appliance can be quickly disconnected from the electrical supply in case of an emergency If the electrical connection cable supplied is damaged it must only be replaced by an original spare part to prevent a hazard for the user Miele can only guarantee the safety of the appliance when original Miele spare parts are used Do not connect the appliance to the mains elec...

Page 10: ...ice water outlet must only ever be carried out by a Miele authorised technician While the appliance is under warranty repairs should only be undertaken by a Miele authorised technician Otherwise the warranty is invalidated Faulty components must only be replaced with genuine Miele original spare parts Miele can only guarantee the safety standards of the appliance when Miele replacement parts are u...

Page 11: ...the air vents as this could impair the efficiency of the appliance increase the electricity consumption and could cause damage to the components If storing food which contains a lot of fat or oil in the appliance or the door make sure that it does not come into contact with plastic components as this could cause stress cracks or break the plastic Risk of fire and explosion Do not store explosive m...

Page 12: ...ce ice cubes or ice lollies in your mouth straight from the freezer zone The very low temperature of the frozen food can cause frost burn to the lips and tongue Do not refreeze partially or fully defrosted food Consume defrosted food as soon as possible as it will lose its nutritional value and spoil if left for too long Defrosted food may only be re frozen after it has been cooked Observe the man...

Page 13: ...am cleaning appliance to clean or defrost this appliance Steam could reach electrical components and cause a short circuit Sharp edged or pointed objects will damage the evaporator causing irreversible damage to the appliance Do not use sharp edged or pointed objects to remove frost and ice separate frozen food or remove ice trays Do not place electric heaters or candles in the appliance to defros...

Page 14: ...st be transported by two people Disposal of your old appliance If your old refrigeration appliance has a door lock destroy it This will prevent the risk of children playing accidentally locking themselves in and endangering their lives Splashes of coolant can damage the eyes Be careful not to damage any part of the pipework whilst awaiting disposal e g by puncturing the coolant channels in the con...

Page 15: ... if disposed of with general waste or if handled incorrectly Please do not therefore dispose of your old appliance with general waste Instead please make use of officially designated collection and disposal points to dispose of and recycle electrical and electronic appliances in your local community with your dealer or with Miele By law you are solely responsible for deleting any personal data fro...

Page 16: ...iance Do not plug in other appliances behind the refrigeration appliance If installation near a heat source is unavoidable observe the following minimum distances between the appliance and the heat source At least 3 cm to electric or gas stoves At least 30 cm to oil or coal based stoves If it is not possible to observe these minimum distances an isolation plate must be installed between the refrig...

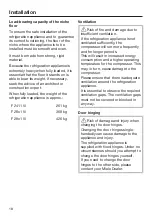
Page 17: ...erating and installation instructions Installation notes Risk of damage and injury due to the refrigeration appliance tipping over This refrigeration appliance is very heavy and can tip forwards when the appliance door s is are open Keep the appliance door s shut until the refrigeration appliance has been built in and secured in its housing in accordance with these operating and installation instr...

Page 18: ...nsufficient ventilation If the refrigeration appliance is not ventilated sufficiently the compressor will run more frequently and for longer periods This will result in increased energy consumption and a higher operating temperature for the compressor This may in turn cause damage to the compressor Please ensure that there is adequate ventilation around the refrigeration appliance It is essential ...

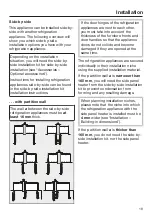
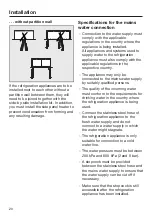
Page 19: ...ges of the refrigeration appliances are next to each other you must take into account the thickness of the furniture fronts and door handles so that the appliance doors do not collide and become damaged if they are opened at the same time The refrigeration appliances are secured individually in their installation niche using the supplied installation material If the partition wall a is narrower th...

Page 20: ...le regulations in the respective country The appliance may only be connected to the mains water supply by suitably qualified persons The quality of the incoming water must conform to the requirements for drinking water in the country where the refrigeration appliance is being used Connect the stainless steel hose of the refrigeration appliance to the fresh water supply and do not connect to a wate...

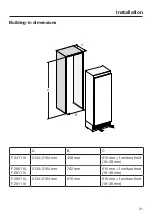
Page 21: ...ing in dimensions A B C A B C F 2411 Vi 2134 2164 mm 458 mm 610 mm furniture front 19 38 mm F 2801 Vi F 2811 Vi 2134 2164 mm 762 mm 610 mm furniture front 19 38 mm F 2901 Vi F 2911 Vi 2134 2164 mm 915 mm 610 mm furniture front 19 38 mm ...

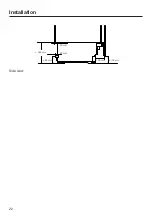
Page 22: ...Installation INSTALLATION 22 30 mm 22 mm 262 mm 102 mm 102 mm 85 mm Side view ...

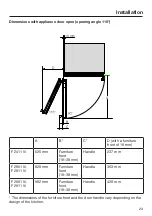
Page 23: ...furniture front of 19 mm F 2411 Vi 525 mm Furniture front 19 38 mm Handle 237 mm F 2801 Vi F 2811 Vi 829 mm Furniture front 19 38 mm Handle 363 mm F 2901 Vi F 2911 Vi 982 mm Furniture front 19 38 mm Handle 428 mm The dimensions of the furniture front and the door handle vary depending on the design of the kitchen ...

Page 24: ...Installation INSTALLATION 24 The opening angle of the appliance door must not be limited to 90 because otherwise the freezer baskets and ice cube container cannot be removed ...

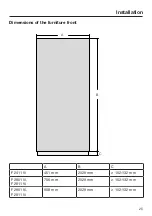
Page 25: ...Installation INSTALLATION 25 Dimensions of the furniture front A B C A B C F 2411 Vi 451 mm 2029 mm 102 132 mm F 2801 Vi F 2811 Vi 756 mm 2029 mm 102 132 mm F 2901 Vi F 2911 Vi 908 mm 2029 mm 102 132 mm ...

Page 26: ...tructions Risk of damage and injury due to the refrigeration appliance tipping over This refrigeration appliance is very heavy and can tip forwards when the appliance door is open Keep the appliance door shut until the refrigeration appliance has been built in and secured in its niche in accordance with these operating and installation instructions Due to its weight and size the refrigeration appl...

Page 27: ...rniture front which is heavier than the maximum permitted weight could damage the hinges This damage can affect various factors such as operation of the appliance Before fitting a furniture front ensure that the weight of the furniture front does not exceed the maximum permitted weight Aligning the building in niche The building in niche must be carefully aligned using a spirit level before the re...

Page 28: ...hose is approx 2 m The stopcock must not be concealed behind the appliance and must be easily accessible in an emergency Check the surroundings for possible collisions see Installation Dimensions with appliance door open Only install the refrigeration appliance in stable solid installation niches positioned on an even and level floor Also check the installation niche for the following criteria The...

Page 29: ...n off cut of flooring or similar material to the floor in front of the installation area Do not remove the installation aids from the appliance door These will be required later for aligning the appliance in the building in niche Risk of damage and injury due to the refrigeration appliance tipping over As soon as you unscrew the brackets that fix the refrigeration appliance to the pallet the appli...

Page 30: ...s very heavy and can tip forwards when the appliance doors are open The building in niche must be secured to the wall behind it and or above it with several screws Only this will prevent the refrigeration appliance from tipping over after being installed In addition use the provided anti tip brackets to secure the building in niche The parts required for installation are supplied with the refriger...

Page 31: ... niche Risk of injury and damage due to tipping refrigeration appliance If the anti tip brackets are fixed too high up they cannot be used to secure the refrigeration appliance The distance between the anti tip brackets and the refrigeration appliance must not exceed 8 mm Make sure that the gap between the refrigeration appliance s rear wall and the building in niche does not exceed 51 mm Place a ...

Page 32: ...ns materials Securing to a concrete wall Securing to a wooden wall Securing with a wooden wedge Secure the building in niche to the wall behind it and or above it as required using the anti tip brackets Connect the refrigeration appliance to the mains water supply see Installation Mains water connection ...

Page 33: ... the plinth ventilation grille Place the plinth ventilation grille to one side Affix edge protection to the adjacent furniture fronts Insert the plug connector at the back of the refrigeration appliance see Installation Electrical connection Insert the plug into the socket The electrical socket must not be concealed behind the appliance and must be easily accessible in an emergency Risk of damage ...

Page 34: ... slide the refrigeration appliance into the niche Remove the edge protection from the adjacent furniture fronts Aligning the refrigeration appliance The installation aids on the appliance door provide assistance with the alignment of the refrigeration appliance in the building in niche The installation aids are suitable for a furniture front thickness of 19 mm or 38 mm Align the refrigeration appl...

Page 35: ...adjusted from the front of the appliance Risk of damage due to incorrect feet adjustment You may damage the adjustable feet if you use a cordless screwdriver Always adjust the front and rear feet by hand Position the supplied spacers on both sides on the markings next to the adjustable feet at the front of the refrigeration appliance ...

Page 36: ...ear feet with a ratchet attachment socket 8 mm or a TX 20 screwdriver Adjust the front feet with a ratchet attachment socket 8 mm or a TX 20 screwdriver Tip Proceed carefully when adjusting the feet alternating between the left and right feet ...

Page 37: ...djust the feet to a height of at least 32 mm so that the ventilation of the refrigeration appliance via the plinth functions correctly Risk of damage if the feet are adjusted too much The rear adjustable feet can be damaged Unscrew the feet only until the marking on the plinth is aligned to a maximum of 62 mm max niche height of 2164 mm Check the alignment of the refrigeration appliance again usin...

Page 38: ...ide fixing plates Open out the side fixing lugs Screw the side fixing lugs to the adjacent cabinets units Open the appliance door Screw the fixing plate lugs at the top and bottom to the cabinets units adjacent to the appliance In a side by side combination only the external panels of the two refrigeration appliances can be secured to the furniture wall ...

Page 39: ...l go Unscrew the installation aids from the appliance door Unscrew the angle trims from both sides of the appliance door and place the trims and screws to one side they will be required later Close the appliance door Measure the gap X between the mounting frame and the upper edge of the adjacent furniture front ...

Page 40: ... furniture front Place the furniture front on a firm surface with the external side facing downwards place on a blanket or similar to prevent it from becoming scratched Mark the distance X 3 mm on the inner side of the furniture front Also locate and mark the centre point Y on the furniture front Position the mounting frame according to the markings on the furniture front Pre drill the holes Screw...

Page 41: ...e always screw into the strongest part of the furniture front To do this select screws which are slightly shorter than the thickness of the furniture front For cassette fronts only secure the mounting frame to the outer frame with the screws Screw the appliance handle to the furniture front from the inside if necessary not for handle free kitchens Now insert the angle trims on both sides as far as...

Page 42: ...ress the angle trims into the white plastic frame on both sides from the outside and screw them on loosely at first Spare screws are provided in the plastic bag marked with the letter E Place the spacers on top of the corners of the furniture front on both sides Close the appliance door and check the distance between the door and adjacent furniture fronts again ...

Page 43: ...e front using the threaded bolts Close the appliance door and check the distance between the door and adjacent furniture fronts again Place the washers and nuts back in position and tighten the nuts The furniture front is now secured Now tighten the screws in the angle trims Open the appliance door Remove the spacers from the furniture front ...

Page 44: ...o not mount the fixing bracket until the refrigeration appliance or side by side combination if applicable has been installed and the furniture front has been aligned Open the appliance door as far as it will go Slide the fixing bracket sideways onto the screw at the bottom of the appliance door Screw the fixing bracket securely to the furniture front ...

Page 45: ...Installation INSTALLATION 45 Tighten the screw at the bottom of the appliance door Fit the cover over the fixing bracket Click the cover onto the fixing bracket ...

Page 46: ...to the gap above the refrigeration appliance so it clicks into place While doing so slide both parts of the cover together as required Installing the cover in a side by side combination Insert the pin from the side by side installation kit halfway into the channel in the cover for the left hand refrigeration appliance Place the second cover onto the pin and press the two covers together Click the ...

Page 47: ...d the furniture front starting at the bottom and working up to the top Secure both sides of the refrigeration appliance using at least 3 clips for the covers Now attach the covers onto the retaining clips on each side In the case of side by side installation the covers are only required on the outer side Fit the cover onto the light contact switch ...

Page 48: ...el Click the plinth ventilation grille onto the bottom of the appliance plinth If necessary cut the plinth panel to the required length and height cut along the lower edge of the plinth where it touches the floor Secure the plinth panel to the bottom of the plinth ventilation grille ...

Page 49: ... and EN 61770 Connection to the water supply must comply with the applicable regulations in the country where the appliance is being installed All appliances and systems used to supply water to the refrigeration appliance must also comply with the applicable regulations in the respective country The water connection pressure needs to be between 200 kPa and 800 kPa 2 bar and 8 bar Risk of damage du...

Page 50: ...liance to the water supply By this time the installation niche should already have been prepared so that the refrigeration appliance needs only to be pushed into it When doing so make sure that the stainless steel hose is not kinked or damaged Position the refrigeration appliance slightly in front of the installation niche so that the stopcock can still be accessed The stainless steel hose for the...

Page 51: ...nclude switches with an all pole contact gap of at least 3 mm These include circuit breakers fuses and contactors EN 60335 The plug and power cable of the refrigeration appliance must not touch the back of the refrigeration appliance as they could be damaged by vibrations from the appliance This could result in a short circuit Do not plug in other appliances behind the refrigeration appliance Do n...

Page 52: ...connector into the socket at the back of the refrigeration appliance Make sure that the plug connector has clicked into position correctly Insert the plug of the refrigeration appliance into the socket The refrigeration appliance is now connected to the electricity supply ...

Page 53: ...t sunlight Not near to a heat source radiator oven Near to a heat source radiator oven Where the ideal ambient room temperature is approx 20 C Where the ambient room temperature is above 25 C Ventilation gaps uncovered and dusted regularly Ventilation gaps covered or dusty Temperature setting Freezer section 18 C The lower the temperature in the appliance the higher the energy consumption ...

Page 54: ...ll run for longer periods Take an insulated cool bag when shopping and load food in the appliance as soon as possible Allow hot food and drinks to cool down before placing them in the appliance Hot food or food at room temperature raises the temperature inside the appliance The appliance will try to cool down and the compressor will run for longer periods Store food well packaged The evaporation o...

Page 55: ...nce 55 F 2411 Vi a Display b On Off switch c Shelves in the appliance door d Interior lighting e Shelves f Ice cube maker g Ice cube container h Freezer baskets i Automatic door opening Push2open Pull2open j Water filter ...

Page 56: ...i F 2811 Vi F 2901 Vi F 2911 Vi a Display b On Off switch c Shelves in the appliance door d Interior lighting e Shelves f Ice cube maker g Ice cube container h Freezer baskets i Automatic door opening Push2open Pull2open j Water filter ...

Page 57: ...when the SuperFreeze function has been switched on b Temperature display target temperature c Sensor control for setting the temperature d Display for Miele home connection status only visible when Miele home has been set up e Sensor control for adjusting various settings in Settings mode ...

Page 58: ...ch off the Buzzer tones completely e g for the door alarm Keypad tone Adjust the volume or switch off the Keypad tone completely F C Temperature unit Set Fahrenheit or Celsius Keypad lock Switch on or off see Selecting additional settings Eco mode Switch on or off see Selecting additional settings Self test The system restarts and is checked for faults or malfunctions see Selecting additional sett...

Page 59: ...ettings Reset to default settings see Selecting additional settings Dispenser unit Switching the ice cube maker on and off see Making ice cubes Sabbath mode Switch on or off see Selecting additional settings Water filter display Switch on or off or reset see Selecting additional settings Symbols in Settings mode Scroll in Settings mode or select a setting Change a setting e g display brightness OK...

Page 60: ... plastic and chrome without the use of chemicals Stainless steel front panel Stainless steel front panels give your refrigeration appliance a high quality appearance Handles and plinth panels are also available in stainless steel look Metal filler panel for cassette fronts If you wish to install two furniture fronts next to each other instead of one furniture front they will have to be connected w...

Page 61: ...fficult to remove from cold surfaces Cleaning Please refer to the relevant instructions in Cleaning and care Clean the inside of the appliance and the accessories Choosing the right door assistant Push2open Pull2open The door assistant helps you to open the appliance door You can choose between the two door assistants Push2open and Pull2open see Selecting additional settings Switching on the Door ...

Page 62: ...ions and alter their settings to some extent see Selecting additional settings Touch the sensor control to open Settings mode Use the and sensor controls to select the function for which you wish to adjust the settings Confirm your selection with OK Adjust the settings using either the and sensor controls or the and sensor controls Confirm your selection with OK The setting with the coloured backg...

Page 63: ...e Set the Temperature unit C degrees Celsius or F degrees Fahrenheit Set up Miele home Select Continue if you wish to set up Miele home now to do this follow the instructions under Selecting additional settings Miele home Select Skip if you would prefer to set up Miele home later Use the and sensor controls to select the right setting and select OK to confirm your selection Touch the sensor contro...

Page 64: ...OK The message will disappear from the display and the alarm tone will stop However the message may reappear on the display after a brief delay As soon as the selected temperature has been reached in the freezer zone the message will disappear completely from the display and the alarm tone will stop To enable the temperature to get sufficiently cold inside the refrigeration appliance allow the app...

Page 65: ...maker off if the water supply is turned off e g while on holiday Close the stopcock in the water supply line approx 3 hours before switching off the refrigeration appliance to avoid the build up of mould caused by stagnant water Empty the ice cube container Clean the refrigeration appliance Clean the water filter Leave the door ajar to air the refrigeration appliance and prevent odours from buildi...

Page 66: ...anges or other unintentional adjustments in Settings mode In Settings mode use the and sensor controls to select Keypad lock and select OK to confirm your selection Use the and sensor controls to switch the sensor lock On or Off and select OK to confirm your selection The sensor lock will not be activated until you close the appliance door Nothing will appear on the display to indicate that the se...

Page 67: ...m your selection Use the and sensor controls to switch the Eco mode On or Off and select OK to confirm your selection Only the changed temperature on the display indicates that Eco mode is switched on Tip You can also switch off the Eco mode function by directly adjusting the temperature see The correct temperature Setting the temperature Health risk caused by decomposing food The usability and qu...

Page 68: ...ar on the display if the self test does not discover any faults or malfunctions If the self test does discover any faults or malfunctions they are indicated as error messages on the display An alarm will also sound If you find the alarm disruptive you can switch it off in advance by touching the sensor control Make a note of the error message s displayed Contact your Miele Dealer and inform them o...

Page 69: ...osed the appliance door leave it closed for 5 minutes Automatic door opening resets itself Switching on Push2open In Settings mode use the and sensor controls to select Door assistant and select OK to confirm your selection Use the and sensor controls to select Mode and select OK to confirm your selection Use the and sensor controls to select Push2open and select OK to confirm your selection Touch...

Page 70: ...ching on Pull2open In Settings mode use the and sensor controls to select Door assistant and select OK to confirm your selection Use the and sensor controls to select Mode and select OK to confirm your selection Use the and sensor controls to select Pull2open and select OK to confirm your selection Touch the sensor control to return to the previous menu level Adjusting the intensity You can also a...

Page 71: ...ill need A WiFi network The Miele mobile app A Miele user account The user account can be created via the Miele mobile app The Miele mobile app will guide you as you connect your refrigeration appliance to your home WiFi network Once the refrigeration appliance is connected to your WiFi network you can use the app to carry out the following activities for example Call up information on the operati...

Page 72: ...e or from the Google Play Store Connecting your refrigeration appliance via the Miele mobile app You will also require the following to log in Your WiFi network password The password for your refrigeration appliance Your refrigeration appliance s password is its serial number which can be found on the data plate The data plate can be found in the interior cabinet of the refrigeration appliance XXX...

Page 73: ... sensor controls to select Miele home and select OK to confirm your selection Set up will appear on the display Confirm your selection with OK Use the and sensor controls to select via WPS and select OK to confirm your selection Now follow the instructions on the display Confirm the process with OK To be able to use the Miele home functions you also have to register your refrigeration appliance in...

Page 74: ... on the display Confirm the message with OK If the WiFi connection is active will appear on the display Checking the WiFi connection status In Settings mode use the and sensor controls to select Miele home and select OK to confirm your selection Use the and sensor controls to select Connection status and select OK to confirm your selection Information about the WiFi connection status will then app...

Page 75: ...the settings to their default settings Switching off the Demo mode Demo mode allows the refrigeration appliance to be presented in the showroom without the cooling system being switched on This setting is not needed for domestic use If Demo mode has been switched on as a default setting will show on the display In Settings mode use the and sensor controls to select Demo mode and select OK to confi...

Page 76: ...is deleted from the refrigeration appliance This will also ensure that a previous owner is no longer able to access the refrigeration appliance In Settings mode use the and sensor controls to select Factory default settings and select OK to confirm your selection Use the and sensor controls to select Reset and select OK to confirm your selection After a brief delay Settings reset will appear on th...

Page 77: ...lour scheme Dark Buzzer tones Middle value 4 of 7 segments Keypad tone Middle value 4 of 7 segments C F Temperature unit Celsius Keypad lock Switched off Eco mode Switched off Door assistant Push2open Miele home Switched off Dispenser unit Switched on Sabbath mode Switched off Water filter display Switched on Temperature 18 C ...

Page 78: ...closed When Sabbath mode is switched on the following functions are switched off Door assistant for furniture fronts without handles the appliance door will have to be pulled from the bottom or side Lighting All acoustic and visual signals Temperature display The SuperFreeze function if previously switched on The ice cube maker if previously switched on You can still select The sensor control for ...

Page 79: ...you automatically the reminder does not need to be switched on separately Switching the Water filter display on If the Water filter display has been switched off it must be switched on again if required In Settings mode use the and sensor controls to select Water filter display and select OK to confirm your selection Use the and sensor controls to select On and select OK to confirm your selection ...

Page 80: ...you do not reset the display it appears again and again In Settings mode use the and sensor controls to select Water filter display and select OK to confirm your selection Use the and sensor controls to select Reset and select OK to confirm your selection The message Clean the water filter will disappear from the display The Water filter display is now activated for the next time the water filter ...

Page 81: ...t into it The higher the ambient temperature surrounding the refrigeration appliance This refrigeration appliance is designed for use within specific ambient temperatures climate range Do not use in ambient temperatures for which it is not designed Setting the temperature Touch the sensor control to set the temperature The previously set temperature will appear Use the and sensor controls to set t...

Page 82: ... be adjusted from 14 C to 24 C The ambient temperature in the room and the installation location can affect the time it takes for the appliance to reach the lowest temperature If the ambient temperature is too high the appliance may not reach the lowest temperature ...

Page 83: ...re display The refrigeration appliance will now run at maximum power Switching off SuperFreeze Touch the sensor control to set the temperature The symbol will be highlighted in colour and the temperature value of 30 C will be shown on the display Touch the sensor control to switch the SuperFreeze function off The symbol will no longer be highlighted in colour and the previous temperature setting w...

Page 84: ...s switched on and the temperature in the appliance differs greatly from the set temperature If a lot of warm room air enters the freezer when frozen food is being loaded rearranged or taken out When large amounts of food are frozen at once When fresh food which is still warm is frozen After an extended mains outage The alarm will be silenced and the message on the display will go out as soon as th...

Page 85: ...pliance door has been left open for longer than 2 minutes The message Close the door will also appear on the display As soon as the appliance door is closed the alarm tone will stop and the message in the display will go out Switching the door alarm off early If the alarm disturbs you it can be turned off early Touch the OK sensor control The alarm will stop and the message will disappear from the...

Page 86: ...atches in the guides at the same height again Make sure that the shelf is straight Tip For the purposes of loading and unloading or cleaning the baskets in the shelves can be removed from their holders completely Removing or moving the shelves Use both hands to grip the shelf from below and raise it slightly so that it can be lifted with the catches over the guide at the back Pull the shelf forwar...

Page 87: ...de on both sides and then slide it all the way in Removing the freezer baskets Open the appliance door as wide as possible The opening angle of the appliance door must not be limited to 90 because otherwise the freezer baskets cannot be removed Pull the freezer basket out as far as it will go Raise the snap fastening on both sides unclip and carefully lift the basket out To replace it pull the tel...

Page 88: ...urn the slots in the pegs into a vertical position Push the freezer basket all the way back in Removing the ice cube container Open the appliance door as far as it will go The opening angle of the appliance door must not be limited to 90 because otherwise the upper freezer basket cannot be pulled out as far as it will go Pull the upper freezer basket out as far as it will go Tilt the ice cube cont...

Page 89: ...ngs 89 To replace the ice cube container pull the upper freezer basket out again as far as it will go Insert the ice cube container with the rearmost side first so that it engages Push the upper freezer basket all the way back in ...

Page 90: ...his means in practice is that the food loses more moisture You can see this in the large amount of water that collects around the food when it defrosts If food is frozen quickly the cells have less time to lose moisture so they shrink less As there is not so much moisture loss it is easier for the food to reabsorb it during the defrosting process and very little water collects around the defrosted...

Page 91: ...hops steaks cutlets etc with a sheet of plastic freezer film This prevents them from freezing together in a block Do not salt or season raw food or blanched vegetables before freezing Cooked food should only be lightly salted and seasoned Some herbs intensify the taste of food when frozen Placing hot foods or drinks in the freezer causes food that is already frozen to partially thaw and increases ...

Page 92: ...et Lower freezer basket F 2411 Vi 12 kg 12 kg F 28x1 Vi 28 kg 28 kg F 29x1 Vi 36 kg 36 kg Unfrozen food should not touch frozen food as this will cause the frozen food to begin to thaw Storage time for frozen food The storage life of food is very variable even at a constant temperature of 18 C Decomposition processes also take place in frozen food albeit at a very reduced speed For example fat can...

Page 93: ... placed directly into a hot frying pan Meat and poultry e g mince chicken fish fillets should not come into contact with other foods while defrosting Catch the liquid from defrosting and dispose of it carefully Fruit should be defrosted at room temperature in its packaging or in a covered bowl Most vegetables can be cooked while still frozen Just put straight into boiling water or hot fat The cook...

Page 94: ...n the ice cubes drop out of the ice maker into the ice cube container Ice cube production is halted automatically when the ice cube container is full The ice maker can make up to approx 1 3 kg of ice cubes in 24 hours The amount of ice cubes made by the appliance depends on the temperature in the freezer zone The lower the temperature the more ice cubes are produced After you have set up the appli...

Page 95: ... Close the stopcock in the water supply line approx 3 hours before switching off the refrigeration appliance to avoid the build up of mould caused by stagnant water In Settings mode use the and sensor controls to select Dispenser unit and select OK to confirm your selection Use the and sensor controls to select Off and select OK to confirm your selection ...

Page 96: ...ts automatically The moisture generated in the appliance collects on the condenser and is automatically defrosted and dissipated from time to time This automatic defrosting system enables the freezer to remain permanently ice free Food stored in the freezer will not defrost with this system ...

Page 97: ...nts To avoid damaging the surfaces of your appliance do not use Cleaning agents containing soda ammonia acids or chlorides Cleaning agents containing descaling agents Abrasive cleaning agents e g scouring powder scouring liquid or pumice stones Cleaning agents containing solvents Stainless steel cleaning agents Dishwasher cleaner Oven sprays Glass cleaning agents Hard abrasive sponges and brushes ...

Page 98: ...r and a little washing up liquid Wash all parts by hand Do not wash in a dishwasher After cleaning wipe with clean water and dry with a soft cloth Leave the door open to air the refrigeration appliance sufficiently for a short while and to prevent odour buildup Aluminium frames The frames for the shelves inside the appliance and the door shelves are partially made from aluminium Aluminium is a dyn...

Page 99: ...iance The ventilation gaps should be cleaned on a regular basis with a brush or vacuum cleaner you could use a Miele vacuum cleaner dusting brush for example Cleaning the water filter IntensiveClear mesh filter Depending on the quantity of ice cubes produced the IntensiveClear mesh filter must be cleaned approx every 6 months Clean the water filter will appear in the display Confirm the message wi...

Page 100: ...ing 5 making sure the cap is horizontal Turn the cap of the filter cartridge clockwise until it is in the vertical position 6 Risk of damage caused by water rushing out If the filter cartridge is not fitted correctly there is a risk of water leaking out of the refrigeration appliance When fitting the filter cartridge be sure to turn it as far as the marker Once the IntensiveClear mesh filter has b...

Page 101: ...iance Switch the refrigeration appliance back on Switch the SuperFreeze function on for a while so that the freezer zone can cool down quickly Once the freezer zone has reached the required temperature place the freezer baskets containing the frozen food back in the freezer zone Switch the SuperFreeze function off as soon as the temperature in the freezer is a constant 18 C or colder ...

Page 102: ...ced However to ensure the highest quality of the ice cubes it is essential to clean the water filter regularly After inserting a new water filter dispose of all ice cubes produced in the next 24 hours following the change Depending on the quantity of ice cubes produced the IntensiveClear mesh filter must be cleaned approx every 6 months Clean the water filter appears on the display Clean the Inten...

Page 103: ...e will be checked for any faults or malfunctions Any errors identified during the self test are shown on the display Perform a self test see Selecting additional settings Performing a Self test If necessary contact your Miele Dealer The refrigeration appliance is not getting cold and the interior lighting does not come on when the appliance door is opened The refrigeration appliance has not been s...

Page 104: ...pliance door After a while the temperature will return to normal by itself If a thick layer of ice has already formed this will affect cooling and increase energy consumption Defrost the refrigeration appliance and clean it The ambient room temperature is too high The higher the ambient temperature the longer the compressor has to run See the information in Location in Installation The refrigerati...

Page 105: ...erature of the room The compressor runs continuously This is not a fault To save energy the compressor runs at a lower speed but for longer when less cooling is required Food has frozen together The food packaging was not dry when placed in the freezer Use a blunt instrument e g a spoon handle or plastic scraper to prise it apart carefully An alarm sounds The appliance door has been open for longe...

Page 106: ...andle free furniture fronts switch on the Push2open door assistant see Selecting additional settings Switching on the Door assistant The appliance door cannot be opened when Sabbath mode is switched on The Push2open door assistant is switched on at the same time as Sabbath mode When Sabbath mode is switched on the door assistant is deactivated Pull the appliance door open from below or from the si...

Page 107: ...isplay The temperature display will show the highest temperature that was reached during the time in which the temperature in the freezer zone rose Depending on the temperature displayed you should check whether food in the freezer has started to thaw or has defrosted If it has it should be used as soon as possible Defrosted food may only be re frozen after it has been cooked In the event of a mai...

Page 108: ... symbol The error message will not disappear from the display until the error has been rectified The voltage level is too high low Observe the connection data under Installation Electrical connection Contact your Miele Dealer To turn the alarm off touch the symbol The error message will not disappear from the display until the error has been rectified The symbol lights up in the display The refrig...

Page 109: ...r supply Check whether the water supply has been vented There is a kink in the water hose Check the water hose and replace it if necessary The temperature in the freezer zone is too high Select a lower temperature The appliance door has been opened too frequently causing the compressor to turn on more often and the ice maker has iced up Only open the appliance door when necessary and for as short ...

Page 110: ...ther the water filter needs to be cleaned The water connection pressure is too low Check that the water connection is between 200 kPa and 800 kPa 2 bar and 8 bar The temperature in the freezer zone is too high Select a lower temperature The ice cubes taste or smell odd The ice cube container is in constant use and needs to be cleaned regularly Check whether the ice cube container is dirty and clea...

Page 111: ...mediately Check whether the water line is damaged Contact your Miele Dealer Check whether the water pressure is too high If the water pressure is too high this can cause leaks see Mains water connection in Installation Check whether the water pressure is between 200 kPa and 800 kPa 2 bar and 8 bar Check whether an incorrect valve has been installed ...

Page 112: ...ere is a fault Risk of electric shock due to exposed live electrical components When removing the lighting cover there is a risk of coming into contact with live electrical components Do not remove the lighting cover The LED lighting may only be repaired or replaced by your Miele Dealer Risk of injury from LED lighting This lighting corresponds to risk group RG 2 If the cover is defective there is...

Page 113: ... heard when materials expand inside the appliance Remember that the noise of the compressor and the coolant circulating in the system is unavoidable Noises Cause and remedy Rattling vibrating The refrigeration appliance is uneven Realign the appliance using a spirit level by raising or lowering the adjustable feet underneath the refrigeration appliance or placing something underneath it The refrig...

Page 114: ... recorded for training purposes and that a call out charge will be applied to service visits where the problem could have been resolved as described in this booklet Please quote the model and serial number of your appliance when contacting your Miele dealer This information can be found on the data plate The data plate can be found inside the appliance Warranty For more information on country spec...

Page 115: ...ion 2 or the GNU Lesser General Public License Version 2 1 For a period of at least 3 years from the date of purchase or delivery of the appliance respectively Miele offers to provide you or third parties with a machine readable copy of the source code of the Open Source components contained in the appliance and licenced under the terms of the GNU General Public License Version 2 or the GNU Lesser...

Page 116: ......

Page 117: ......

Page 118: ......

Page 119: ...op shop miele ae Taif Riyadh Branches Khobar Jeddah Jeddah Jeddah P O Box 11529 Jeddah 21463 Tel 966 12 2560888 Fax 966 12 2560555 Hotline for customer care 920003240 Website www awadnahas com Madina Road Tel 966 12 6970060 Fax 966 12 6970012 Sitteen Street Tel 966 12 6611675 Fax 966 12 6606852 Miele Gallery Al Thanyyan Group Building Al Madina Road Near Al Rowdah District Jeddah Tel 966 12 698933...

Page 120: ...M Nr 11 633 570 00 en AE SA F 2411 Vi F 2801 Vi F 2811 Vi F 2901 Vi F 2911 Vi ...

Reviews: