background image

Climate range

This appliance is designed for use
within certain climate ranges (ambient
temperatures), and should not be used
outside this range. The climate range of
the appliance is stated on the data
plate inside the appliance.

Climate range

Ambient room

temperature

SN

N

ST

T

+10 °C to +32 °C
+16 °C to +32 °C
+16 °C to +38 °C
+16 °C to +43 °C

Operating in a room which is too cold
will cause the cooling system to switch
off for too long, causing the internal
temperature in the appliance to rise.

Ventilation

Air at the back of the appliance gets
warm. To ensure sufficient ventilation,
the ventilation gaps must not be
covered or blocked in any way. They
should be dusted on a regular basis.

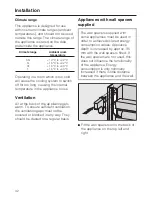
Appliances with wall spacers
supplied

The wall spacers supplied with
some appliances must be used in
order to achieve declared energy
consumption values. Appliance
depth is increased by approx. 35
mm with the wall spacers fitted. If
the wall spacers are not used, this
does not influence the functionality
of the appliance. Energy
consumption is only minimally
increased if there is little distance
between the appliance and the wall.

^

Fit the wall spacers onto the back of
the appliance on the top left and
right.

Installation

42

Summary of Contents for FN 12221 S

Page 1: ...rost free freezer FN 12221 S 1 FN 12421 S 1 FN 12621 S 1 FN 12821 S 1 To avoid the risk of accidents or damage to the appliance it is essential to read these instructions before it is installed and used for the first time M Nr 09 559 200 en GB ...

Page 2: ...vating or deactivating the Lock 18 The correct temperature 20 Setting the temperature 20 Temperature display 21 Alarm 22 Temperature alarm 22 Door alarm 22 Switching the alarm off early 22 Super freeze 23 Freezing and storing food 24 Maximum freezing capacity 24 Freezing fresh food 24 Isolation plate 24 Important 24 Storing frozen food 25 Home freezing 26 Hints on home freezing 26 Packaging 26 Bef...

Page 3: ...lem solving guide 33 Noises 37 After Sales Guarantee 38 Information for dealers 39 Demo mode r 39 Electrical connection 40 Installation 41 Location 41 Climate range 42 Ventilation 42 Appliances with wall spacers supplied 42 Installation 43 Aligning the appliance 43 Appliance dimensions 44 Changing the door hinging 45 Aligning the appliance door 50 Building in the appliance 51 Contents 3 ...
Page 4: ...l which has been set As soon as a button is pressed the display will light up at the brightest setting dLock symbol eMenu symbol Setting mode for the brightness level of the display switching the lock on off fAlarm symbol gTemperature display hTemperature selector button iAlarm off button jSuper freeze symbol kBrightness symbol Guide to the appliance 4 ...

Page 5: ...aControl panel bFrost free system cTop freezer drawer can be used as a freezer tray dFreezer drawers number will depend on model Guide to the appliance 5 ...

Page 6: ...otentially hazardous to human health and to the environment They are however essential for the correct functioning of your appliance Please do not therefore dispose of it with your household waste Please dispose of it at your local community waste collection recycling centre or contact your dealer for advice Ensure that it presents no danger to children while being stored for disposal Take care no...

Page 7: ...on The appliance is not designed for commercial use It is intended for use in domestic households and similar working and residential environments This appliance is not intended for outdoor use The appliance must only be used as a domestic appliance to store deep frozen food to freeze fresh food and to prepare ice Any other usage is not supported by the manufacturer and could be dangerous The appl...

Page 8: ...aintain the appliance unsupervised This appliance is not a toy To prevent the risk of injury do not allow children to play with it or use the controls Please supervise children whilst you are using the appliance Danger of suffocation Packaging e g cling film polystyrene and plastic wrappings must be kept out of the reach of babies and children Whilst playing children could become entangled in pack...

Page 9: ...stem are damaged Leaking coolant can damage the eyes In the event of any damage avoid open flames and anything which creates a spark disconnect from the mains air the room in which the appliance is located for several minutes and contact the Service Department for advice The more coolant there is in an appliance the larger the room it should be installed in In the event of a leakage if the applian...

Page 10: ...d electrician The manufacturer cannot be held liable for damage or injury caused by the lack of or inadequacy of an effective earthing system e g electric shock Installation maintenance and repairs may only be carried out by a suitably qualified and competent person in strict accordance with current national and local safety regulations Repairs and other work by unqualified persons could be danger...

Page 11: ...to the appliance switching off for longer periods so that it cannot maintain the required temperature Do not block the ventilation gaps in the appliance as this would impair the efficiency of the appliance increase the electricity consumption and could cause damage to the appliance Never handle frozen food with wet hands Your hands may freeze to the frozen food Danger of frost burn Do not take ice...

Page 12: ... instructions given on food manufacturer s packaging on storage conditions required as well as the use by date Do not store explosive materials in the appliance or any products containing propellants e g spray cans Thermostats switching on may produce sparks which could present a fire hazard Flammable compounds could explode Do not operate any electrical equipment e g an electric ice cream maker i...

Page 13: ...or seal as these will cause the seal to deteriorate and become porous with time Disposal of your old appliance Before disposing of an old appliance first make the door latch or lock unusable This way you will prevent children from accidentally locking themselves in and endangering their lives Be careful not to damage any part of the pipework whilst awaiting disposal e g by puncturing the refrigera...

Page 14: ...xchanger dusted at least once a year Dust build up on the compressor and metal grille heat exchanger Temperature setting with a thermostat which is approximate set in stages With a medium setting of 2 to 3 With a higher setting the lower the temperature the higher the energy consumption Temperature setting with a thermostat which is exact to the degree digital display Larder section 8 to 12 C On a...

Page 15: ...s possible Replace any food removed rapidly before it begins to thaw Allow hot food and drinks to cool down before placing them in the appliance Hot food or food at room temperature raises the temperature inside the appliance The appliance works harder to cool down and the compressor runs for longer periods Store food covered or packaged The evaporation or condensation of liquids will cause a loss...

Page 16: ...hours before placing food in it Do not place food in the appliance until the temperature is at least 18 C Switching off Press the On Off button until the display goes out The cooling system is switched off Switching off for longer periods of time If the appliance is not going to be used for a longer period of time e g whilst on holiday switch the appliance off disconnect it from the mains clean th...

Page 17: ...ghtness can be adjusted to suit the lighting conditions of the room There are five different display brightness settings The factory default setting is 1 Press the Super freeze button for approx five seconds The Menu symbol X will light up Settings mode is now activated The Lock symbol 0 will start flashing Press the temperature selector button to call up the Brightness function The Lock symbol 0 ...

Page 18: ... required temperature Activating or deactivating the Lock The Lock can be activated to prevent the appliance being switched off by mistake To activate the Lock Press the Super freeze button for approx five seconds The Menu symbol X will light up Settings mode is now activated The Lock symbol 0 will start flashing Press the Super freeze button briefly to call up the Lock function The Lock symbol 0 ...

Page 19: ...l start flashing Press the Super freeze button briefly to call up the Lock function The Lock symbol 0 will light up The 18 C field will light up in the temperature display Press the Super freeze button briefly to deactivate the Lock function The Lock symbol 0 will start flashing The 18 C field in the temperature display will go out To come out of Settings mode Press the On Off button or Wait for 5...

Page 20: ...h food is stored in it at once if too much fresh food is being frozen at once the higher the ambient temperature surrounding the appliance The appliance is designed for use in specific ambient temperatures climate ranges Do not use in ambient temperatures for which it is not designed Setting the temperature Press the temperature selector button repeatedly until the temperature you want lights up i...

Page 21: ...nce has risen by several degrees indicating that the appliance is warming up too much This loss of coldness is no cause for concern in the following circumstances when the door has been left open for a while e g for removing or storing a large amount of food when fresh food is being frozen However if the temperature in the freezer remains above 18 C for a long time check that the frozen food has n...

Page 22: ... being loaded re arranged or taken out in the event of a power cut if the appliance has a fault The alarm will stop the Alarm symbol will go out and the field next to the set temperature will light up constantly as soon as the temperature has dropped down to the correct level again However if the temperature in the freezer remains above 18 C for a long time check that the frozen food has not start...

Page 23: ...riefly The Super freeze symbol ª will light up The appliance will work at full power to lower the temperature in the appliance The compressor can switch on up to 8 minutes later This is due to an built in delay switch which helps prolong the life of the appliance Switching off Super freeze The Super freeze function will switch off automatically after approx 65 hours The Super freeze symbol ª will ...

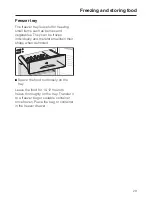
Page 24: ...s has happened by the amount of liquid around the food If food is frozen quickly the cells have less time to lose moisture so they shrink less As there is not so much moisture loss it is easier for the food to reabsorb it during the defrosting process and very little water collects around the defrosted food Isolation plate depending on model available as an optional accessory The isolation plate i...

Page 25: ...rozen food to store in your freezer check that the packaging is not damaged the use by date and the temperature at which the frozen food is being stored in the shop The length of time it can be kept is reduced if it has been stored at a temperature warmer than 18 C Buy frozen food once you have finished the rest of your shopping and wrap it in newspaper or use a cool bag or cool box to transport i...

Page 26: ...ets or rolled meat from freezing together in solid blocks when packed separate with a sheet of plastic freezer film Do not season fresh food or blanched vegetables before freezing Only season cooked food lightly before freezing but care should be taken as the taste of some spices alters when frozen Do not place hot food or drinks in the freezer This causes already frozen food to thaw and increases...

Page 27: ...ower freezer drawers Place the food flat in the bottom of the drawers so that it freezes through to the core as quickly as possible Please note that when removing drawers the lowest freezer drawer must always remain in the freezer When placing food on the glass cold plate make sure it does not obstruct the ventilation gaps at the back This is important for problem free operation and normal energy ...

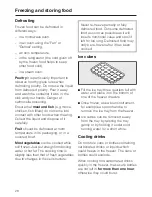
Page 28: ...r or hot fat The cooking time is slightly less than that of fresh vegetables due to changes in the cell structure Never re freeze partially or fully defrosted food Consume defrosted food as soon as possible as it will lose its nutritional value and spoil if left for too long Defrosted food may only be re frozen after it has been cooked Ice cubes Fill the ice tray three quarters full with water and...

Page 29: ...ozen individually and therefore maintain their shape when defrosted Space the food out loosely on the tray Leave the food for 10 12 hours to freeze thoroughly on the tray Transfer it to a freezer bag or suitable container once frozen Place the bag or container in the freezer drawer Freezing and storing food 29 ...

Page 30: ...omatically The moisture generated by defrosting settles on the condensor and is automatically dissipated from time to time This automatic defrosting system enables the freezer to remain permanently ice free however the food stored in the freezer will not defrost Defrosting 30 ...

Page 31: ...lass cleaning agents hard abrasive sponges and brushes e g pot scourers melamine eraser blocks sharp metal scrapers Before cleaning Switch the appliance off Disconnect it from the mains Take any frozen food out of the appliance and store it in a cool place Take the freezer drawers and the glass cold plates out of the freezer to clean them Cleaning the interior and accessories Use lukewarm water wi...

Page 32: ...s or grease on the door seal as these will cause the seal to deteriorate and become porous over time The door seal should be cleaned regularly with clean water and then wiped dry with a soft cloth Metal grille at the back of the appliance The metal grille at the back of the appliance heat exchanger should be dusted at least once a year A build up of dust will increase the energy consumption of the...

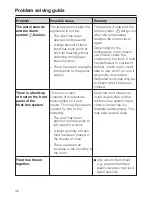
Page 33: ...urer cannot be held liable for unauthorised work Problem Possible cause Remedy The appliance does not cool The appliance has not been switched on The temperature display is not lit up Press the On Off button The plug is not inserted in the socket correctly Insert the plug in the socket correctly Check whether the mains fuse has tripped There could be a fault with the appliance the household electr...

Page 34: ...ntilation gaps Dust the ventilation gaps and the heat exchanger regularly The metal grille heat exchanger at the rear of the appliance has become dusty The door has been opened too frequently or a large amount of fresh food has been put in at once for freezing Only open the door when necessary and for as short a time as possible The required temperature will re establish itself after a while See T...

Page 35: ...eze symbol ª and the temperature display are flashing There is a fault Call Miele Service The r symbol lights up Demo mode has been activated This allows the appliance to be displayed in the showroom without the cooling system being switched on Do not activate this setting for domestic use Deactivate Demo mode see Information for dealers Demo mode Problem solving guide 35 ...

Page 36: ...till safe to use and if so use it as quickly as possible Defrosted food may only be re frozen after it has been cooked There is a build up of frost on the front panel of the frost free system This is not a fault Droplets of condensate have settled on it and frozen This may have been caused by one of the following The door has been opened too frequently or left open for a while A large quantity of ...

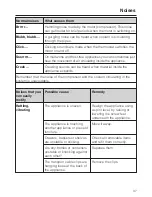
Page 37: ...al inside the appliance expands Remember that the noise of the compressor and the coolant circulating in the system is unavoidable Noises that you can easily rectify Possible cause Remedy Rattling vibrating The appliance is uneven Realign the appliance using a spirit level by raising or lowering the screw feet underneath the appliance The appliance is touching another appliance or piece of furnitu...

Page 38: ... that telephone calls may be monitored and recorded for training purposes N B A call out charge will be applied for service visits where the problem could have been resolved as described in these instructions Guarantee For information on the appliance guarantee specific to your country please contact Miele See back cover for contact details In the U K your appliance is guaranteed for 2 years from ...

Page 39: ...ss the Super freeze button Demo mode has now been activated The r symbol and the 18 C field of the temperature display will light up If Demo mode is activated and the appliance is then switched off and back on again all fields of the temperature display will light up for a short time Demo mode remains activated To deactivate Demo mode Press the On Off button and the Temperature selector button at ...

Page 40: ...er system When switching the appliance on a surge in power could trigger the safety cut out mechanism This could damage the electronic unit The appliance must not be used with so called energy saving devices These reduce the energy supply to the appliance which could then become too warm Using such devices could alter the specification of the product If the connection cable has to be replaced this...

Page 41: ...erature of the room the more energy the appliance requires to operate When installing the appliance please be aware The socket must be easily accessible in an emergency not concealed behind the appliance The plug and cable must not touch the rear of the appliance as they could be damaged by vibrations from the appliance Do not plug in other appliances behind this appliance Important tropical humid...

Page 42: ...at the back of the appliance gets warm To ensure sufficient ventilation the ventilation gaps must not be covered or blocked in any way They should be dusted on a regular basis Appliances with wall spacers supplied The wall spacers supplied with some appliances must be used in order to achieve declared energy consumption values Appliance depth is increased by approx 35 mm with the wall spacers fitt...

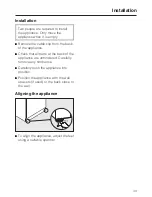
Page 43: ...of the appliance Check that all parts at the back of the appliance are unhindered Carefully remove any hindrance Carefully push the appliance into position Position the appliance with the wall spacers if used or the back close to the wall Aligning the appliance To align the appliance adjust the feet using a suitable spanner Installation 43 ...

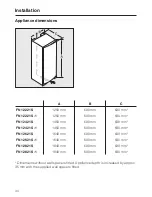
Page 44: ... mm 630 mm FN 12421 S 1 1450 mm 600 mm 630 mm FN 12621 S 1640 mm 600 mm 630 mm FN 12621 S 1 1640 mm 600 mm 630 mm FN 12821 S 1840 mm 600 mm 630 mm FN 12821 S 1 1840 mm 600 mm 630 mm Dimensions without wall spacers fitted Appliance depth is increased by approx 35 mm with the supplied wall spacers fitted Installation 44 ...

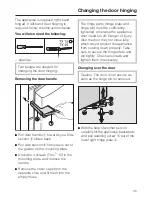
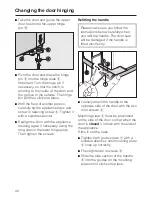
Page 45: ...er caps from the opposite side and fit them into the empty holes The hinge parts hinge plate and hinge pin must be sufficiently tightened otherwise the appliance door could fall off Danger of injury Also the door may not close fully which would prevent the appliance from cooling down properly Take care to secure the hinge plate and pin tightly Check all screws and tighten them if necessary Changin...

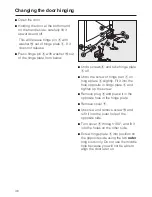
Page 46: ...n hinge plate d slightly Fit it into the hole opposite in hinge plate d and tighten up the screw Remove plug h and place it in the opposite hole in the hinge plate Remove cover i Unscrew and remove screw j and refit it into the outer hole of the opposite side Turn cover i through 180 and fit it into the holes on the other side Screw hinge plate d into position on the opposite side using the two ou...

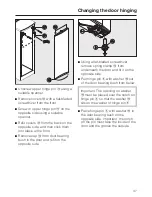
Page 47: ...it on the opposite side Using a flat bladed screwdriver remove spring clamp n from underneath the door and fit it on the opposite side Pull hinge pin e with washer o out of the door bearing bush from below Important The opening on washer o must be placed over the notch on hinge pin e so that the washer o sits on the washer of hinge pin e Place hinge pin e with washer o in the door bearing bush on ...

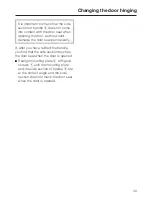
Page 48: ...n the lower hinge plate Then tighten the screws Refitting the handle Please make sure you follow the instructions below carefully when you refit the handle The door seal will be damaged if the handle is fitted incorrectly Loosely attach the handle to the opposite side of the door with the two front screws b Mounting plate c must be positioned on the side of the door so that when the door is closed...

Page 49: ...eal permanently If after you have refitted the handle you find that the side section touches the door seal when the door is opened Realign mounting plate c with grub screws a until the mounting plate and the side section of handle d are at the correct angle and the side section does not touch the door seal when the door is opened Changing the door hinging 49 ...

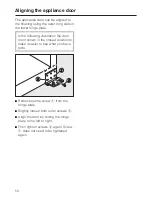
Page 50: ...he door is not shown in the closed position to make it easier to see what you have to do Remove centre screw a from the hinge plate Slightly loosen both outer screws b Align the door by sliding the hinge plate to the left or right Then tighten screws b again Screw a does not need to be tightened again Aligning the appliance door 50 ...

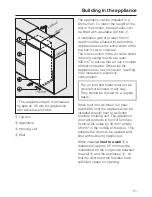
Page 51: ...e Otherwise the appliance has to work harder resulting in an increase in electricity consumption The air inlet and outlet must not be covered or blocked in any way They should be dusted on a regular basis When built into a kitchen run max depth 580 mm the appliance can be installed directly next to a kitchen furniture housing unit The appliance door will protrude in front of furniture fronts at th...

Page 52: ...Alteration rights reserved 4812 FN 12221 S 1 FN 12421 S 1 FN 12621 S 1 FN 12821 S 1 M Nr 09 559 200 00 ...

Reviews: